If you would like to read the other parts in this article series please go to:
- Deep dive into rich coexistence between Exchange Forests (Part 1)
- Deep dive into rich coexistence between Exchange Forests (Part 2)
- Deep dive into rich coexistence between Exchange Forests (Part 3)
- Deep dive into rich coexistence between Exchange Forests (Part 4)
- Deep dive into rich coexistence between Exchange Forests (Part 5)
- Deep dive into rich coexistence between Exchange Forests (Part 6)
- Deep dive into rich coexistence between Exchange Forests (Part 7)
- Deep dive into rich coexistence between Exchange Forests (Part 8)
- Deep dive into rich coexistence between Exchange Forests (Part 9)
- Deep dive into rich coexistence between Exchange Forests (Part 10)
- Deep dive into rich coexistence between Exchange Forests (Part 11)
- Deep dive into rich coexistence between Exchange Forests (Part 12)
- Deep dive into rich coexistence between Exchange Forests (Part 14)
- Deep dive into rich coexistence between Exchange Forests (Part 15)
Introduction
In part 12, we began setting up cross-forest availability between Exchange forest 1 (Exchange 2010) and Exchange forest 3 (Exchange 2003). Since Exchange 2003, unlike Exchange 2007/2010 doesn’t include the availability service, we need to use the InterOrg tool to replicate free/busy information from Exchange 2003 to Exchange 2010 and vice versa.
In this part 13, we will continue where we left off. More specifically we will begin configuring the InterOrg tool. When done, we will test whether free/busy works between Exchange forest 1 (Exchange 2010) and Exchange forest 3 (Exchange 2003).
Time to play with a legacy GUI… BTW wouldn’t it be awesome if InterOrg had a Metro look? 🙂
Configuring InterOrg
The server on which we are going to configure InterOrg is a Windows 2003 32 bit server since neither Windows server 2008 or 64-bit editions are supported.
The server must be domain-joined. In addition, the Exchange 2003 System Manager tools (with SP2) must be installed on the server.
Note:
If you have any experience with InterOrg you may have seen documentation that mentioned you could install the Exchange 2007 Management tools and MAPI/CDO library, but this is no longer supported and as a matter of fact it no longer works.
The Exchange 2003 System Manager tools requires the IIS component to be installed on the server.

Figure 1: Required Windows Components
When the Exchange 2003 System Manager tools have been installed, it’s time to open the hosts file on the server. In the host file enter the IP address and the NetBIOS name for the Exchange 2003 in Exchange forest 3 (Exchange 2003) holding the InterOrg service Account mailbox and public folder. This may or may not be required in your environment, but I have made it a habit since I’ve seen issues when I didn’t perform this step.

Figure 2: Modifying hosts file on InterOrg server
After you have updated the hosts file, open a command prompt and run a “Nbtstat –R” then make sure you can ping the server.

Figure 3: Pinging Exchange 2003 using NetBIOS name from InterOrg server
Now download the InterOrg tool here. When you have extracted the InterOrg files (default location c:\exchsync), double-click on the “exscfg.exe” file.

Figure 4: InterOrg files
This will bring up the Exchange Replication Configuration window as shown in Figure 5.

Figure 5: InterOrg Exchange Replication Configuration window
So as you can see this is not the most state-of-the-art GUI so there’s no fancy right-clicking and stuff like that.
What we want to do now is to add a new so called session. To do so, click on the file icon in the toolbar. In the “Add Session” dialog box, select “Schedule+ Free/Busy Replication” and click “OK”.
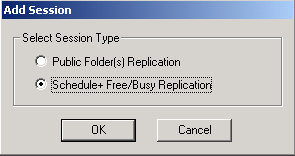
Figure 6: Adding a new session
We need to create a “Schedule+ Free/Busy Replication” that replicate free/busy data from Exchange forest 1 (Exchange 2010) to Exchange forest 3 (Exchange 2003) and vice versa. You cannot create two-way sessions.
In the Free/Busy Session Configuration windows, enter a meaningful title as shown in Figure 7.

Figure 7: Naming the new session
Click on the “Schedule” button. In the “Session Schedule Configuration” window, select “All Days”, “All Day” and change the repeat interval to 5 minutes (Figure 8) then click “OK”.

Figure 8: Setting schedule configuration for the session
Now click on the “Logging” button and enable “Log access warnings” then click “OK”.
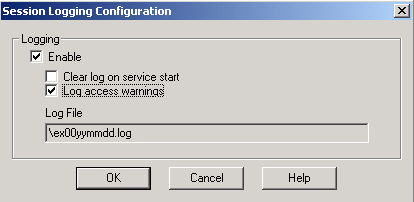
Figure 9: Enabling logging
Now specify the server and InterOrg service account mailbox for both forests. For this session the publisher is Exchange forest 1 (Exchange 2010) and the subscriber is Exchange forest 3 (Exchange 2003).

Figure 10: Specifying the server and mailbox for the publisher and subscriber organization
Click on the “Advanced” button for the publisher organization and enter the credential and domain name for the InterOrg service account. Then click “OK”.

Figure 11: Entering credentials and domain for InterOrg service account in Exchange forest 1
Do the same for the subscriber organizations, but enter the credentials for the InterOrg service account in Exchange forest 3 (Exchange 2003).

Figure 12: Entering credentials and domain for InterOrg service account in Exchange forest 3
Under “Publisher Site Filter” click on the “Site List” button.
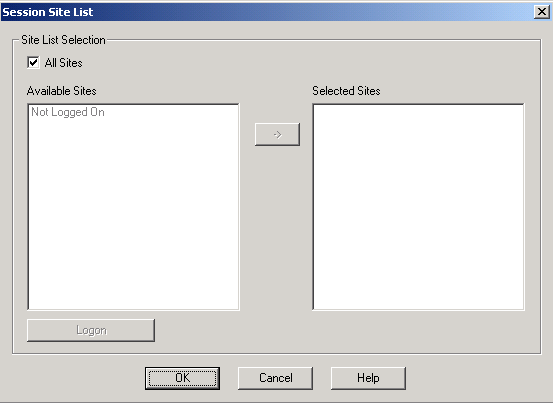
Figure 13: Session Site List
Untick “All Sites” and click on the “Logon” button. If this has been configured properly this should result in the administrative group for the Exchange 2003 forest to show up under “Available Sites”.
If it does then you’ve done everything right so far and you can tick “All Sites” again and exit the “Session Site List”.

Figure 14: Logging on to InterOrg Service Account Mailbox
Click “OK” and you can now see the new session listed.

Figure 15: New session listed under Exchange Replication Configuration
We now need to create an identical session that points the other way (from Exchange 2003 to Exchange 2010). So once again, click on the file icon in the toolbar and select “Schedule+ Free/busy”. Name the session like shown in Figure 16 then configure the schedule and logging settings and enter the publisher and subscriber information etc. just like we did in the above steps. Only difference is you need to specify the Exchange 2003 server and service account credentials under “Publisher Organization” and the Exchange 2010 server and service account credentials under “Subscriber Organization”.

Figure 16: Specifying the server and mailbox for the publisher and subscriber organization
With the two sessions created now is the time to save the configuration file. To save, click on the Floppy disc icon.

Figure 17: Two sessions listed under Exchange Replication Configuration
Save the configuration file in the “exchsync” folder.

Figure 18: Saving the configuration file
With the configuration file saved, double-click on the “exssrv.exe” file.

Figure 19: Launching exssrv.exe
Click on the “Install” button (note the copyright date :)).

Figure 20: Exchange Replication
In the appearing window enter the credentials for an account that has permissions to run InterOrg as a service on the specific server (must have Let Log on Locally and Logon as a Service rights). As you can see, this is also the place where you can specify the working directory and startup options. Click “OK”.
Import:
You must enter credentials using “domain\account” format.

Figure 21: Entering the account used to run the InterOrg service
You now have the option of clicking on the “Start” button. Do so and note that InterOrg now has been scheduled to run each session every 5 minutes.

Figure 22: InterOrg now replicating free/busy data between the forests
When the session starts to replicate and then completes, you should see “Last Completion Status” say successful. If it says failed it’s time to troubleshoot using the InterOrg log files and the application log.
From now on when new meeting appointments etc. is created by the users, you should see this under the “Message Changes” column as well.
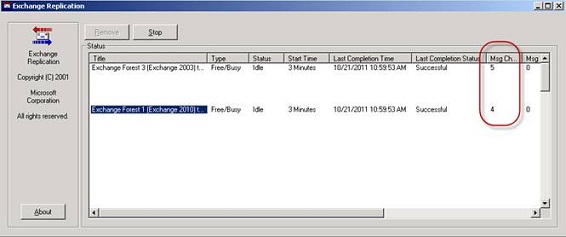
Figure 23: Message changes between the Exchange forests
We’re now ready to verify whether cross-forest free/busy requests works as expected. Let’s first open an Outlook 2003 client in Exchange forest 3 (Exchange 2003) and create a new meeting invite. In Figure 24, we have added attendees form both the local and remote forest and as you can see we see the free/busy information for all users instead of the infamous hash marks.

Figure 24: Verifying free/busy requests works cross-forest from the Exchange 2003 forest
Let’s try the same from an Outlook 2010 client in the Exchange 2010 forest. Again we see the free/busy time meaning InterOrg works as expected.

Figure 25: Verifying free/busy requests works cross-forest from the Exchange 2010 forest
This concludes part 13. Until next time enjoy!
If you would like to read the other parts in this article series please go to:
- Deep dive into rich coexistence between Exchange Forests (Part 1)
- Deep dive into rich coexistence between Exchange Forests (Part 2)
- Deep dive into rich coexistence between Exchange Forests (Part 3)
- Deep dive into rich coexistence between Exchange Forests (Part 4)
- Deep dive into rich coexistence between Exchange Forests (Part 5)
- Deep dive into rich coexistence between Exchange Forests (Part 6)
- Deep dive into rich coexistence between Exchange Forests (Part 7)
- Deep dive into rich coexistence between Exchange Forests (Part 8)
- Deep dive into rich coexistence between Exchange Forests (Part 9)
- Deep dive into rich coexistence between Exchange Forests (Part 10)
- Deep dive into rich coexistence between Exchange Forests (Part 11)
- Deep dive into rich coexistence between Exchange Forests (Part 12)
- Deep dive into rich coexistence between Exchange Forests (Part 14)
- Deep dive into rich coexistence between Exchange Forests (Part 15)


