If you would like to read the other parts in this article series please go to:
- Deep dive into rich coexistence between Exchange Forests (Part 1)
- Deep dive into rich coexistence between Exchange Forests (Part 2)
- Deep dive into rich coexistence between Exchange Forests (Part 3)
- Deep dive into rich coexistence between Exchange Forests (Part 4)
- Deep dive into rich coexistence between Exchange Forests (Part 5)
- Deep dive into rich coexistence between Exchange Forests (Part 6)
- Deep dive into rich coexistence between Exchange Forests (Part 7)
- Deep dive into rich coexistence between Exchange Forests (Part 8)
- Deep dive into rich coexistence between Exchange Forests (Part 9)
- Deep dive into rich coexistence between Exchange Forests (Part 10)
- Deep dive into rich coexistence between Exchange Forests (Part 11)
- Deep dive into rich coexistence between Exchange Forests (Part 12)
- Deep dive into rich coexistence between Exchange Forests (Part 13)
- Deep dive into rich coexistence between Exchange Forests (Part 15)
Introduction
In part 13, we configured the InterOrg tool, so that Exchange forest 1 (Exchange 2010) and Exchange forest 3 (Exchange 2003) could perform cross-forest free/busy requests. Well actually it wasn’t really cross-forest as InterOrg replicates the free/busy data between the organizations meaning the Outlook or OWA client just access the data via local Schedule+ Free Busy system folders. After we configured InterOrg, we verified that things worked as expected using Outlook.
In this part 14, we will go from InterOrg (which is the most legacy way of sharing free/busy data cross-forest today) to looking at how to do it using native Exchange 2010 federation features and the Microsoft Federation Gateway (MFG). In this article, we’re configuring Exchange federation between two Exchange 2010 forests.
Supported Scenarios
So as mentioned in the introduction, we will configure cross-forest free/busy between two pure Exchange 2010 forests using native Exchange federation features and the Microsoft Federation Gateway (MFG). The MFG is a Windows Live based cloud service that acts as a trust broker between organizations that want to share free/busy, calendar and contact information. The MFG is a free service and it’s also important to stress that no information is sent to this service. As mentioned, it simply acts as a trust broker between organizations. Shared data will be send directly between the involved organizations.
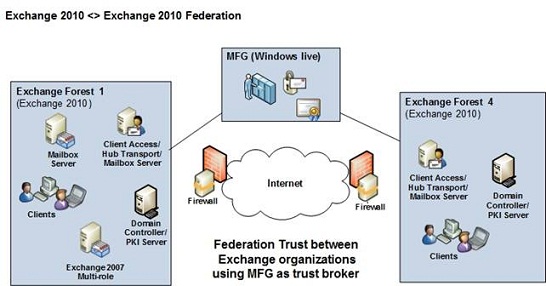
Figure 1
Although we will set up Exchange federation between two Exchange 2010 organizations, it isn’t a requirement that both Exchange forests run Exchange 2010. Exchange 2003 and Exchange 2007 are also supported. However, you must deploy at least one Exchange 2010 server in the respective Exchange 2003 or 2007 forests as we’re using Exchange 2010 features. If you deploy an Exchange 2010 server in either an Exchange 2003 or 2007 forest, the Exchange 2010 server will do down-level proxying when 2003 or 2007 mailboxes request free/busy information from the other Exchange forest.
Unlike the case with Exchange 2010 RTM, you no longer need to use a certificate from a 3rd party CA provider to establish a federation trust with MFG. You can now use a self-signed certificate, which the wizard (as you will see in the next section) will create for you automatically.
Creating the Federation Trusts in Exchange Forest 4
To create the federation trust in Exchange forest 4, open the Exchange Management Console then click “Organization Configuration”. Under “Organization Configuration“ launch the “New Federation Trust” wizard.
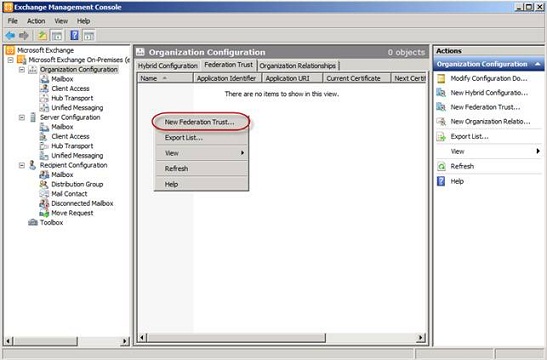
Figure 2: Launching the New Federation Trust wizard
Click “New” in order to create the federation trust.
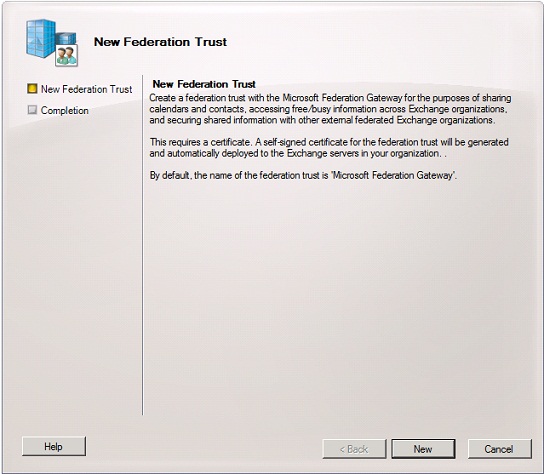
Figure 3: New Federation Trust wizard
On the “Completion”, notice that the wizard creates a new Exchange certificate. Also, note that in order to complete the federation configuration, we need to add a TXT record in DNS for the respective domain we wish to federate. Click “Finish”.

Figure 4: New Federation Trust Wizard Completion page
As shown in Figure 5, the federation trust object has now been created.

Figure 5: Federation Trust object in EMC
Under “Server Configuration” we can of course also see the Exchange Delegation Federation certificate that the wizard created for us.
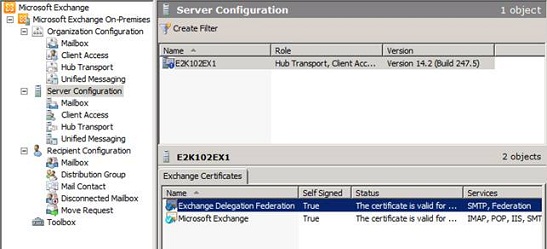
Figure 6: Exchange Delegation Federation Certificate created by the New Federation Trust wizard
Okay let’s get the TXT record created in external DNS. To do so, we first need to open the Exchange Management Shell and type the following command so that we can get the test that needs to be inserted in the TXT record:
Get-FederatedDomainProof –DomainName “e2k10forest2.dk”
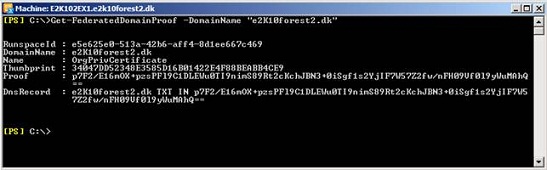
Figure 7: Retrieving the DNS Record info to be used for the TXT record in external DNS
Now logon to your account at your DNS provider and create the TXT record as below.
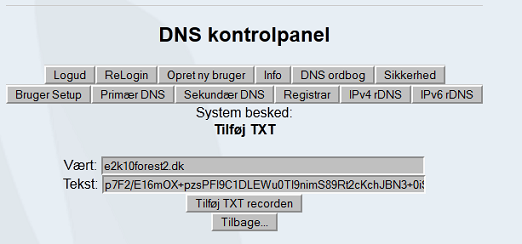
Figure 8: Creating TXT record in external DNS
With the TXT record created switch back to the EMC and right-click on the “Federation Trust”. In the context menu select “Manage Federation”. On the “Manage Federation Certificate” click “Next”.
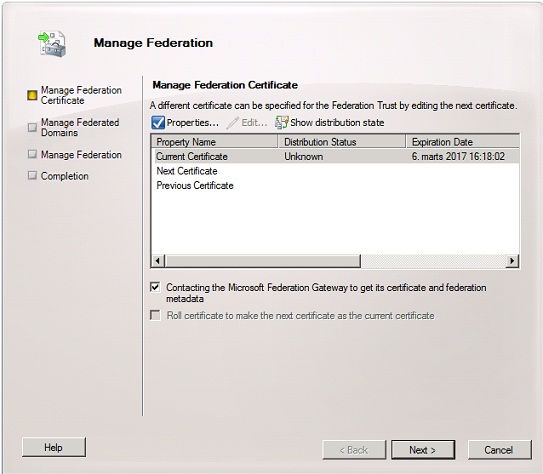
Figure 9: Manage Federation Certificate page
Under the “Manage Federated Domains” page, click “Add” and select the domain you wish to federate. Also, enter an email address for the organization contact and then click “Next”.
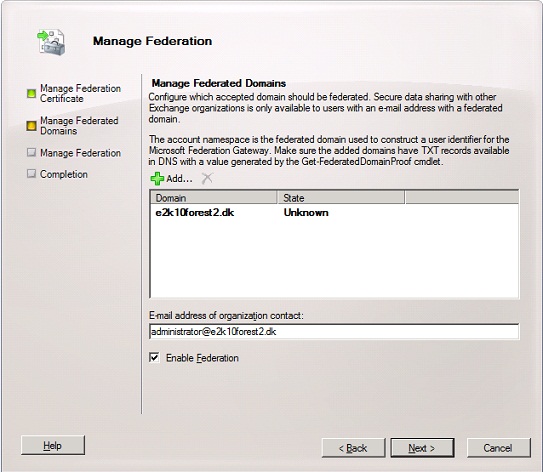
Figure 10: Adding the domain to be federated
Click “Manage”.
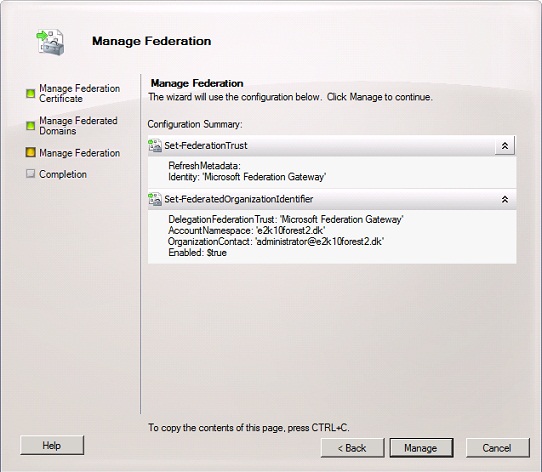
Figure 11: Configuration Summary page
Click “Finish” to exit the wizard.

Figure 12: Completion page
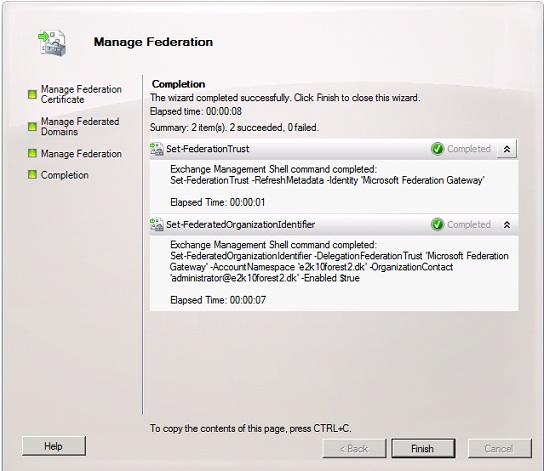
Figure 13: Configuration of the federation trust complete
We have now completed the configuration for the federation trust. As you can see an Application identifier and Application URI have been configured for the trust.
With the federation trust with MFG in place, we can now move on to the organizational relationship we need to set up in order to share free/busy data with Exchange Forest 1. To do so click on the “Organizational Relationships” tab and then launch the “New Organization Relationship” wizard.
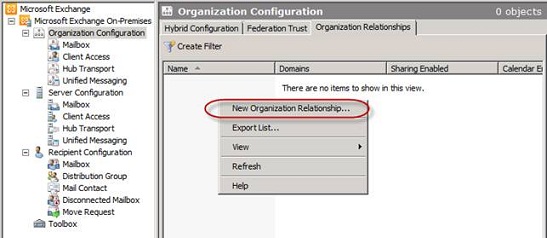
Figure 14: Launching the New Organization Relationship wizard
On the “Introduction” page enter a meaningful name (such as To <domain name>) then enabled the organization relationship followed by specifying the access level. In this example, we want to share Free/Busy access with time plus subject and location.
When done, click “Next”.
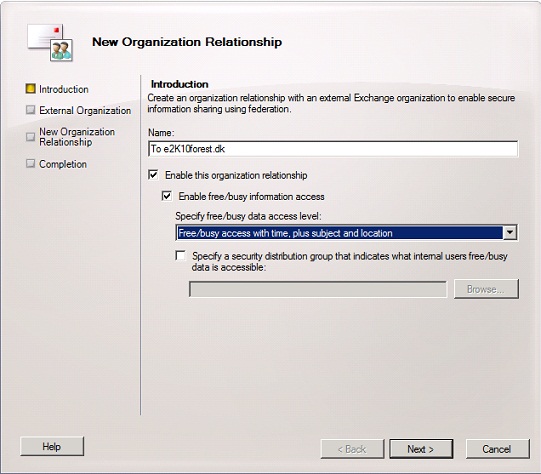
Figure 15: New Organization Relationship Introduction page
On the “External Organization” select “Automatically discover configuration information” and then enter the domain name for the Exchange forest you want to federate with.
Important:
The CAS server in both forests must be published to the Internet and autodiscover must also be working correctly. You can check whether this is the case with the Remote Connectivity Analyzer.
Click “Next”.
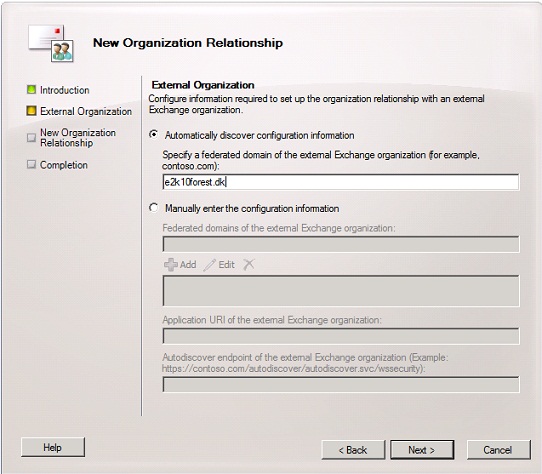
Figure 16: Selecting “Automatically discover configuration information”
On the “Configuration Summary” page, click “New”.

Figure 17: Configuration Summary page
On the “Completion” page, click “Finish”.

Figure 18: Completion page
Now let’s open the property page for the new organization relationship, so we can see how it’s been configured. As you can see not much of interest under the “General” tab as it just shows us the access level we specified in the wizard.
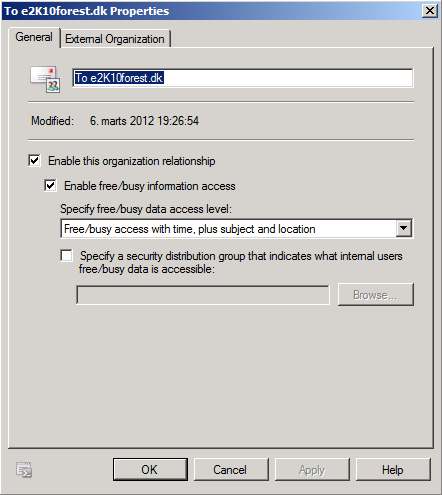
Figure 19: Organization Relationship – General tab
Click on the “External Organization” tab. Here you can see the SMTP domain which we want to share free/busy with as well as the application URI and autodiscover endpoint. Things look as they should, so we’ll click “Cancel” to exit the property page.

Figure 20: Organization Relationship – External Organization tab
We have now configured Exchange forest 4 and now we just need to repeat the above steps in Exchange forest 1. Only difference will be the SMTP domain that is to be specified. The domain for Exchange forest 4 is “e2k10forest2.dk”.
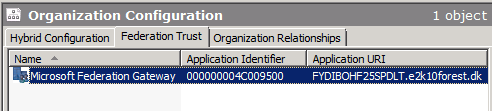
Figure 21: Configuration of the federation trust complete
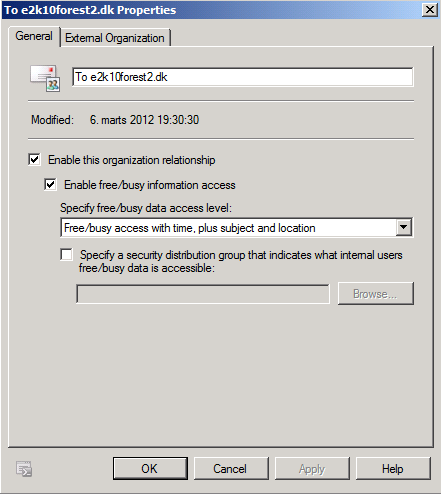
Figure 22: Organization Relationship – General tab
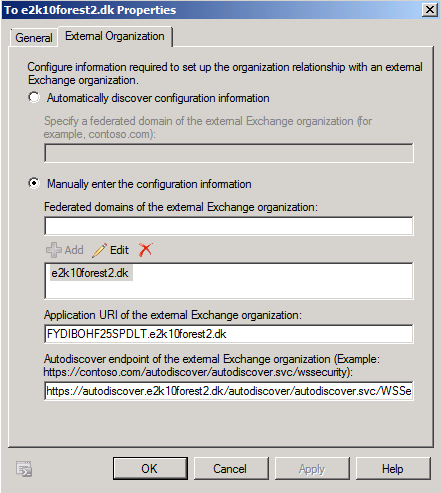
Figure 23: Organization Relationship – External Organization tab
When done free/busy sharing has been set up between the Exchange forests.
Verifying Free/Busy Works between the Exchange Forests
Okay it’s time to test free/busy requests between the two Exchange forests. Let’s begin with an Outlook client connected to a mailbox in Exchange forest 4.
We’ll create a new meeting request and click on the “Scheduling Assistant”. Since we don’t have any GALSync in place between these two forests, we can’t look up the user in the GAL. Instead, we need to enter the email address of the respective user we wish to add as an attendee (Figure 24).
The free/busy request will then be sent to the other Exchange forest (based on the domain in the email address) using autodiscover and the Exchange federation trust will allow us to get free/busy data returned.
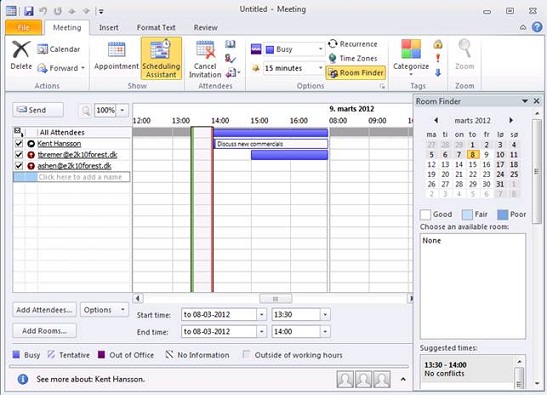
Figure 24: Requesting free/busy for users in the other forest in Outlook using the email address
Let’s try the same from an Outlook client in Exchange forest 1. Again things work as expected, or almost that is. Because those of you who have taken a closer look at the figures might have noticed that we only see free/busy time not subject and location.
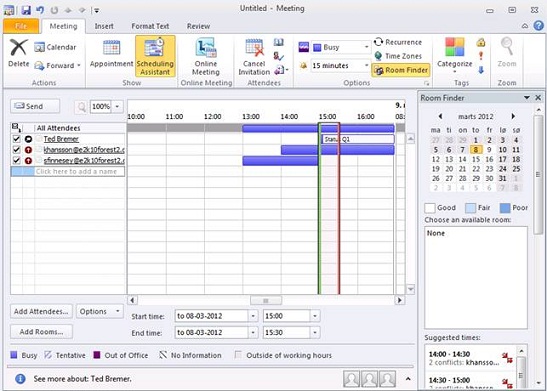
Figure 25
The reason for this is because of the access level set for the “Default” user on calendars in Exchange 2010.
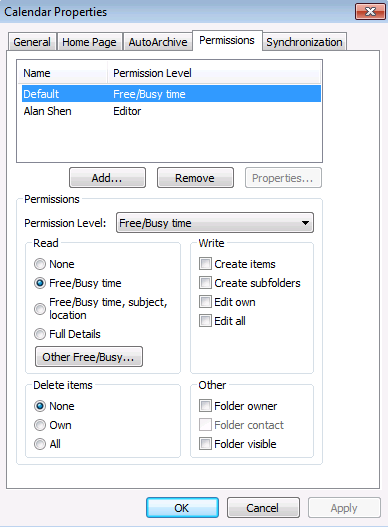
Figure 26: Permission level for Default user on calendar
If we change this to “Free/Busy time, subject, location”, this will also be reflected in the scheduling assistant.
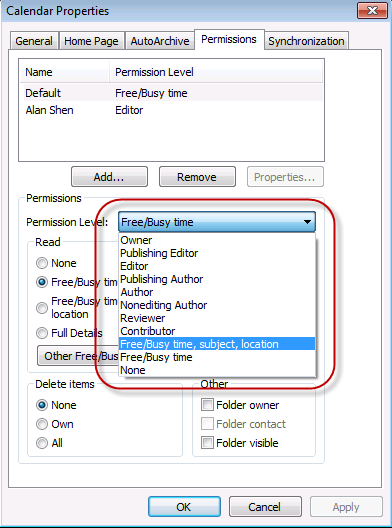
Figure 27:Changing the Permission level for the default user
Okay this concludes part 14 but it doesn’t stop here. In part 15, we will set up sharing policies so that users will not only be able to share free/busy data but also calendars and contacts.
If you would like to be notified of when Henrik Walther releases the next part in this article series please sign up to our MSExchange.org Real Time Article Update newsletter.
If you would like to read the other parts in this article series please go to:
- Deep dive into rich coexistence between Exchange Forests (Part 1)
- Deep dive into rich coexistence between Exchange Forests (Part 2)
- Deep dive into rich coexistence between Exchange Forests (Part 3)
- Deep dive into rich coexistence between Exchange Forests (Part 4)
- Deep dive into rich coexistence between Exchange Forests (Part 5)
- Deep dive into rich coexistence between Exchange Forests (Part 6)
- Deep dive into rich coexistence between Exchange Forests (Part 7)
- Deep dive into rich coexistence between Exchange Forests (Part 8)
- Deep dive into rich coexistence between Exchange Forests (Part 9)
- Deep dive into rich coexistence between Exchange Forests (Part 10)
- Deep dive into rich coexistence between Exchange Forests (Part 11)
- Deep dive into rich coexistence between Exchange Forests (Part 12)
- Deep dive into rich coexistence between Exchange Forests (Part 13)
- Deep dive into rich coexistence between Exchange Forests (Part 15)


Hi Henrik,
Great article. I have a question around the DNS record with regards to the ‘Get-FederatedDomainProof –DomainName “e2k10forest2.dk”’
If my e-mail domain is different from the publicly published URL of the exchange server, which one of those domain names am I using for the Get-FederatedDomainProof command?
i.e. Get-FederatedDomainProof –DomainName “myemaildomain.com”
or Get-FederatedDomainProof –DomainName “mypublishedautodicoverurl.com”
Many Thanks,