If you would like to read the other parts in this article series please go to:
- Deep dive into rich coexistence between Exchange Forests (Part 1)
- Deep dive into rich coexistence between Exchange Forests (Part 2)
- Deep dive into rich coexistence between Exchange Forests (Part 3)
- Deep dive into rich coexistence between Exchange Forests (Part 5)
- Deep dive into rich coexistence between Exchange Forests (Part 6)
- Deep dive into rich coexistence between Exchange Forests (Part 7)
- Deep dive into rich coexistence between Exchange Forests (Part 8)
- Deep dive into rich coexistence between Exchange Forests (Part 9)
- Deep dive into rich coexistence between Exchange Forests (Part 10)
- Deep dive into rich coexistence between Exchange Forests (Part 11)
- Deep dive into rich coexistence between Exchange Forests (Part 12)
- Deep dive into rich coexistence between Exchange Forests (Part 13)
- Deep dive into rich coexistence between Exchange Forests (Part 14)
- Deep dive into rich coexistence between Exchange Forests (Part 15)
Introduction
In part 3, I took you through a walk down memory lane when it comes to Microsoft identity solutions supported by each version of Exchange server. Then I showed you the GALSync synchronization flow planned for the specific scenario in this articles series. Lastly, we prepared each Exchange forest for global address list synchronization (GALSync) by creating a GALSync organizational unit (OU) in the root of the domain partition.
In this part 4 of this articles series, we’ll first enable provisioning in the FIM Synchronization Manager then create the GALSync Management Agents (GALSync Mas) for Exchange forest 1 (Exchange 2010 forest) and Exchange Forest 2 (Exchange 2007 forest) on the FIM 2010 server.
Enabling Provisioning in the FIM Synchronization Manager
In order for the GAL Synchronization management agents to function properly, provisioning must be enabled. So it’s important you verify that provisioning is enabled before you begin to stage data.
To enable provisioning, open the “FIM Synchronization Service Manager” and click “Tools” > “Options”. Under “Metaverse Rules Extensions”, ensure that the Enable metaverse rules extensions and “Enable Provisioning Rules Extension” check boxes are both ticked.
Click “OK”.
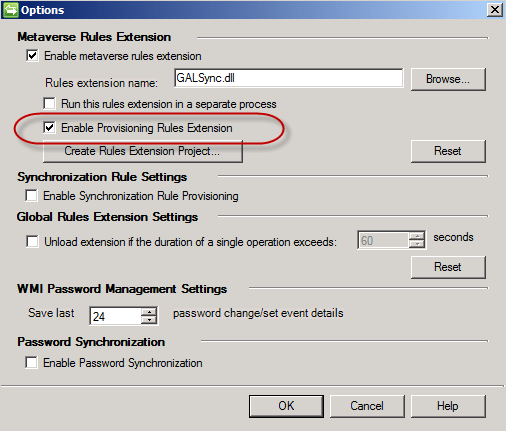
Figure 1: Enabling Provisioning
Creating the GALSync MA for Exchange Forest 1 (Exchange 2010)
We are now ready to create and configure the GAL MA for Exchange Forest 1 (Exchange 2010 forest). To do so, log on to the FIM server and launch the “Synchronization Service Manager” and then click “Management Agents” as shown in Figure 2.

Figure 2: Management Agents tab in the Synchronization Service Manager
Click “Create” to launch the “Create Management Agent” wizard. On the first page, select “Active Directory global address list (GAL)” in the drop-down box and then enter a meaningful name and description for this MA. Then click “Next”.

Figure 3: Configuring the basics for the GALSync MA
Now we need to enter the information required to connect to Exchange Forest 1 (Exchange 2010 forest). When you have done so, click “Next”.

Figure 4: Entering the information required to connect to Exchange Forest 1 (Exchange 2010 forest)
On the “Configure Directory Partitions” page tick gthe directory partion and then click “Containers”.

Figure 5: Selecting the directory partition that should be used for this GALSync MA
Now check all the containers (OUs) that contains objects that should be synchronized to FIM. Also make sure you select the GALSync OU to which objects should be exported and then click “OK” > “Next”.

Figure 6: Selecting the containers (OUs) that should be used with this GALSync MA
On the “Configure GAL” page, click “Target”.

Figure 7: Configure GAL Page
Under “Target Container” click “Container”.

Figure 8: Target Container Box
Now tick the container (OU) to which you want to export objects from the FIM metaverse (in our example the GALSync OU) and click “OK”.

Figure 9: Selecting the OU to which objects from metaverse should be exported
Now click the “Source” (Figure 6) and then “Add Containers”.
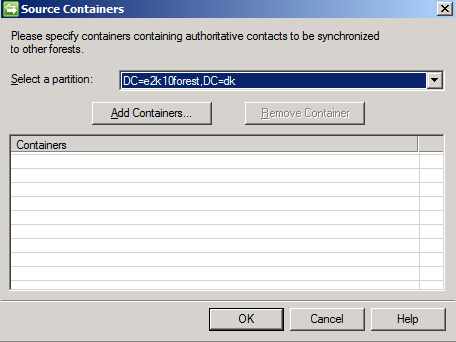
Figure 10: Source Containers Box
Tick the containers (OUs) from which you want to import objects to the FIM metaverse and click “OK” twice.

Figure 11: Selecting the OU from which objects should be imported to metaverse
Under “Exchange configuration” (Figure 6) click “Edit”. Then add the SMTP domain name for Exchange forest 1 (Exchange 2010 forest), which in this case is “e2k10forest.dk”. Remember that you must prepend it with an “@” as shown in Figure 12.
Click “OK”.
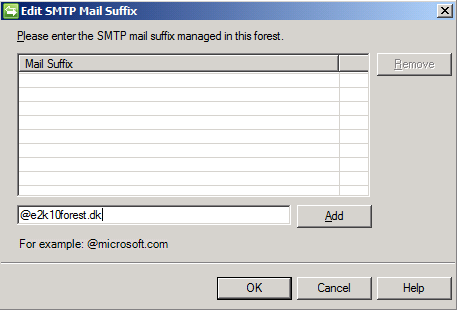
Figure 12: Adding SMTP domain for Exchange Forest 1 (Exchange 2010 forest)
Tick “Support cross-forest delegation (Exchange 2007 or 2010 only)” and click “Next”.
Note:
Enabling “Support cross-forest delegation (Exchange 2007 or 2010 only)” will stamp the attributes required on the MEU objects (Mail-enabled user objects), so that we can do things such as delegate a MEU permissions to access a mailbox calendar.

Figure 13: Enabling support for cross-forest delegation (Exchange 2007 or 2010 only)
On the “Configure Provisioning Hierarchy” page, click “Next”.

Figure 14: Configuring Provisioning Hierarchy page
On the “Select Object Types” page, accept the defaults and click “Next”.
Note:
If there are one or more object types you do not want to sync (group, contat etc.), go ahead and de-select them.

Figure 15: Select Object Types page
On the “Select Attribues” page, accept the defaults and click “Next”.
Note:
If there are attributes you want to sync that aren’t ticked, go ahead and select them.

Figure 16: Select Attributes page
On the “Configure Connector Filter” page, accept the defaults and click “Next”.

Figure 17: Configure Connector Filter page
On the “Configure Join and Projection Rules” page, accept the defaults and click “Next”.
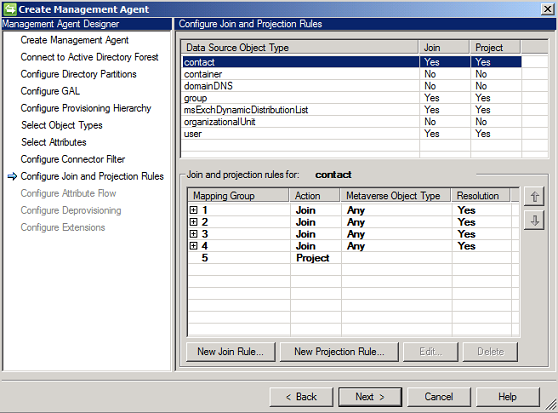
Figure 18: Configure Join and Projection Rules page
On the “Configure Attributes Flow” page, accept the defaults and click “Next”.
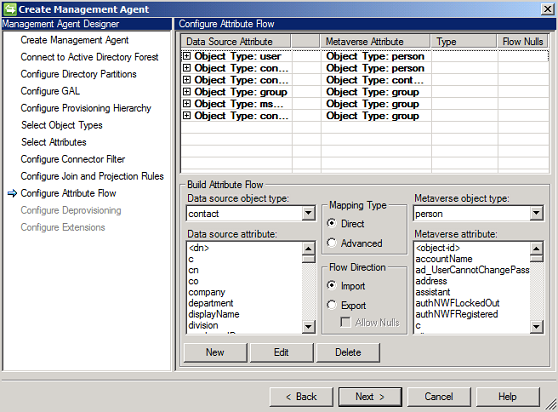
Figure 19: Configure Attributes Flow page
On the “Configure Deprovisioning” page, accept the defaults and click “Next”.

Figure 20: Configure Deprovisioning page
On the “Configure Extensions” page, under “Configure partition display name(s)”, select “Exchange 2010” in the drop-down box and then enter the following in the “Exchange 2010 RPS URI” text field:
http://e2k10ex1.e2k10forest.dk/PowerShell

Figure 21: Configure Extensions page
Now before clicking “Finish”, let’s test whether the FIM server can establish a PowerShell session to the CAS server in the Exchange 2010 forest. To do so, open a Windows PowerShell window and create the following variable:
$rs = new-pssession -conf microsoft.exchange -conn http://e2k10ex1.e2k10forest.dk/PowerShell -auth kerberos -cred (get-credential)
You will be asked for credentials. Enter the credentials of an account with the permissions necessary to create a remote PowerShell session to the CAS server.

Figure 22: Creating variable and entering necessary credentials
Now enter the following command to send an Exchange command via remote PowerShell:
Invoke-Command $rs {get-recipient -ResultSize 1}
You should now see the first Exchange recipient in the forest listed as shown in Figure 23.

Figure 23: Listing the first Exchange recipient in the forest
If the above succeeds, you can complete the creation of the FIM MA by clicking “Finish”.

Figure 24: GALSync MA for Exchange Forest 1 listed in the FIM Synchronization Service Manager
Creating the GALSync MA for Exchange Forest 2 (Exchange 2007)
With the GALSync MA for Exchange Forest 1 (Exchange 2010 forest) created, we can moved on and create the GALSync MA for Exchange Forest 2 (Exchange 2007 forest). Although the steps are alomost identical to the ones we went through in order to create the Exchange 2010 GALSync MA, we’ll go through them anyway since there are a few differences.
Click “Create” to launch the “Create Management Agent” wizard. On the first page, select “Active Directory global address list (GAL)” in the drop-down box and then enter a meaningful name and description for this MA. Then click “Next”.

Figure 25: Configuring the basics for the GALSync MA
Now we need to enter the information required to connect to Exchange Forest 2 (Exchange 2007 forest). When you have done so, click “Next”.

Figure 26: Entering the information required to connect to Exchange Forest 2 (Exchange 2007 forest)
On the “Configure Directory Partitions” page tick gthe directory partion and then click “Containers”.

Figure 27: Selecting the directory partition that should be used for this GALSync MA
Now check all the containers (OUs) that contains objects that should be synchronized to FIM. Also make sure you select the GALSync OU to which objects should be exported and then click “OK” > “Next”.

Figure 28: Selecting the containers (OUs) that should be used with this GALSync MA
On the “Configure GAL” page, click “Target” > “Container” and then tick the “GalSync” container (OU) followed by clicking “OK” twice.

Figure 29: Selecting the OU to which objects from metaverse should be exported
Now click “Source” and then “Add Containers”. Tick the containers (OUs) from which you want to import objects to the FIM metaverse and click “OK” twice.

Figure 30: Selecting the OU from which objects should be imported to metaverse
Under “Exchange configuration” click “Edit”. Then add the SMTP domain name for Exchange forest 2 (Exchange 2007 forest), which in this case is “e2k7forest.dk”. Remember that you must prepend it with an “@” as shown in Figure 31.
Click “OK”.

Figure 31: Adding SMTP domain for Exchange Forest 2 (Exchange 2007 forest)
Tick “Support cross-forest delegation (Exchange 2007 or 2010 only)” and click “Next”.
Note:
Enabling “Support cross-forest delegation (Exchange 2007 or 2010 only)” will stamp the attributes required on the MEU objects (Mail-enabled user objects), so that we can do things such as delegate a MEU permissions to access a mailbox calendar.

Figure 32: Enabling support for cross-forest delegation (Exchange 2007 or 2010 only)
Click “Next” through all the pages until you get to the “Configure Extensions” page (Figure 33).
On the “Configure Extensions” page, make sure that Exchange 2007 is selected in the “Provision for” drop-down box as shown in Figure 33. Optionally you can specify an Exchange 2007 RUS server. Since, we do not need to specify a RUS server in this articles series, click “Finish” to create the Exchange 2007 GALSync MA.
Note:
You may wonder why there’s an option to specify a RUS server for an Exchange 2007 GALSync MA since the Recipient Update service we know from Exchange 2000/2003 was eliminated with Exchange 2007. Well, actually we still have pieces of the RUS in Exchange 2007. More specifically the the Address List service which is a component in the System Attendant service which runs on the Mailbox server role. The Exchange 2007 RUS Server option let’s us point at a specific Mailbox server that should be used with this GALSync MA.

Figure 33: Configure Extensions page
We have now created the GALSync MA for Exchange Forest 1 (Exchange 2010 forest) and 2 (Exchange 2007 forest) and with this this part 4 ends.
If you would like to read the other parts in this article series please go to:
- Deep dive into rich coexistence between Exchange Forests (Part 1)
- Deep dive into rich coexistence between Exchange Forests (Part 2)
- Deep dive into rich coexistence between Exchange Forests (Part 3)
- Deep dive into rich coexistence between Exchange Forests (Part 5)
- Deep dive into rich coexistence between Exchange Forests (Part 6)
- Deep dive into rich coexistence between Exchange Forests (Part 7)
- Deep dive into rich coexistence between Exchange Forests (Part 8)
- Deep dive into rich coexistence between Exchange Forests (Part 9)
- Deep dive into rich coexistence between Exchange Forests (Part 10)
- Deep dive into rich coexistence between Exchange Forests (Part 11)
- Deep dive into rich coexistence between Exchange Forests (Part 12)
- Deep dive into rich coexistence between Exchange Forests (Part 13)
- Deep dive into rich coexistence between Exchange Forests (Part 14)
- Deep dive into rich coexistence between Exchange Forests (Part 15)


