If you would like to read the other parts in this article series please go to:
- Deep dive into rich coexistence between Exchange Forests (Part 1)
- Deep dive into rich coexistence between Exchange Forests (Part 2)
- Deep dive into rich coexistence between Exchange Forests (Part 3)
- Deep dive into rich coexistence between Exchange Forests (Part 4)
- Deep dive into rich coexistence between Exchange Forests (Part 5)
- Deep dive into rich coexistence between Exchange Forests (Part 7)
- Deep dive into rich coexistence between Exchange Forests (Part 8)
- Deep dive into rich coexistence between Exchange Forests (Part 9)
- Deep dive into rich coexistence between Exchange Forests (Part 10)
- Deep dive into rich coexistence between Exchange Forests (Part 11)
- Deep dive into rich coexistence between Exchange Forests (Part 12)
- Deep dive into rich coexistence between Exchange Forests (Part 13)
- Deep dive into rich coexistence between Exchange Forests (Part 14)
- Deep dive into rich coexistence between Exchange Forests (Part 15)
Introduction
In part 5, we created and configured the GALSync MA for Exchange Fore
st 3 (Exchange 2003 forest) which was a somewhat different experience from when we created and configured the GALSync MA for Exchange forest 1 (Exchange 2010 forest) and 2 (Exchange 2007) forest respectively.
In this part 6 of this articles series, we’ll continue where we left off in part 5. We will first run the GALSync MAs in order to verify FIM stages (imports) and exports objects properly for each Exchange forest. Moreover, we will configure automatic run profiles for each GALSync MA and then verify the objects exported to each Exchange forest are properly stamped with required attributes etc. And lastly we’ll create new address lists for the remote Exchange forests.
Running the GALSync Management Agents
Okay time has come to verify our GALSync MAs works properly. To do so, we’ll first run each of the 3 MAs with the Full Import (Staging Only) run profile. Doing so will import the Active Directory objects located in the OUs we defined as source containers back when we created and configured the MAs. The AD objects will be imported into the so called connector space in FIM 2010.
To perform a “Full Import (Stage Only)”, right-click on the GALSync MA and then click “Run” in the context menu.
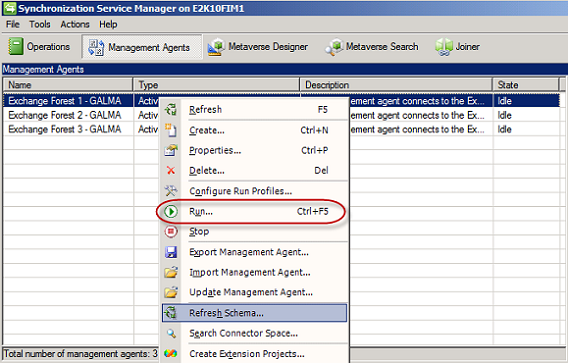
Figure 1: Selecting “Run” in the context menu for a GALSync MA
In “Run Management Agent” select “Full Import (Stage Only)” and click “OK”.
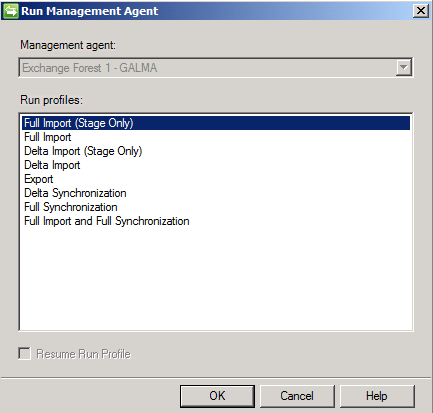
Figure 2: Selecting the Full Import (Stage Only) run profile
Now switch to the “Operations” tab and note that depending on the number of objects in the defined OUs in your forests, you have a number of adds under “Synchronization Statistics” as shown in Figure 3.
Perform the above steps for all three GALSync MAs.
When done, the AD objects from each forest have made it into the FIM connector space.

Figure 3: Full Import (Stage Only) run profile ran with success
Next up, we need to perform a “Full Synchronization”. This will cause the join and projection rules to be processed. All objects that exist in the connector space will be created in the metaverse and be linked to their corresponding connector space objects. In addition, the export attribute flow rules will prepare objects that have to be exported.
To perform a full synchronization, right-click on GALSync MA and select “Run” in the context menu. In “Run Management Agent” select “Full Synchronization” and “OK”.
Again do this for each GALSync MA.

Figure 4: Selecting the Full Synchronization run profile
After a full synchronization has been performed for each GALSync MA, Synchronization Statistics will show a number of projections for each. Projections equal the new objects created in the metaverse.
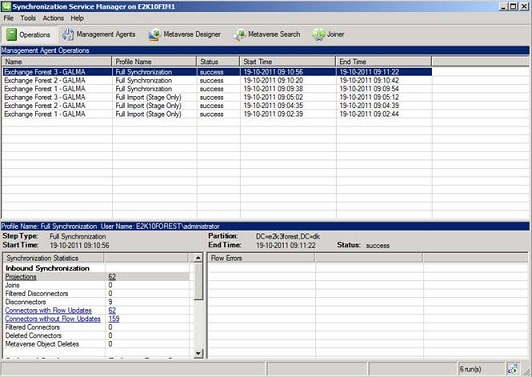
Figure 5: Full Synchronization run profile ran with success
Time has come to export the data to each Exchange forest. When using the “Export” run profile, objects staged for export (in previous step) will be exported from the connector space to the Exchange forests (aka connected data sources).
To perform an export, right-click on GALSync MA and select “Run” in the context menu. In “Run Management Agent” select “Export” and “OK”.
Again do this for each GALSync MA.
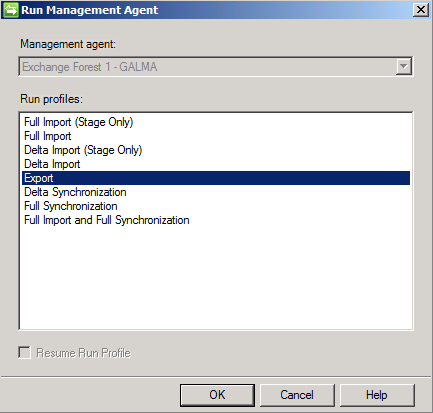
Figure 6: Selecting the Export run profile
In the Export Statistics, you can then see a number of adds have been made for each Exchange forest, which means objects have been exported from the connector space to the Exchange forests as mail-user and contact objects.

Figure 7: Export run profile ran with success
Finally we must perform a delta import so that FIM 2010 can confirm that the export to each Exchange forest (connector space source) was successful.
To perform an export, right-click on GALSync MA and select “Run” in the context menu. In “Run Management Agent” select “Delta Import” and “OK”.
Again do this for each GALSync MA.

Figure 8: Selecting the Delta Import run profile
Now verify that several adds and updates are reported back from each Exchange forest to FIM 2010 as a result of the “Delta Import” run profile.

Figure 9: Delta Import run profile ran with success
Automating and Scheduling Run Profiles in FIM 2010
Okay so now we have the required GALSync MAs all set up and configured accordingly. But there’s not much automation yet. Currently, you need to manually execute run profiles for each MA. This means that if an AD user object is added, removed or modified in Exchange Forest 1 (Exchange 2010), this won’t be reflected in Exchange forest 2 (Exchange 2007) or Exchange forest 3 (Exchange 2003) and vice versa.
To have changes occuring in one Exchange forest to reflect in another forest, it’s best practice to schedule a script that does delta import and export changes every 3 hours and a full synchronization ever 24 hours. With previous versions of Microsoft’s identity management solution (MIIS/ILM), we usually used a VB script to do this. But in these PowerShell days, it would probably make more sense to use a PowerShell script. There are even 3rd party tools that allow you to do this via a GUI.
Since this topic is well documented on the TechNet Wiki, I won’t go into the specifics on how to automate run profiles in this article series.
Looking at Contact and Mail-enabled Users in Exchange Forests
Let’s take a look at the mail user and contact objects created in each Exchange forest. We’ll start with Exchange forest 3 (Exchange 2003). Opening the Active Directory Users and Computers snap-in and selecting the GALSync OU lists all the objects that were exported from FIM 2010. We have 159 objects which match the number of mailbox users we have in Exchange forest 1 and 2.

Figure 10: Contact objects exported from FIM 2010 to Exchange forest 3 (Exchange 2003)
Taking properties of a contact objexct reveals that it has an e-mail address in a remote forest (in this example Exchange forest 1).
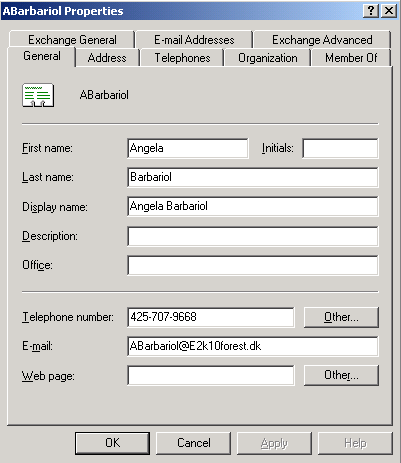
Figure 11: Contact object representing a Mailbox User in Exchange forest 1
Let’s try to select the “Exchange General” tab. Here we can see the email address to which emails sent to this contact object are forwarded. This is also known as the targetAddress which is the attribute name for this property field.
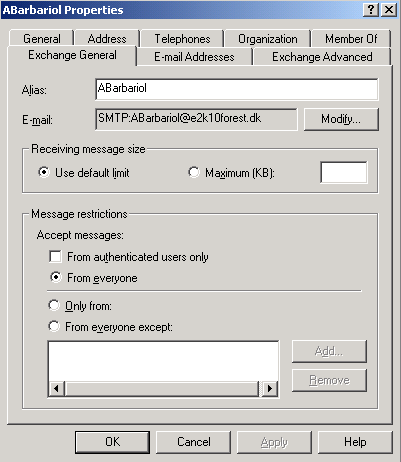
Figure 12: Forwarding address (targetAddress) configured for contact object
Let’s switch to Exchange forest 2 (Exchange 2007). Under Mail Contact in the Exchange Management Console (EMC), we can see 136 mail user objects, which equal the total of Mailbox user objects from Exchange forest 1 (Exchange 2010) and Exchange forest 3 (Exchange 2003).

Figure 13: Mail User objects listed in the Exchange Management Console in Exchange Forest 2 (Exchange 2007)
Again taking properties for one of these objects reveals that it represents a mailbox user in another forest (in this example Exchange forest 3).
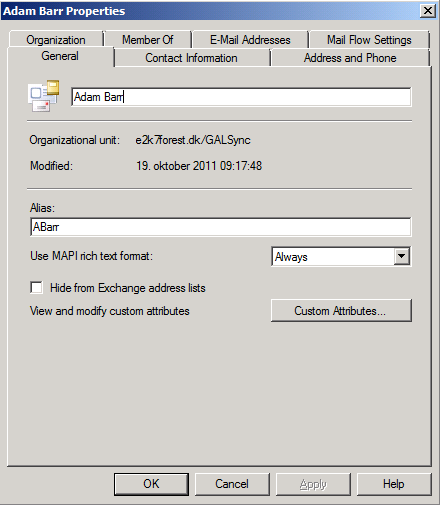
Figure 14: Property page of a mail user object in Exchange forest 2 (Exchange 2007)
Selecting the “E-Mail Addresses” shows us the forwarding address (targetAddress) configured for the object is an address in Exchange forest 3 (Exchange 2003).

Figure 15: Forwarding address (targetAddress) for Mail User object in Exchange forest 2 (Exchange 2007)
Lastly let’s open the Exchange Management Console on an Exchange 2010 server in Exchange forest 1 (Figure 15). Under the “Mail Contact” node, we have 147 objects which again equal the total of mailboxes that exist in the two other Exchange forests.

Figure 16: Mail user objects in Exchange 2010 Management Console in Exchange forest 1
Opening the property page of a mail user object reveals it represents a mailbox user in one of the other Exchange forests (in this case Exchange forest 2).

Figure 17: Mail user object representing mailbox user in Exchange forest 2 (Exchange 2007 forest)
Again we can see that the mail user object forwards mail sent to this mail user to Exchange forest 2 (Exchange 2007).

Figure 18: External e-mail address (aka targetAddress)
Notice that the mail user and contact objects are stamped with two additional X500 addresses.
Creating an Address List for each Exchange Forest
Because you’re still in the merging phase of the three companies, you may still want to keep some separation of users between each Exchange forest. In order to achieve this you can create two new address list Exchange forests in each forest containing the mail user and contact objects for the two other Exchange forests. This could make it easier for your users to lookup users from the other forests.
To create a new address list, open the Exchange Management Console (Exchange 2007/2010) or the Exchange System Manager (Exchange 2003) on an Exchange server in the respective forest and then launch the “New Address List” wizard.
In this example we’ll create a new address list that will contain mail user objects (representing Exchange 2007 mailbox users) in Exchange forest 1 (Exchange 2010). Give the new address list a name and click “Next”.

Figure 19: Giving the new address list a name
Don’t specify a recipient container as the wizard will come up with an error when trying to create the address list object. This is because a legacy server (Exchange 2007 server) exists in the organization.
Click “Next”.
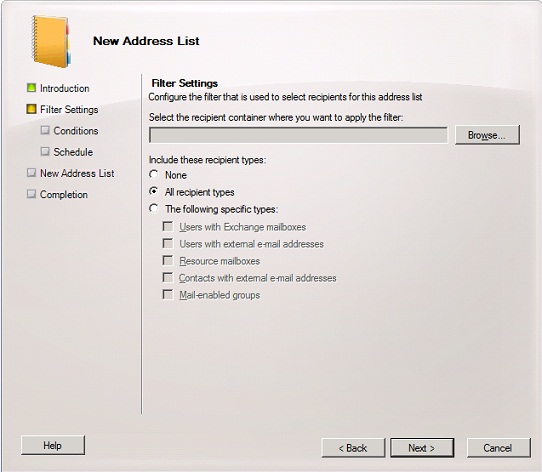
Figure 20: New address list filter settings
On the conditions page, select a criteria that is unique for Exchange mail user objects representing the mailbox users in Exchange fores 2 (Exchange 2007). In this example, we’ll use the company field.
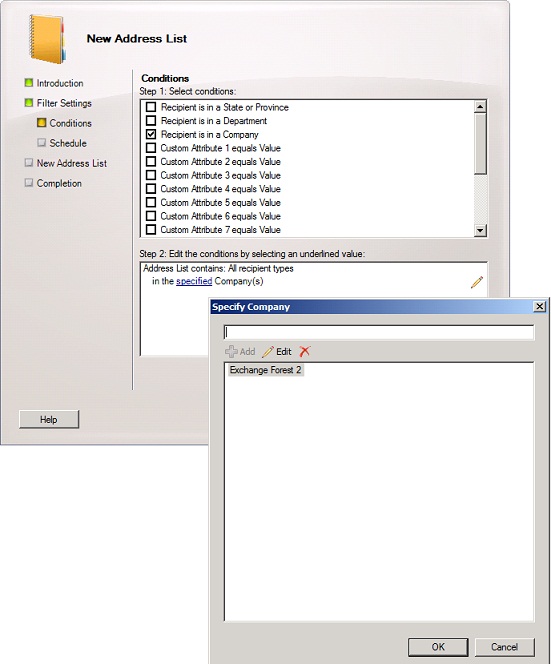
Figure 21: Setting company field as the condition
Click “Preview” to verify the right objects are included in the filter.
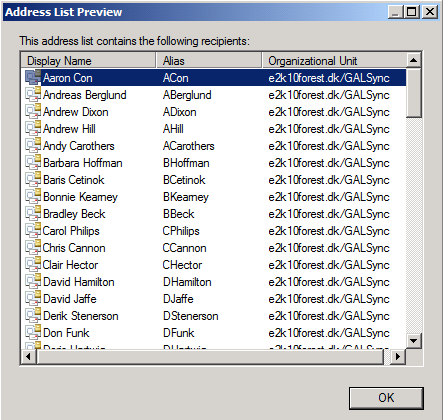
Figure 22: Address List Preview
Exit the wizard by click “Finish”.

Figure 23: Completing the new address list wizard
Your users will now be able to select these two new address lists from the drop-down address book list in Outlook and OWA.
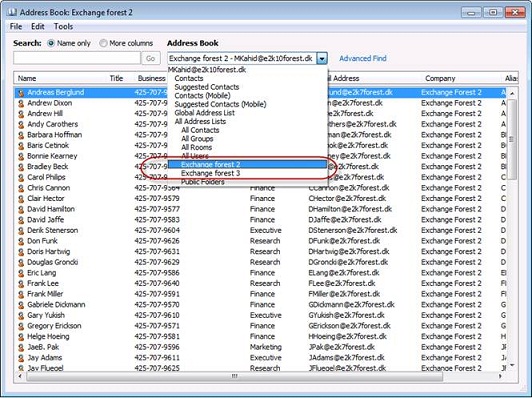
Figure 24: Drop-down address book list in Outlook 2010
This concludes part 6 of this articles series. Until next time, have fun.
If you would like to read the other parts in this article series please go to:
- Deep dive into rich coexistence between Exchange Forests (Part 1)
- Deep dive into rich coexistence between Exchange Forests (Part 2)
- Deep dive into rich coexistence between Exchange Forests (Part 3)
- Deep dive into rich coexistence between Exchange Forests (Part 4)
- Deep dive into rich coexistence between Exchange Forests (Part 5)
- Deep dive into rich coexistence between Exchange Forests (Part 7)
- Deep dive into rich coexistence between Exchange Forests (Part 8)
- Deep dive into rich coexistence between Exchange Forests (Part 9)
- Deep dive into rich coexistence between Exchange Forests (Part 10)
- Deep dive into rich coexistence between Exchange Forests (Part 11)
- Deep dive into rich coexistence between Exchange Forests (Part 12)
- Deep dive into rich coexistence between Exchange Forests (Part 13)
- Deep dive into rich coexistence between Exchange Forests (Part 14)
- Deep dive into rich coexistence between Exchange Forests (Part 15)


