If you missed the first part in this article series please read Deploying an Exchange Resource Forest (Part 1)
If you would like to be notified when Anderson Patricio releases the next part in this article series please sign up to the MSExchange.org Real Time Article Update newsletter.
In the second part of this article we will be working with Exchange Server 2007. We will create users using the Exchange Management Shell and Exchange Management Console. One thing to keep in mind is that the next section will explain the current situation of the Exchange Resource Forest after which we will start to work on Exchange Server 2007.
Our current scenario
In the first article we worked on our infrastructure, where we fixed the name resolution, installed Exchange Server 2007 in the Resource Forest and created the one-way outgoing trusts between Resource Forest and Account Forests. Now, our scenario is shown below in figure 01.

Figure 01: Our scenario with Exchange Server 2007 installed, trusts created and DNS resolution working
Organizing the Resource Forest
Before we begin user creation, we can organize our Active Directory and Exchange Server 2007 to hold both account Forests. In our article let us put the users in separated OUs. To do that, we can create a parent OU called Host and two sub-OUs called: APatricio OU and Other OU, as shown in Figure 02.

Figure 02: Creating OUs to distribute the users
We are going to create two Storage Groups and consequently two mailbox databases for the users of both Account Forests, as shown in Figure 03. Following Microsoft’s best practices, we should separate the mailbox databases and mailboxes into distinct disks.

Figure 03: Separated Storage Groups for each Account Forest
Okay, now that we have distinct OUs, Storage Groups, and mailbox databases for the Account Forest, we can start the last procedure, that is the user creation.
Creating a Linked Mailbox using the Exchange Management Console
The process to create a mailbox in this scenario is a little bit different than a usual mailbox. We are going to create a Linked Mailbox. This feature is available only in the Exchange Server 2007 Resource Forest scenario. In the steps below, we will be checking out all the tasks involved in the process.
Open the Exchange Management Console; click on Recipient Configuration, and on the Toolbox Actions click on New Mailbox. A wizard will appear in the screen, select Linked Mailbox as shown in figure 04, and click Next.

Figure 04: Starting the process to create a Linked Mailbox in the Resource Forest
We do not have many options in the User Type section of the wizard, just select New User, and click Next.
We will define user information in the User Information section of the wizard. First of all click the Browse button and choose the OU in which we will be creating the new disabled user, as shown in Figure 05. In this case, we are creating a mailbox for the Apatricio’s Account Forest.
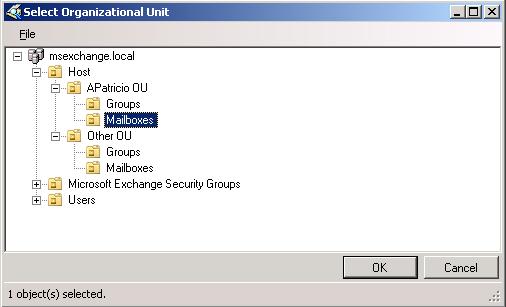
Figure 05: Choosing the OU where the new linked mailbox will be created
Fill out the rest of the information, such as user name, pre-user logon name, and password. Even in the linked Mailbox we have to do that. However, the real user will never know about the disabled account in the resource forest, as shown in Figure 06. The most import thing to consider in this section will be the Name field since that is what appears in the GAL (Global Address List). Click on Next.

Figure 06: Filling out the Linked Mailbox user information
Now we have to choose in the Mailbox Settings section of the wizard, the related information where this mailbox will be hosted, such as Exchange Server name, Storage Group and Mailbox Database. We have created two different Storage Groups. Now let us create this user in the appropriate Storage Group and Mailbox Store as shown in Figure 07.

Figure 07: Setting up the Mailbox settings of the new Linked Mailbox
Now, we have something new in the Master Account section of the wizard. First of all, we have to choose which Account Forest we will be using for this linked mailbox, and then choose the wanted Account Forest by clicking in the first Browse button (Figure 08).

Figure 08: Choosing which Account Forest that will contain the user who we are going to be linked to the new mailbox
Now, we can check the option Use the following Windows user account to access linked domain controller, fill out the credentials (user name and password) for the wanted Account Forest. We are now able to find the Linked domain controller. To do that click on Browse… and click OK.

Figure 09: The Global Catalogs of the Account Forest
We are almost there. Click on the third Browse… button to find the Account Forest user to match with the mailbox, as shown in Figure 10. The mailbox that we are creating is UserA, then we are going to select UserA. Click OK.

Figure 10: Selecting the user in the Account Forest which will access the mailbox in the Resource Forest
Now, we can see the Master Account section of the wizard filled out by our last choices (Account Forest, Global Catalog in the Account Forest and finally the user of that Account Forest), click Next, as shown in Figure 11.

Figure 11: Associating a user account to the new Mailbox
In the New Mailbox section of the wizard, we will see a summary of all our choices up to now; click Next, as shown in figure 12.

Figure 12: Summary of the new Linked Mailbox
Completion. This is our last screen of the wizard, where we can see the cmdlet and all the parameters that were used to create our Link Mailbox, as shown in figure 13.

Figure 13: Final screen of the New Mailbox Wizard
Now we can see the newly created account in the Exchange Management Console. There is a specific icon for the Link, as shown in Figure14.

Figure 14: The newly linked mailbox that we have just created
We can also see the disabled account that was created in the msexchange.local, as shown in Figure 15.
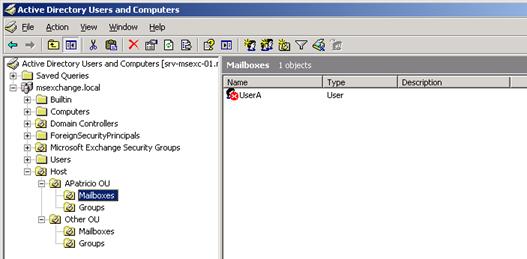
Figure 15: The disabled account created for the Linked Mailbox
Finally, we can check out the account using the cmdlet get-mailbox <user> | fl *linked*, where we will see the parameters IsLinked and LinkedMasterAccount that gives us the values to see if the account is linked and who is the owner of the account, as shown in figure 16.

Figure 16: Getting information about the Linked Mailbox using get-mailbox cmdlet
Creating a Linked Mailbox using Exchange Management Shell
Especially in this kind of scenario, we can use the Exchange Management Shell to create all the users of the account forest. We are going to see how to create a single user, but if you want to create using a csv file you can check the following article: Managing mailboxes in Exchange Server 2007 (Part 1).
First of all, open the Exchange Management Shell, type in $credential = get-credential, then a dialog box will pop up (Figure 17). Fill out that dialog box with the Account Forest credentials and click on OK.
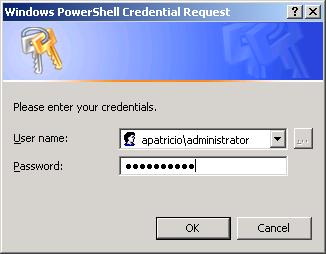
Figure 17: Typing in the credentials of the Account Forest
Now, we have the credential of the Account Forest in a variable called $credential, that is necessary to create a Linked Mailbox. The full cmdlet is shown below:
C:\>$credential = Get-Credential
Fill in the dialog box with the Account Forest credentials
C:\>New-mailbox –Name <user-name> -Alias <Alias-Name> -OrganizationalUnit <OU-path> -UserPrincipalName [email protected] –Database <database-name> -LinkedMasterAccount <AccountForest\UserFromAccountForest> -LinkedDomainController <AccountForestDomainController> -LinkCredential $credential
Using the above cmdlet we can create a Linked Mailbox through the Exchange Management Shell, as shown in Figure 18.

Figure 18: Creating a Linked Mailbox
Conclusion
In this second article, we have seen how to create a Linked Mailbox in an Exchange Server 2007 Resource Forest environment using either Exchange Management Console or Exchange Management Shell. In the next article we will be taking a look at the user experience in this kind of scenario
If you missed the first part in this article series please read Deploying an Exchange Resource Forest (Part 1)
If you would like to be notified when Anderson Patricio releases the next part in this article series please sign up to the MSExchange.org Real Time Article Update newsletter.