If you would like to read the other parts in this article series please go to:
- Deploying Exchange Server 2007 and Office Communications Server 2007 R2 (Part 1)
- Deploying Exchange Server 2007 and Office Communications Server 2007 R2 (Part 3)
- Deploying Exchange Server 2007 and Office Communications Server 2007 R2 (Part 4)
- Deploying Exchange Server 2007 and Office Communications Server 2007 R2 (Part 5)
- Deploying Exchange Server 2007 and Office Communications Server 2007 R2 (Part 6)
- Deploying Exchange Server 2007 and Office Communications Server 2007 R2 (Part 7)
- Deploying Exchange Server 2007 and Office Communications Server 2007 R2 (Part 8)
- Deploying Exchange Server 2007 and Office Communications Server 2007 R2 (Part 9)
- Deploying Exchange Server 2007 and Office Communications Server 2007 R2 (Part 10)
- Deploying Exchange Server 2007 and Office Communications Server 2007 R2 (Part 11)
OCS Design
As we have seen in the previous part of this series, both Exchange Server and OCS can be deployed in many different ways and using a different number of servers based on the company’s SLA (Service Level Agreements) and solution requirements. OCS 2007 R2 has a tool called Planning Tool for Microsoft Office Communications Server 2007 R2 that recommends topology diagrams and hardware requirements to deploy OCS 2007 R2 based on the information provided by the administrator.
The tool can be found here.
The tool can be run on Windows Server 2008, Windows Vista Service Pack 1 and Windows XP Service Pack 3 operating systems. Please note that.Net Framework 3.5 is also required. The installation is a straight forward process, just accept the default values and you will find an icon entitled Planning tool in All Programs / Microsoft Office Communications Server 2007 R2.
The tool is really useful and easy to work, in the initial page (Figure 1), we have three options: Get Started (to create a new design), Design Sites (go straight to the design phase where you can select the server roles by site) and the last item that is Display where you can load a previous saved topology created by the tool. Let us start the tool from the basics, then we are going to click on Get started.

Figure 1
The second phase of the Planning Tool consists of several questions about functionalities and each question comes with a brief explanation about the future. Here are all the features that will be asked during this phase:
-
Audio and Video Conferencing
-
Web Conferencing
-
Communicator Web Access (CWA)
-
Enterprise Voice
-
Monitoring
-
Archiving
-
Unified Communications Applications where we can select these Applications:
– Response Group Service
– Conferencing Attendant
– Conference Announcement Service
– Outside Voice Control -
Group Chat Server
-
Device Update Service
-
Federation
-
High Availability
The next phase of the Planning Tool is the Site design. We can create more than one and also associate a name, domain, number of users and features of that specific site (all the options selected at this point were based on the questionnaire that we have just answered in the previous section), as shown in Figure 2. For each site configured, the administrator has to answer additional questions, these topics above are the content of those new set of questions:
-
Percentage of users for that specific site that will be using Communicator Web Access (CWA) at the same time.
-
Phone Settings, where we can decide how many users will be enabled for Enterprise voice, average number of calls to a PSTN destination, Network Line, gateway type and mediation server.
-
External user access, in this section we can define the use of Edge Servers and if they are going to be highly available. Also, if you are deploying more than one site you can use Edge servers from another location.

Figure 2
As soon as you finish entering the site information, the Draw button will appear. You will now be able to see the Global Topology that consists of all your sites and Internet connections. You can double click on any site and the OCS Topology of that site, based on the information provided, will be displayed (as shown in Figure 3). The Actions section is really useful because from there you can print and view the Planning and Deployment steps based on the current environment/topology, also Export to a Visio file.
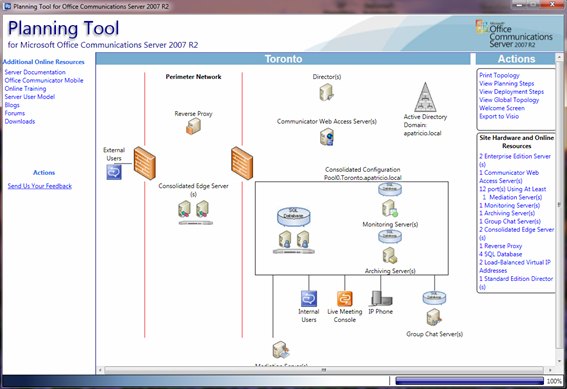
Figure 3
If you hover the mouse over each server on the topology diagram you will be able to see Hardware and port requirements for that role. Another nice feature of the diagram is the ability to generate an Excel file containing information about hardware profile, and port requirements. In order to generate such a file you must be on the Global Topology view level, if you are not there, just click on View Global Topology and on the menu entitled Actions you will see Export to Excel, the result will be a XML file that can be opened in Excel, as shown in Figure 4.

Figure 4
Exchange 2007 Planning
A nice tool that can be used for the planning stages of Exchange Server 2007 implementation is the System Center Capacity Planner 2007, found at Microsoft’s Download Center. The installation process is pretty straight forward. These are the steps that you can follow to validate your environment:
-
On the Welcome to the System Center Capacity Planner 2007 Setup Wizard page, click on Next
-
On the License Agreement page, if you agree with the license agreement, click on I agree
-
On the Select Installation Folder page, select the folder where you want to install the System Center Capacity Planner 2007, and click on Next
-
On the Confirm Installation page, click on Next to start the installation process
-
On the Installation Complete page, leave the current selection on Start System Center Capacity Planner 2007 and click Close
-
A pop-up will be displayed, click OK
-
On the main page, select Exchange Server 2007 and click on Create a new Capacity Model (Figure 5)

Figure 5
-
Click on Add Mailbox Site and a window will pop up at the bottom. On that page we can add more information about the site, such as the Name of the site, SAN usage, site profile, client profiles and so on (Figure 6). After submitting all the site details, click OK and the current site will add the list on the same page, you can add additional sites that will contain Exchange Server. When done, click Next

Figure 6
-
On the Client-Only Sites step, we can define sites that will have users but not Exchange Servers. Add the information according to your environment specifications and click Next
-
On the Networks step, we can define the internet bandwidth and the bandwidth between sites (if you have defined any additional site in the previous steps). Click Next
-
On the Hardware step, we can select CPU profiles to be used on each Exchange Server role if we are going to use different servers to each role. Select the CPU configuration and click Next
-
On the Application tasks we can select whether we want to have high availability for the Mailbox Server role and other roles. Our initial scenario will be simple with a single server, as shown in Figure 7. When done, click Next

Figure 7
-
On Model Summary page. We will see a summary of our topology and information of each site based on the decision that we have just done. Click on Finish. (Figure 08)

Figure 8
When done modeling the topology, the Model Editor will appear. Here you will be able to see a diagram of the proposed design (Figure 9). By default, all roles are added to the design; we can adjust the proposed design with the requirements. In our example, right click on a server role and then click on Edit Server Role. Once in the properties page we can consolidate the roles. Click on Run Results and if there are no critical issues, the Results Summary page will be displayed. We can now analyze and see possible bottlenecks of the planned solution, as shown in Figure 10.
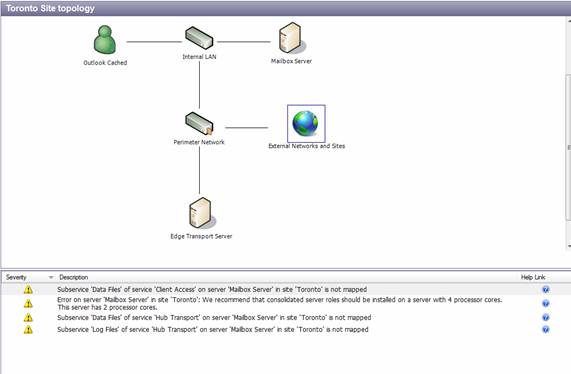
Figure 9
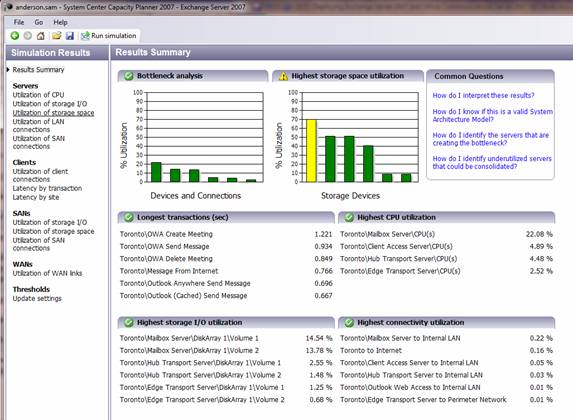
Figure 10
Disk subsystem is really important for an Exchange Server deployment, the best way to measure the disk requirements is using a spreadsheet called Exchange 2007 Mailbox Server Role Storage Requirements Calculator spreadsheet from MSExchange.org team that can be found here. On the same page, we can find more information on how to use the spreadsheet.
Some vendors offer tools to help size Exchange Servers, you can always ask your vendor or use some of their public available tools. Here are some vendors and their respective Exchange size tools:
Conclusion
In this second article of our series we went over the planning phase for OCS 2007 R2 and Exchange Server 2007. There are different ways to do plan a solution, in this article we saw two Microsoft tools that are available to help you through this process. In the next article we will start building our POC environment from scratch, we will cover AD, DNS, Certificates services and more. Till next time!
If you would like to read the other parts in this article series please go to:
- Deploying Exchange Server 2007 and Office Communications Server 2007 R2 (Part 1)
- Deploying Exchange Server 2007 and Office Communications Server 2007 R2 (Part 3)
- Deploying Exchange Server 2007 and Office Communications Server 2007 R2 (Part 4)
- Deploying Exchange Server 2007 and Office Communications Server 2007 R2 (Part 5)
- Deploying Exchange Server 2007 and Office Communications Server 2007 R2 (Part 6)
- Deploying Exchange Server 2007 and Office Communications Server 2007 R2 (Part 7)
- Deploying Exchange Server 2007 and Office Communications Server 2007 R2 (Part 8)
- Deploying Exchange Server 2007 and Office Communications Server 2007 R2 (Part 9)
- Deploying Exchange Server 2007 and Office Communications Server 2007 R2 (Part 10)
- Deploying Exchange Server 2007 and Office Communications Server 2007 R2 (Part 11)


