If you would like to read the other parts in this article series please go to:
- Deploying Lync Server 2010 (Part 7) – Managing Lync Users
- Deploying Lync Server 2010 (Part 8) – Managing User Policies
Introduction
Now that we ran the Planning Tool and validated how to install Topology Builder on a workstation we will start the process of deploying the product, Figure 01 shows the process that we will be following in this article series. The process itself is pretty straight forward but you may have already noticed it requires a lot of planning before actually playing with installation and software configuration. (It has been 2 articles and we haven’t touched the Lync Server Deployment Wizard so far :))
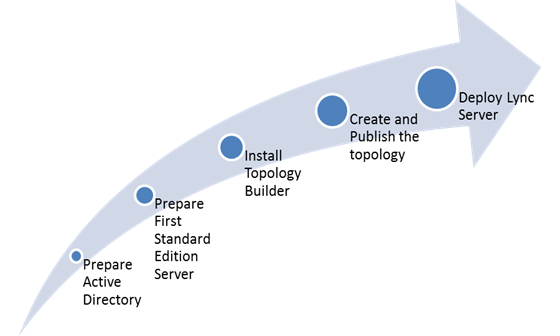
Figure 01
Starting Lync Server 2010 Deployment
In this article series we will be deploying the Standard Edition and as we discussed before as this version has everything that we need to start running Lync Server internally in a single box. In this section we will cover the basics to get the Lync Server 2010 – Deployment Wizard up and running.
Before running the Setup from Lync Server media, we need to install some prerequisites such as: .Net Framework and Active Directory Management Tools (it is required because we are going also to upgrade Schema, Forest and domain from the Lync Server) plus the additional Operating System components required to run Lync Server 2010.
In order to save some time let’s use a single cmdlet using PowerShell that will install all requirements in a single shot (Figure 02). Basically, logged as Administrator on your future Lync Server (POA-FE is the server name in our article series), please open PowerShell and run Import-Module ServerManager and then afterwards let’s install the features using this long cmdlet (It’s a single and long line):
Add-WindowsFeature NET-Framework-Core, RSAT-ADDS,Web-Server, Web-Scripting-Tools, Web-Windows-Auth, Web-Asp-Net, Web-Log-Libraries, Web-Http-Tracing, Web-Stat-Compression,Web-Default-Doc, Web-ISAPI-Ext, Web-ISAPI-Filter, Web-Http-Errors, Web-Http-Logging, Web-Net-Ext, Web-Client-Auth, Web-Filtering, Web-Mgmt-Console

Figure 02
After that let’s restart our server and we are good to install Lync Server 2010. We can run the Autorun of the media, or go to the location where you have Lync installation files and go to \Setup\Amd64, and double click on Setup.exe. In order to start the Deployment Wizard one of the prerequisites is to install Visual C++ 2008, and that is the first question that you will be asked in case you don’t have it. Let’s click on Yes and the component will be installed automatically (Figure 03)
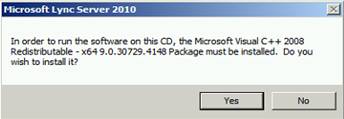
Figure 03
After installing the Visual C++ 2008, the setup will ask you about the installation files location (Figure 04) (the default path is C:\Program Files\Microsoft Lync Server 2010), let’s accept the default values and let’s click on Install. A License Agreement window will pop-up, just Accept it and click on OK afterwards.
Note: If you change the Installation Location, make sure that you remember it if you are going to do the Active Directory Schema extension using command line.

Figure 04
Okay we finally reached the Lync Server 2010 Deployment Wizard (Figure 05) and from that screen we will be able to prepare our Active Directory, install the Admin tools, install Lync Server and also prepare the Central Management Store.
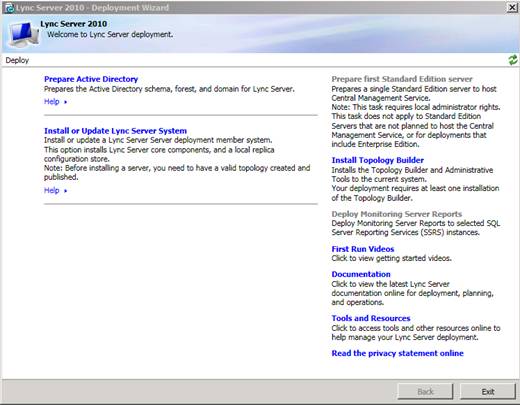
Figure 05
Preparing Active Directory…
In order to prepare the Active Directory environment to be able to run Lync Server we have three preparations to perform and they can be done either using command line or Deployment Wizard:
- Schema
- Forest
- Domain
The process is straight forward and we will cover both methods in this section. On the main page (Figure 06) of our Deployment Wizard, let’s click on Prepare Schema, and all steps required to prepare and to check the results will be listed in the proper order to be performed.

Figure 06
Preparing the Schema
All preparation processes follow the same process from the Deployment Wizard perspective. In order to avoid a bunch of similar screens we are going over the Schema preparation and the other two preparations (Forest and Domain) won’t have any screenshots on their sections.
The Schema preparation process in a nutshell will load four LDF files that can be found on the Installation Folder to your Schema. These are the files that will be loaded into your Schema: ExternalSchema.ldf which is responsible for the interoperability between Lync Server and Exchange Server; ServerSchema.ldf which is Lync Server 2010 schema changes required; BackCompatSchema.ldf which provides compatibility with previous versions and VersionSchema.ldf which only contains the Schema version update.
A couple of points that must be checked before preparing the schema:
- The logged account must have Schema Admins credentials, you can check that out running net user <username> /domain the Schema Admins must be listed. If it is not you need to add the user and logoff and log back on again
- The server that holds the Schema Master FSMO in Active Directory must be running and accessible. To find out which server holds the Schema Master you can run netdom query fsmo and the Schema Master is the first line of the command output
- The Schema Master must have its Remote Registry service enabled
- Make sure that your Active Directory replication is working properly
Let’s click on Run located on the Step 1: Prepare Schema area (Figure 07).

Figure 07
The first page of the Schema preparation we just need to click on Next (Figure 08).
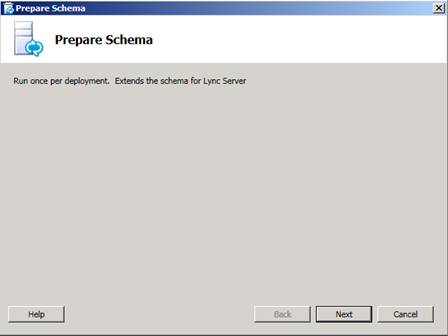
Figure 08
It’s that easy, the second screen (Figure 09) has the cmdlet performed to upgrade the schema and the only option that we have different than Finish the wizard is to View Log which gives us a nice HTML page with detailed information about the process.
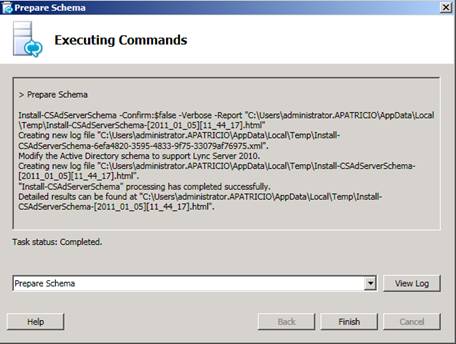
Figure 09
If you think that the GUI interface is too easy, we can use the hard way using PowerShell, first open the Lync Server Management Shell and type in Install-CsADServerSchema.
Note:
The cmdlet will use the same location that was used during the initial deployment (Installation files) to retrieve the LDF information.
If you want to double check that the Schema was replicated properly to all your Domain Controllers, you can use ADSIEdit.msc to check the Schema Version (Figure 10). You can open Adsiedit.msc, right click on ADSI Edit on the left side, and then click on Connect to…, then select Schema on the Select a well-known Naming Context section, and choose against which Domain Controller you want to check. Finally, expand Schema, then CN=Schema,CN=Configuration…, and right click on CN=ms-RTC-SIP-SchemaVersion on the right side and in the properties you must have the values 1100 for rangeUpper and 14 for rangeLower.
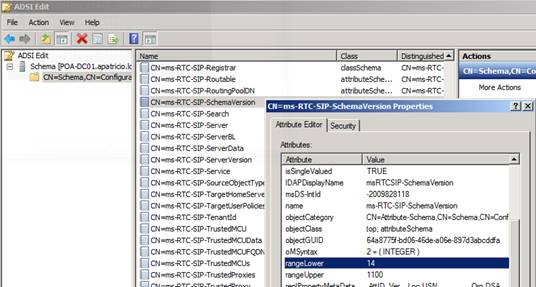
Figure 10
Preparing the Forest
The forest preparation creates the global settings and all Universal Groups used by Lync Server 2010, also the groups used by RBAC (all groups with CS prefix underneath Users).
To prepare the forest, just click on Run located on the Step 3: Prepare Current Forest area, and click Next on the following page and accept the default values on the Universal Group Location page (we have the option to define a different domain to create the Universal Groups, but in a single domain scenario like this article series is not applicable), click Next and Finish.
If you want to do the same process using command-line you can use the following cmdlet:
Enable-CsADForest
As part of the Forest preparation we can see all CS* group created by the process, as shown in Figure 11.
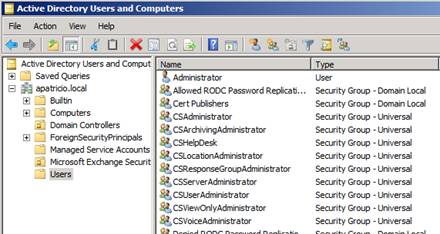
Figure 11
Note:
It’s not common but you can undo a forest preparation, if you have a good reason for that you can use Disable-CsADForest cmdlet. By the way, by default it does not run if you have a domain already prepared in the forest (in the next section we will cover how to undo a domain preparation as well). Please, as we stated before only use such option if you have a really good reason.
To check the replication, validate if you Global Catalogs are replicating properly.
Preparing the Domain
The domain preparation will create additional permissions on the domain in three different places: Users, Computers, domain and root folder container. Bear in mind that the Domain must be prepared only if it will host Lync enabled users and/or Lync Servers.
If you are going to use Deployment Wizard to prepare the domain, click on Run located on the Step 5: Prepare Current Domain area, click Next on the following page, and click on Finish.
In order to prepare using PowerShell, you can run the following cmdlet:
Enable-CsADDomain
Note:
Domain can also be reversed, in order to do that we can use the Disable-CsADDomain cmdlet however it only works if there is not a Front-End or AV Conferencing Server active in the domain.
Wrapping up the Active Directory preparation process…
After preparing Schema, Forest and Domain, we can go back to the main page and we will see a nice green check beside the Prepare Active Directory section which informs us that this section is complete! (Figure 12). The Active Directory preparation is not a daily task and we are probably going to run only one for each version of the product In some cases it’s necessary to rerun some of these tasks but only do that if you are covered by a Microsoft KB or a Microsoft Support recommendation.

Figure 12
One last thing about Lync Server Management Shell for this section is that we can also use it to check all three components (Schema, Forest and Domain) using a couple of cmdlets, as shown in Figure 13.

Figure 13
As soon as we finish preparing the Active Directory the option Prepare first Standard Edition Server will be available.
Conclusion
In this article we went over the process to prepare the Active Directory to support Lync Server 2010. In the next article we will be starting the deployment of the product.
If you would like to read the other parts in this article series please go to:


