If you would like to read the other parts in this article series please go to:
Introduction
At this point we understand the differences between Standard and Enterprise versions, and so far we prepared our Active Directory to support Lync Server 2010. Now we need to create the Central Management Store and install, and configure the Topology of our environment. We are going to start this tutorial with the main page of the Lync Server 2010 – Deployment Wizard (Figure 01).
The Central Management Store is a key component of the Lync Server 2010 and the introduction of this new concept in the Lync architecture provides redundancy for remote locations and a single location for most of the settings. The CMS (Central Management Store) is a SQL repository that replicates the configuration among other servers in a master with multiple replicas format. Where all updates are done at the master copy (the one that we are creating in this article series) and then, replicated to the other servers afterwards. The best practice is to deploy CMS on an Enterprise pool because it has high availability provided by the SQL cluster, however, in smaller environments it can be installed on a Standard Edition. Then the server itself will have two SQL Express instances (rtc which hosts the CMS, and rtclocal which includes a replica of the information).

Figure 01
Installing the Central Management Store…
We are going to create the topology in the next section but before that we need to create the Central Management Store. This process has to be performed only if you have Standard Edition and just on the first server.
Let’s click on Prepare first Standard Edition server link on the main page, then in the Prepare single Standard Edition Server page, click Next, as shown in Figure 02.

Figure 02
Similar to the Active Directory preparation we don’t have a lot of options, the process will start and SQL 2008 Express Edition and its firewall rules exceptions will be added to the server (Figure 03). We can also check the log files afterwards, and then click Finish.
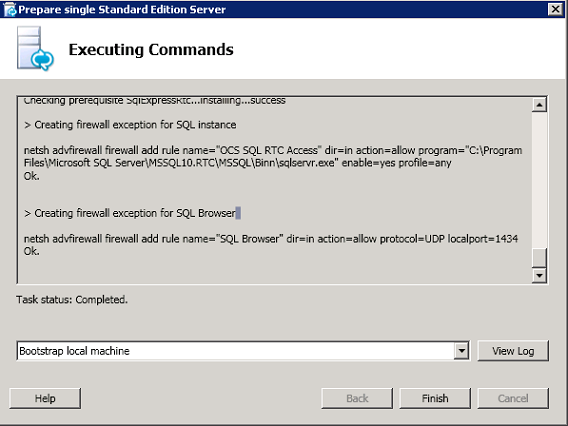
Figure 03
Defining the Topology…
Let’s click on Install Topology Builder on the main page of Lync Server 2010 – Deployment Wizard. The Topology builder installation is a straightforward process and as part of its installation a couple of tools will be installed, as shown in Figure 04.

Figure 04
If we look back to the Deployment Wizard we will notice that we knocked down 3 items already 🙂 (Figure 05).
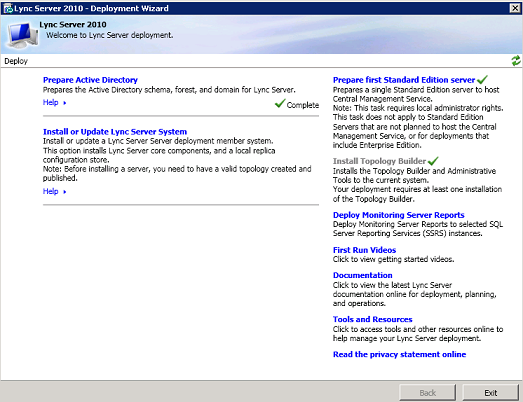
Figure 05
Now, our next step is to create the initial Topology using Topology Builder. Let’s start opening the Lync Server Topology Builder, and on the initial screen, click on New Topology (Figure 06) and hit OK. A new dialog box will show up asking for the file name, select a folder to save our new Topology and click on Save.
Note:
The file extension will be tbxml; you can always import the settings from Lync Planning Tool but in this article series we are going to start from scratch to demonstrate the entire process.

Figure 06
On the Define the primary domain page, we can define the primary SIP domain for the organization, in our article series it is going to be andersonpatricio.org, as shown in Figure 07.

Figure 07
If your company has more than one SIP domain to be configured, you can specify it here (Figure 08). Click Next.
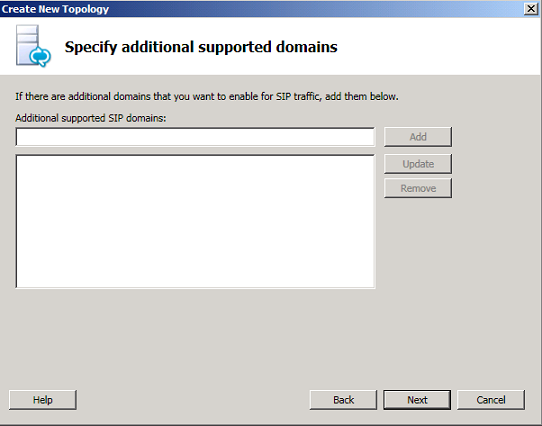
Figure 08
Lync Server does not use Active Directory sites in the Topology Builder. In the Lync Server world we can have two types of sites: Central Site and Branch site. Each Central Site requires at least one Front-End Server; a Branch site was designed to have some of these components: IP/PSTN Gateway, Mediation Server role and/or Survivable Branch Appliance (basically it’s an appliance running Windows Server 2008 designed for small locations, up to 1000 users).
Let’s move on and define the first site, as shown in Figure 09. The next page will be also related to the site information, please fill out using the location information and click Next.

Figure 09
After creating the first site, the Topology Wizard will automatically enable the option to create a new front end wizard, so let’s leave the default settings and hit Finish.
On the Define the New Front End Pool page, just click Next.
On the Define the Front End Pool FQDN page, click on Standard Edition Server and the FQDN will be the FQDN of our new server, as shown in Figure 10.

Figure 10
On the Select Features page (Figure 11), IM and presence is enabled by default. At this stage we can define which additional features we want to have installed in our environment. If you are learning the product, I would recommend to always go as simple as possible and then start adding features later on. In our article series we will do that and have just Conferencing enabled, click Next.
Note:
If you select additional features then the wizard pages will be based on your feature selection.

Figure 11
On the Select collocated server roles page. Here is one of the new features of the product, where we have the ability to collocate different roles on the same server. In this article we are going to leave default settings and then click Next (Figure 12)

Figure 12
On the Associate server roles with this Front End pool page (this section can be tricky); if we select the provided roles then a new wizard is required to create each of our selections afterwards. We are starting our article series with just a single server, so let’s leave all of them unchecked and then click Next (Figure 13)

Figure 13
On the Define the SQL store page, since we are not using the Enterprise edition, we don’t have an option to change any settings related to the database. Therefore, we just need to click on Next.
On the Define the file share page (Figure 14), we can define the information about the new File Share. This process does not create the Share itself and in this article series we are going to use the name of LyncShare.

Figure 14
On the Specify the Web Services URL page (Figure 15), we can define the External Base URL that will differentiate internal and external domains, in our tutorial we will be using webconf.andersonpatricio.org. The same URL will be used by external clients when an Edge Server is used in the Lync Server environment.

Figure 15
Finally, we are done with the initial topology. I expanded all options on the left side and our Central Site Porto Alegre is defined with its Front-End, A/V, SQL Stores, File stores and so forth. Bear in mind that all this information is just in a tbxml file at this point and we need to publish it to our Central Management Store (CMS), as shown in Figure 16.
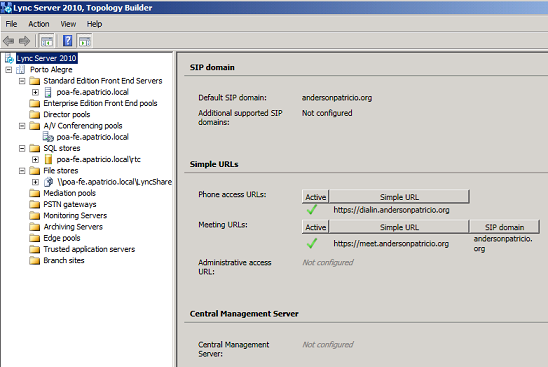
Figure 16
Final steps:
-
On the Lync Server, let’s create a folder on the C:\ drive and that folder will be called LyncShare.
-
Let’s share this new folder with the same name and add the Everyone group with Full Control access at Share level. The main reason is that Users by default has Read only at NTFS level.
Load the properties and configure the Simple URLs, let’s use https://admin.andersonpatricio.org as administrative URL and make sure that the meet and dialin URLs are also configured, as shown in Figure 17.
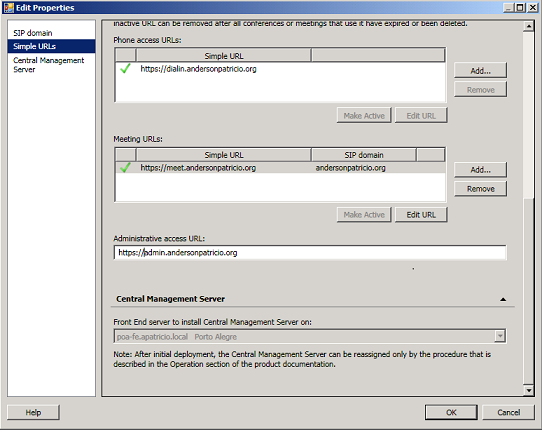
Figure 17
Conclusion
In this article we went through the process to install a Management Store and how to configure the initial Lync Deployment using Topology Builder.
If you would like to read the other parts in this article series please go to:


