In my previous article in this series, I explained how to find the Server Management Tools within the Azure marketplace. In this article, I want to show you how to deploy the Server Management Tools, and how to set up the required gateway.
For the Server Management Tools to work, you will need a gateway server in your on-premises environment. Azure uses this server as a point of entry into your network, thereby allowing the Server Management Tools to work.
For the purposes of this article series, my gateway server is going to be running Windows Server 2016. You can use Windows Server 2012 or 2012 R2 instead, but if you choose to use this version of Windows, then you will have to deploy version 5.0 of the Windows Management Framework. You can download the required framework here. Keep in mind that you will only need to install the Windows Management Framework if you are using Windows Server 2012 or 2012 R2.
Once you have installed Windows Server on your gateway computer, be sure to join the server to your Active Directory domain. Remember, you want to be able to use the Server Management Tools to manage servers within your on-premises environment, and domain joining the gateway server will help you to be able to manage domain members through Azure.
So with that said, you can get started by opening the Azure Marketplace and searching for the Server Management Tools. Once you locate the tools, click the Create button. At this point, you will see a screen similar to the one shown in below, which asks for several pieces of information.

The first field within this dialog box asks for the name of an existing computer. The computer that you specify should be a Windows Server 2016 machine on your private network. This computer will act as a management target. In other words, you will be able to manage the specified computer through Azure. You can provide the computer’s IP address or its NetBIOS name or fully qualified domain name.
The next field asks you to specify your Azure subscription. After that, you will need to specify a resource group. If you do not currently have any resource groups defined within Azure, just enter a name that you want to use for a resource group, and be sure that the Create New option is selected.
Next, you will need to enter a friendly name to identify your gateway server. You can use any name that you want. The name does not have to match the gateway server’s NetBIOS name or its fully qualified domain name. Finally, make sure that your location is set correctly, and that the Pin to Dashboard checkbox is selected. Now, click the Create button.
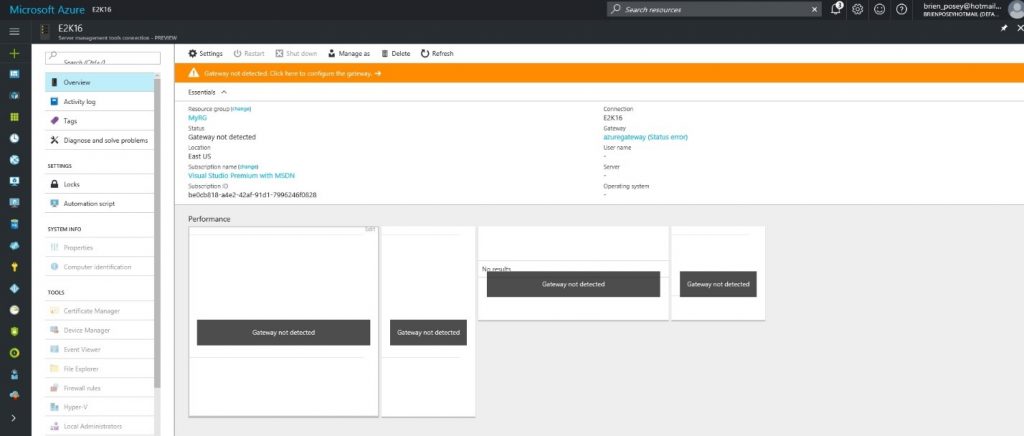
At this point, Azure will create a dashboard tile for the computer that you specified, and will then take you to a screen like the one shown below. As you can see, this screen contains an error message stating that the gateway was not detected. You will need to click on the error message to configure the gateway.
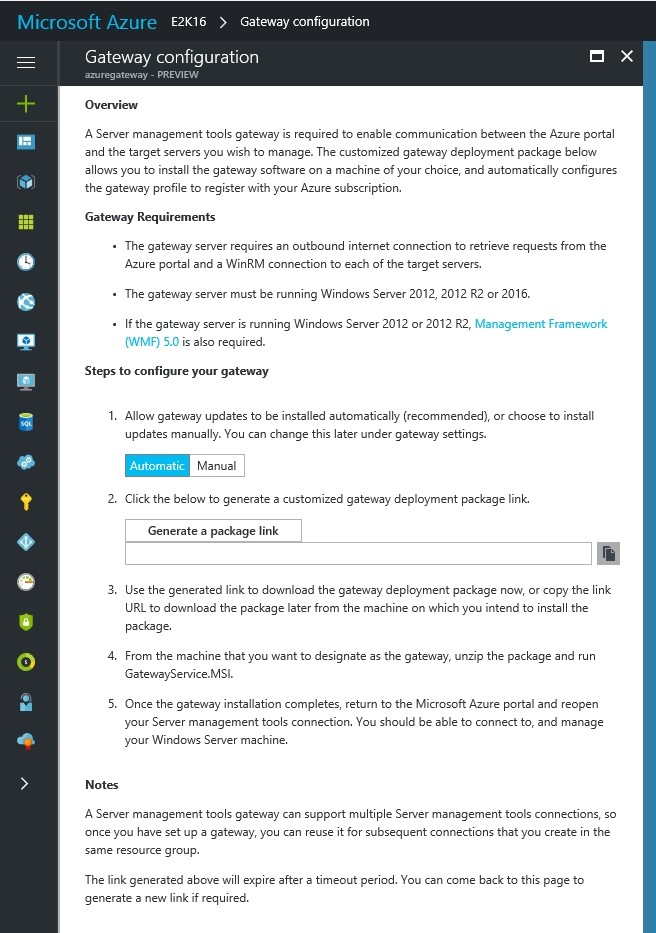
The good news is that configuring the gateway is an easy process. In the past, I have had to create a gateway within Azure and link it to an on-premises VPN to enable communications between Azure VMs and Hyper-V VMs. It was a tedious and time-consuming process, to say the least. Thankfully, this process is nothing like that. If you look at the screenshot below, you can see that Azure displays a button that you can use to create a package link. After creating this link, download the corresponding MSI file, and then install it onto your gateway server.
When you paste the gateway link into a Web browser on the gateway server, you will be prompted to download a zip file. This zip file contains an MSI file and a JSON file. Copy these files to an empty folder and then execute the GatewayService.MSI file. As you can see in below, the installer does not really require you to do much. You will have to accept the license agreement and then either provide a certificate or generate a self-signed certificate (which the installation wizard can do automatically).

Once the gateway software finishes installing, go back to the Azure portal and go to the dashboard. Now, click on the link that is associated with the computer that you want to manage. Azure will take you into the Server Management Tools, but you will see an error message stating that you need to enter your credentials. Click on the Manage As icon and then enter your domain credentials.
When I entered my domain credentials, I received an error message stating that the computer could not be managed. However, when I went back to the dashboard and clicked on the computer again, management began working correctly. As you can see in the screenshot below, Azure is providing basic performance data for the computer, and also provides me with some basic management tools.

Microsoft makes the deployment of the Server Management Tools relatively painless. You do have to set up a separate connection for each server that you want to manage, so at least for right now this technique is not practical for large-scale management. However, you can use your gateway to manage multiple servers. You do not have to download a separate gateway installer package for each computer that you want to manage. Once the gateway is functional, you can use it to manage multiple systems.
If you would like to read the other parts in this series, please go to: