If you missed the previous articles in this series, please read:
- Deploying Vista – Part 1: Understanding the Windows AIK
- Deploying Vista – Part 2: Understanding Windows Setup and the Windows Imaging File Format
- Deploying Vista – Part 3: Understanding Configuration Passes
- Deploying Vista – Part 4: Understanding Deployment Scenarios
- Deploying Vista – Part 5: Using Sysprep
- Deploying Vista – Part 6: Using Windows SIM
- Deploying Vista – Part 7: Creating a Minimal Answer File
- Deploying Vista – Part 8: Unattended Install from DVD Method
- Deploying Vista – Part 9: Automating the Machine OOBE
- Deploying Vista – Part 10: Understanding the Windows Preinstallation Environment
- Deploying Vista – Part 11: Working with Windows PE
- Deploying Vista – Part 12: Understanding Image-Based Deployment
- Deploying Vista – Part 13: Performing Image-Based Deployment
- Deploying Vista – Part 14: Understanding Windows Deployment Services
- Deploying Vista – Part 15: Implementing Windows Deployment Services
- Deploying Vista – Part 17: Working With the Windows DS Image Store
- Deploying Vista – Part 18: Managing Windows Deployment Services
- Deploying Vista – Part 19: Managing Windows Deployment Services (Continued)
- Deploying Vista – Part 20: Working With Discover Images
- Deploying Vista – Part 21: Working With Capture Images
- Deploying Vista – Part 22: Deploying Images using Windows Deployment Services
- Deploying Vista – Part 23: Unattended Image Deployment Using Windows Deployment Services
- Deploying Vista – Part 24: Understanding Microsoft Deployment Toolkit
- Deploying Vista – Part 25: Preparing Microsoft Deployment Toolkit for Deploying Vista
- Deploying Vista – Part 26: Deploying Vista Using Microsoft Deployment Toolkit
- Deploying Vista – Part 27: Automating a Light Touch Installation
- Deploying Vista – Part 28: Configuring Distribution Shares
- Deploying Vista – Part 29: Configuring Distribution Shares (Continued)

In the previous article of this series we looked at the first two steps for implementing Windows DS in your networking environment. These two steps are:
-
Preparing your environment to make sure it meets the requirements for implementing Windows DS.
-
Installing the Windows DS role on one or more servers running Windows Server 2008.
In this present article, we’ll examine the final step for implementing Windows DS, namely:
-
Performing the initial configuration of the Windows DS servers you have deployed.
Step 3: Performing Initial Configuration of a Windows DS Server
Performing the initial configuration of your Windows DS server does several things including:
-
Creating the image store.
-
Configuring the PXE server settings.
As we’ll see later in a future article of this series, you can also further configure Windows DS server settings afterwards.
You can perform the initial configuration of a Windows DS server two ways:
-
Using the Windows Deployment Services Configuration Wizard.
-
Using the WDSUTIL command.
Let’s examine both of these approaches now.
Performing Initial Configuration Using the Windows Deployment Services Configuration Wizard
Figure 1 shows the Windows Deployment Services MMC console immediately after installing the Windows Deployment Services server role on a server named SEA-WDS belonging to the contoso.com domain. This MMC console and the WDSUTIL command-line utility are the two primary tools you use for configuring and working with Windows DS servers.
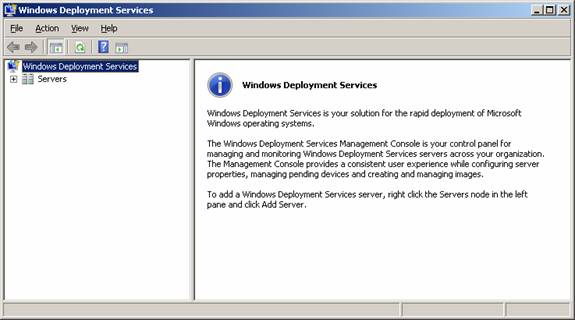
Figure 1: The Windows Deployment Services MMC console
To perform the initial configuration of your Windows DS server, expand the Servers node in the console tree and select the node beneath it that represents your Windows DS server (Figure 2).

Figure 2: Selecting your Windows DS server
Tip:
If you are running the Windows DS console from a different computer, right-click the Servers node and select Add Server to add the Windows DS server you want to administer.
Now right-click on your Windows DS server and select Configuration Server from the shortcut menu. This launches the Windows Deployment Services Configuration Wizard (Figure 3).
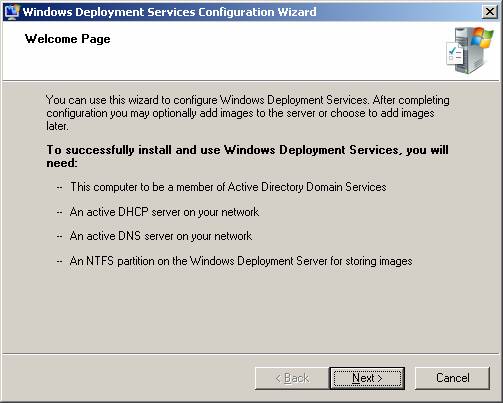
Figure 3: Launching the Windows Deployment Services Configuration Wizard
Clicking Next displays the Remote Installation Folder Location page of the wizard (Figure 4).

Figure 4: Remote Installation Folder Location page of the wizard
This page of the wizard lets you specify the location for your server’s image store. The image store (or image repository) is where you will store your boot images, install images, and other types of files that may be needed when deploying Vista onto bare-metal destination computers. We’ll see how to populate the image store in the next article of this series.
By default, the wizard suggests the C:\RemoteInstall folder as the location for your image store, but for performance reasons it will be better if you specify a different partition on a separate hard drive. In this scenario, we’ll be using a folder named Images on a separate volume (W: drive) as our image store location (Figure 5).

Figure 5: Locating the image store on a separate drive
Note:
You cannot locate the image store at the root of a drive.
Clicking Next displays the PXE Server Initial Settings page of the wizard (Figure 6).

Figure 6: PXE Server Initial Settings page of the wizard
This page of the wizard lets you configure how your Windows DS server will respond to PXE-enabled bare-metal destination computers when you boot those computers on to your network. You have three options you can select from on this page:
-
Do not respond to any client computers – Choosing this option (which is the default) causes your Windows DS server to not respond to any computers when they boot up. In other words, your Windows DS server is “idling” when this setting is selected.
-
Respond only to known client computers – Choosing this option causes your server to only respond to “known” computers, that is, client computers for which you have already created (“pre-staged”) computer accounts in Active Directory. This option is useful if you want to prevent your Windows DS server from responding to unknown or “rogue” client computers, but it requires more preparation to set up.
-
Respond to all (known and unknown) client computers – Choosing this option causes your server to respond to any PXE-enabled computers on your network when they boot up. This is the simplest option to choose so we’ll select it for our scenario (Figure 7).

Figure 7: Configuring Windows DS to respond to any PXE-enabled client computers
Note:
If you select “Respond only to known client computers” you also have the option of selecting “For unknown clients, notify administrator and respond after approval” if desired. When this checkbox is selected, network boot requests from unknown client computers that PXE boot onto the network are placed in the pending queue and remain there until the request is approved, rejected, a time-out is reached, or the request is cancelled by the user. We’ll examine this option in more detail later in a future article of this series.
Once you have configured your PXE Server Initial Settings as desired, click Finish to complete the wizard and configure your server. Files will then be copied, settings applied, the image store is created, and the Windows Deployment Services service is started. A final wizard page will then be displayed, giving you the option of adding images to the store immediately (Figure 8). Instead of using this page however, we’ll clear this checkbox and add our images manually in the next article of this series.
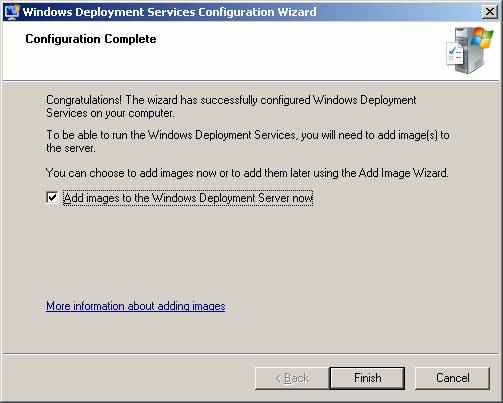
Figure 8: You have the option to add images immediately to the store
Once the wizard is finished, the initial configuration of your Windows DS server is complete. The Windows Deployment Services console now displays a logical folder hierarchy for the image store on your server (Figure 9).
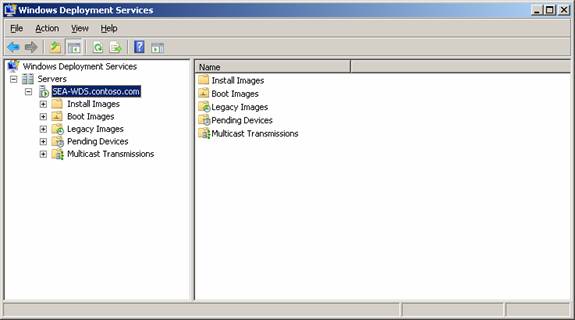
Figure 9: The Windows Deployment Services console showing the image store folders of a configured Windows DS server
Performing Initial Configuration Using the WDSUTIL Command
Advanced users can also perform the initial configuration of a Windows DS server from the command-line using the WDSUTIL utility. To perform the same initial configuration of your newly installed Windows DS server that we achieved using the wizard above, open a command prompt and run the following two commands:
WDSUTIL /Initialize-Server /reminst:”W:\Images”
WDSUTIL /Set-Server /AnswerClients:all
The first command above creates your image store in the Images folder on your W: drive, while the second command configures your server to respond to network boot requests from all computers, both known and unknown.
Tip:
If your Windows DS server is also your DHCP server, you will need to perform one additional configuration step by running the following command:
WDSUTIL /Set-Server /UseDHCPPorts:no /DHCPoption60:yes
Conclusion
This article and the previous one have walked you through the steps of implementing Windows Deployment Services in your networking environment and performing the initial configuration of your Windows DS server. Once this is done however, you are not yet ready to begin using Windows DS to deploy Windows Vista onto PXE-enabled bare-metal systems. Before you can begin deploying Vista, you still have to add boot and install images to your image store, configure the Windows DS client boot menu, and optionally perform other Windows DS configuration tasks. The next several articles of this series will walk you through these additional steps.
If you missed the previous articles in this series, please read:
- Deploying Vista – Part 1: Understanding the Windows AIK
- Deploying Vista – Part 2: Understanding Windows Setup and the Windows Imaging File Format
- Deploying Vista – Part 3: Understanding Configuration Passes
- Deploying Vista – Part 4: Understanding Deployment Scenarios
- Deploying Vista – Part 5: Using Sysprep
- Deploying Vista – Part 6: Using Windows SIM
- Deploying Vista – Part 7: Creating a Minimal Answer File
- Deploying Vista – Part 8: Unattended Install from DVD Method
- Deploying Vista – Part 9: Automating the Machine OOBE
- Deploying Vista – Part 10: Understanding the Windows Preinstallation Environment
- Deploying Vista – Part 11: Working with Windows PE
- Deploying Vista – Part 12: Understanding Image-Based Deployment
- Deploying Vista – Part 13: Performing Image-Based Deployment
- Deploying Vista – Part 14: Understanding Windows Deployment Services
- Deploying Vista – Part 15: Implementing Windows Deployment Services
- Deploying Vista – Part 17: Working With the Windows DS Image Store
- Deploying Vista – Part 18: Managing Windows Deployment Services
- Deploying Vista – Part 19: Managing Windows Deployment Services (Continued)
- Deploying Vista – Part 20: Working With Discover Images
- Deploying Vista – Part 21: Working With Capture Images
- Deploying Vista – Part 22: Deploying Images using Windows Deployment Services
- Deploying Vista – Part 23: Unattended Image Deployment Using Windows Deployment Services
- Deploying Vista – Part 24: Understanding Microsoft Deployment Toolkit
- Deploying Vista – Part 25: Preparing Microsoft Deployment Toolkit for Deploying Vista
- Deploying Vista – Part 26: Deploying Vista Using Microsoft Deployment Toolkit
- Deploying Vista – Part 27: Automating a Light Touch Installation
- Deploying Vista – Part 28: Configuring Distribution Shares
- Deploying Vista – Part 29: Configuring Distribution Shares (Continued)


