If you would like to read previous articles in this series, please go to:
- Deploying Windows 7 – Part 1: Windows AIK 2.0 Enhancements
- Deploying Windows 7 – Part 2: Using DISM
- Deploying Windows 7 – Part 3: Understanding MAP 4.0
- Deploying Windows 7 – Part 4: Using MAP 4.0
- Deploying Windows 7 – Part 5: MDT 2010 Enhancements
- Deploying Windows 7 – Part 6: Light Touch using MDT 2010
- Deploying Windows 7 – Part 7: Automated LTI Deployment
- Deploying Windows 7 – Part 8: Understanding LTI Configuration Files
- Deploying Windows 7 – Part 9: Deploying 32-bit vs. 64-bit Windows
- Deploying Windows 7 – Part 10: Capturing and Deploying an Image of a Reference Computer
- Deploying Windows 7 – Part 11: Capturing an Existing Installation
- Deploying Windows 7 – Part 12: Planning for Application Compatibility
- Deploying Windows 7 – Part 13: Manual Migration from Windows XP to Windows 7
- Deploying Windows 7 – Part 14: Automated Migration from XP
- Deploying Windows 7 – Part 15: Configuring the MDT Database
- Deploying Windows 7 – Part 17: Deploying Applications Based on Make and Model
- Deploying Windows 7 – Part 18: Determining the UUID of a Computer
- Deploying Windows 7 – Part 19: Building a Custom WinPE Tools CD
- Deploying Windows 7 – Part 20: Securing MDT (Part 1)
- Deploying Windows 7 – Part 21: Securing MDT (Part 2)
- Deploying Windows 7 – Part 22: Bulk Populating the MDT Database Using PowerShell
- Deploying Windows 7 – Part 23: Managing Drivers – Introduction
- Deploying Windows 7 – Part 24: Managing Drivers – Issues and Approaches
- Deploying Windows 7 – Part 25: Managing Drivers – Selection Profiles
- Deploying Windows 7 – Part 26: Managing Drivers – By Make and Model
- Deploying Windows 7 – Part 27: Managing Drivers – Tips and Tricks
- Deploying Windows 7 – Part 28: Managing Software Updates
- Deploying Windows 7 – Part 29: Completing the LTI Deployment Infrastructure

Tip:
You can find more information about automating LTI deployment in the Windows 7 Resource Kit from Microsoft Press. I am the lead author for this Resource Kit and I also maintain the Unofficial Support Site for the Windows 7 Resource Kit where you will find the latest updates and other useful information.
In the previous article of this series you learned how to create and configure the MDT database using Microsoft SQL Server 2008 Express. In this article and ones following we will examine how to use the MDT database to customize how Windows 7 is deployed based on the properties of the target computers, their intended roles, their locations, and their make/model. This present article focuses on the first method, that is, customizing how Windows 7 is deployed based on the properties of the target computer.
Configuring MDT Database Rules
As explained in the previous article of this series, the MDT database lets you store many of the configuration settings used for customizing deployment in a single, central database. These configuration settings are essentially the same as those that can be stored in the CustomSettings.ini file, and using the database allows you to have only one, generic CustomSettings.ini file while the remaining settings are stored in the database. Furthermore, by using the MDT database you can often perform all of your deployments using only a handful of images (such as x86 client, x64 client and x64 server) and only two task sequences (Standard Client and Standard Server). Clearly, being able to understand and use the MDT database is an essential key for simplifying Lite Touch (LTI) deployments.
Let us begin by picking up where we left off from the previous article in this series where you learned how to create the MDT database in SQL Server 2008 Express. Figure 1 shows the properties of the MDT database we created in that article:

Figure 1: Properties of MDT database created in previous article of this series
Let us also examine our CustomSettings.ini file again, which is configured to perform fully automated deployments of Windows 7 Enterprise edition (Figure 2):
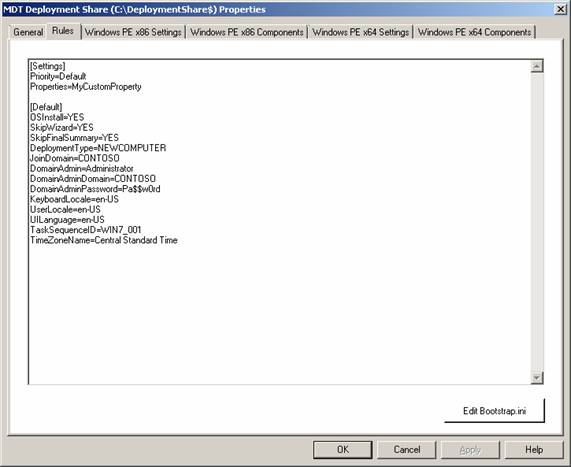
Figure 2: CustomSettings.ini file configuring MDT database rules
Now before we can use the MDT database to deploy Windows 7 based on the properties, intended roles, locations or make/model of our target computers, we need to configure our CustomSettings.ini file so that it can use settings we choose to store in this database. To do this, right-click on Database in the Deployment Workbench and select Configure Database Rules. This launches the Configure DB Wizard, which is a bit of a misnomer because it does not configure the database but instead configures your CustomSettings.ini file by adding additional rules to it so that MDT can query the database during deployment. The first screen of this wizard enables MDT to query the database for computer-specific settings and for roles, applications, packages and administrators assigned to the computer (Figure 3):

Figure 3: Enabling MDT to query the database using computer options
Note that for each item selected in this wizard, MDT will use a script to perform the corresponding database query. That means the more items you select, the more queries will be performed and the longer it will take to perform the deployment. This added delay happens right after logging into the Windows Deployment Wizard using the credentials you specified, that is, it happens during the beginning “blue screen” portion of the deployment. On the other hand, the more items you select in the wizard, the more options you will have later for customizing how your deployments can be performed. Personally, I simply recommend you leave all checkboxes selected in this wizard, which is what I’m doing here in this article.
The next wizard page enables MDT to query the database for location names based on default gateways, for location-specific settings, and for roles, applications, packages and administrators assigned to the location (Figure 4):

Figure 4: Enabling MDT to query the database using location options
The next wizard page enables MDT to query the database for model-specific settings, and for roles, applications, packages and administrators assigned to the specified make and model (Figure 5):

Figure 5: Enabling MDT to query the database using make/model options
The next wizard page enables MDT to query the database for role-specific settings, and for applications, packages and administrators assigned to the role (Figure 6):

Figure 6: Enabling MDT to query the database using role options
The next wizard page presents a summary of your selections – verify and complete the wizard. Now open the CustomSettings.ini file for your deployment share and examine the changes (Figure 7):
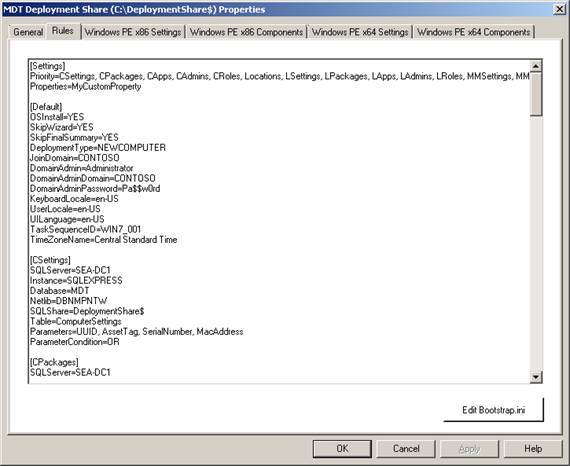
Figure 7: CustomSettings.ini file after configuring MDT database rules
The new sections in this file are parsed and actions taken in the order specified by the Priority= statement in the initial Settings section. For example, the first section used is CSettings, which queries the contents of the MDT database for computer-specific information concerning the target computer such as the computer’s Universally Unique Identifier (UUID), asset tag, serial number, or Media Access Control (MAC) address.
Customizing Deployment Based on the Target Computer’s MAC Address
To see how this works in practice, let us add a new entry to the MDT database that specifies the MAC address of a particular computer on our network so that MDT can install Windows 7 onto this computer and assign the computer a pre-specified computer name. In other words, we’re going to use the MDT database to identify a particular computer in our organization on which we want to perform a certain type of customized deployment of Windows 7 – this is the essence of what you can do using the MDT database. To do this, right-click on the Computers node in your database and select New to identify a particular computer you want to deploy to by adding a new record concerning the computer to your database (Figure 8):

Figure 8: Step 1 of identifying a particular computer on which you want to perform a customized deployment of Windows 7
In the Properties sheet that opens up for the computer you are going to define in the database, type the MAC address for the computer (Figure 9). The MAC address for the computer can be determined by using Ipconfig (if the computer already has an operating system installed) and possibly also from its accompanying documentation or by using a network card configuration utility that might have been included with the computer’s documentation.
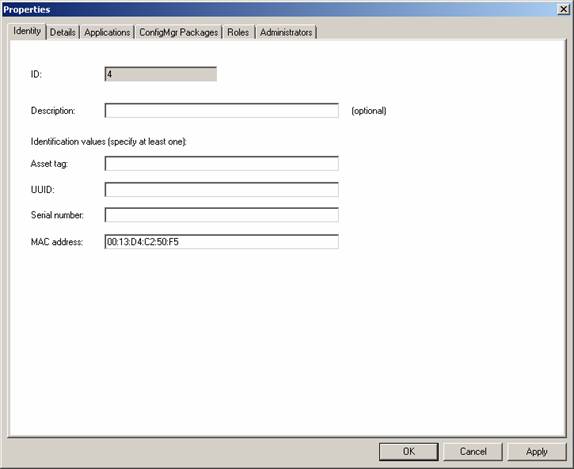
Figure 9: Step 2 of identifying a particular computer on which you want to perform a customized deployment of Windows 7
Tip:
The MAC address must be specified in the format XX:XX:XX:XX:XX:XX. If you use any other format such as XX-XX-XX-XX-XX-XX, MDT will flash a red exclamation point icon, and hovering your mouse pointer over this icon will display a tip telling you the mistake you made. So watch out for these flashing red exclamation point icons!
Now let us indicate what type of customization will be performed when Windows 7 is deployed to the computer having this particular MAC address. To do this, select the Details tab, scroll down to the Identification section, and type SEA-DESK-299 as the value for the OSDComputerName property (Figure 10). Note that you must use the OSCComputerName property for doing this – the ComputerName property several lines above this is deprecated and should not be used.
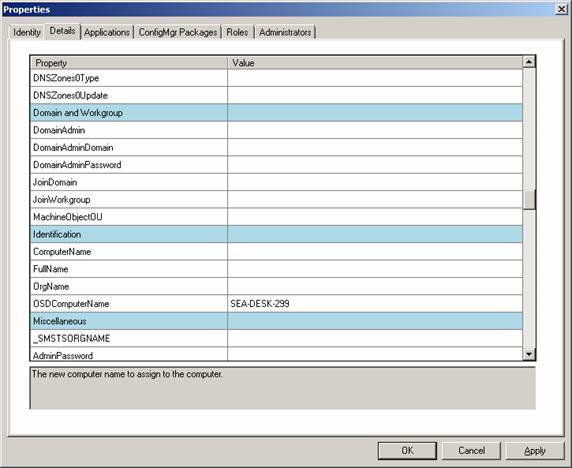
Figure 10: Step 3 of identifying a particular computer on which you want to perform a customized deployment of Windows 7
Click OK to close the Properties sheet and create the new record in the MDT database. The result is shown in Figure 11:
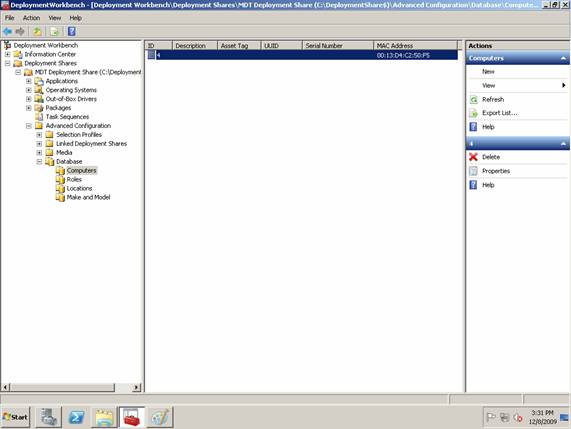
Figure 11: A new record has been created in the MDT database that identifies a computer and allows deployment to be customized for this computer
Now when we boot the computer having this MAC address using my LiteTouch_x64 CD, the computer boots to Windows PE, connects to MDT and the database is queried and the record returned. MDT then uses CustomSettings.ini together with the results of the query to install Windows 7 on the computer and configure the computer’s name as we intended, which can be verified by opening the System properties on the computer after MDT finishes the install (Figure 12):

Figure 12: Verifying that the computer has been named SEA-DESK-299 as specified in the MDT database
Customizing Deployment Based on the Target Computer’s UUID
As a second example, we can also use MDT to customize how Windows 7 is deployed based on the UUID of the target computer. The UUID of a computer (sometimes called the computer’s Globally Unique Identifier or GUID) is a hexadecimal string of the form XXXXXXXX-XXXX-XXXX-XXXX-XXXXXXXXXXXX that may be listed on a label on the outside of the computer’s case or on a label inside the case. It may also be specified in the BIOS settings or displayed by the BIOS when the computer is starting up. If none of these helps and you already have a Windows operating system installed on the computer, you can use the following Windows Management Instrumentation (WMI) script that I wrote which lists the computer’s UUID along with other information gleaned from the Win32_ComputerSystemProduct WMI class:
' DisplayClassProperties.vbs
' Used to find the UUID of a specific desktop computer
' By Mitch Tulloch (www.mtit.com)
Option Explicit
On Error Resume Next
Dim strComputer
Dim strWMINamespace
Dim strWMIQuery
Dim objWMIService
Dim colItems
Dim objItem
strComputer = "."
strWMINamespace = "\root\CIMV2"
strWMIQuery = ":Win32_ComputerSystemProduct.IdentifyingNumber='MXG5380254 NA540',Name='PY196AV-ABA a1130e',Version='0n31211CT101AMBEM00'"
Set objWMIService = GetObject("winmgmts:\\" & strComputer & strWMINamespace & strWMIQuery)
WScript.Echo "Number of properties of " & strWMIQuery & " class is " & objWMIService.Properties_.count
For Each objItem in objWMIService.Properties_
   Wscript.Echo "Property: " & objItem.name & vbTab & "Value: " & objItem.value
Next
Note that you’ll have to customize the following line for your particular computer before the script can work:
strWMIQuery = ":Win32_ComputerSystemProduct.IdentifyingNumber='MXG5380254 NA540',Name='PY196AV-ABA a1130e',Version='0n31211CT101AMBEM00'"
Specifically, you’ll need to use wbemtest.exe to determine how to modify the above line for a particular computer. To learn how to do this, see the earlier article by me on WindowsNetworking.com called Managing Windows Networks Using Scripts – Part 13: A Handy Return-All-Values Script.
For example, when I run cscript DisplayClassProperties.vbs on a particular computer where the line identified has been customized appropriately, the results returned look like this:
Microsoft (R) Windows Script Host Version 5.8
Copyright (C) Microsoft Corporation. All rights reserved.
Number of properties of :Win32_ComputerSystemProduct.IdentifyingNumber='MXG5380254 NA540',Name='PY196AV-ABA a1130e',Version='0n31211CT101AMBEM00' class is 8
Property: Caption            Value: Computer System Product
Property: Description        Value: Computer System Product
Property: IdentifyingNumber  Value: MXG5380254 NA540
Property: Name               Value: PY196AV-ABA a1130e
Property: SKUNumber          Value:
Property: UUID Value: 843E4800-986A-1010-9814-8CFE95F168A8
Property: Vendor             Value: HP Pavilion 061
Property: Version            Value: 0n31211CT101AMBEM00
From the above script output you can see that this particular computer’s UUID is 843E4800-986A-1010-9814-8CFE95F168A8. Now, if I create a new Computer record in the MDT database that specifies this UUID, I can perform a customized deployment of Windows 7 to this particular computer in a similar way as if I had specified the MAC address of the computer.
If you would like to read previous articles in this series, please go to:
- Deploying Windows 7 – Part 1: Windows AIK 2.0 Enhancements
- Deploying Windows 7 – Part 2: Using DISM
- Deploying Windows 7 – Part 3: Understanding MAP 4.0
- Deploying Windows 7 – Part 4: Using MAP 4.0
- Deploying Windows 7 – Part 5: MDT 2010 Enhancements
- Deploying Windows 7 – Part 6: Light Touch using MDT 2010
- Deploying Windows 7 – Part 7: Automated LTI Deployment
- Deploying Windows 7 – Part 8: Understanding LTI Configuration Files
- Deploying Windows 7 – Part 9: Deploying 32-bit vs. 64-bit Windows
- Deploying Windows 7 – Part 10: Capturing and Deploying an Image of a Reference Computer
- Deploying Windows 7 – Part 11: Capturing an Existing Installation
- Deploying Windows 7 – Part 12: Planning for Application Compatibility
- Deploying Windows 7 – Part 13: Manual Migration from Windows XP to Windows 7
- Deploying Windows 7 – Part 14: Automated Migration from XP
- Deploying Windows 7 – Part 15: Configuring the MDT Database
- Deploying Windows 7 – Part 17: Deploying Applications Based on Make and Model
- Deploying Windows 7 – Part 18: Determining the UUID of a Computer
- Deploying Windows 7 – Part 19: Building a Custom WinPE Tools CD
- Deploying Windows 7 – Part 20: Securing MDT (Part 1)
- Deploying Windows 7 – Part 21: Securing MDT (Part 2)
- Deploying Windows 7 – Part 22: Bulk Populating the MDT Database Using PowerShell
- Deploying Windows 7 – Part 23: Managing Drivers – Introduction
- Deploying Windows 7 – Part 24: Managing Drivers – Issues and Approaches
- Deploying Windows 7 – Part 25: Managing Drivers – Selection Profiles
- Deploying Windows 7 – Part 26: Managing Drivers – By Make and Model
- Deploying Windows 7 – Part 27: Managing Drivers – Tips and Tricks
- Deploying Windows 7 – Part 28: Managing Software Updates
- Deploying Windows 7 – Part 29: Completing the LTI Deployment Infrastructure


Mitch, this guide has been the gold standard for assistance in MDT setup since you wrote it. It’s how I remember your name. Thank you for writing it.
Due to a change in positions, I haven’t used MDT in 8 years. I’m now setting the database up again and struggling. I suspect it is because this new instance (setup by someone else) has MDT and SQL Server Express on a server together — but the deployment share is on a network drive. So it takes about 5 minutes for database querying to start after I boot to a USB key … but I don’t know if it’s actually querying. When it starts processing the Rules it takes another 10 minutes. I can deploy an OS but nothing stored in the database (Roles, Computer Name, etc). After and OS finished being deployed I get the yellow screen with errors.
Error – Unable to map a network drive to \\MDT19\Depshare. “Unable to establish database connection using [CROLES] properties. The network name cannot be found.”
Well, the deployment share is not at \\MDT19\Depshare. MDT and SQL Server Express are on MDT19 but the Deployment Share is at \\NetworkName\Depshare. Is there something I can do to correct this? Thank you in advance!