If you would like to read previous articles in this series, please go to:
- Deploying Windows 7 – Part 1: Windows AIK 2.0 Enhancements
- Deploying Windows 7 – Part 2: Using DISM
- Deploying Windows 7 – Part 3: Understanding MAP 4.0
- Deploying Windows 7 – Part 4: Using MAP 4.0
- Deploying Windows 7 – Part 5: MDT 2010 Enhancements
- Deploying Windows 7 – Part 6: Light Touch using MDT 2010
- Deploying Windows 7 – Part 7: Automated LTI Deployment
- Deploying Windows 7 – Part 8: Understanding LTI Configuration Files
- Deploying Windows 7 – Part 9: Deploying 32-bit vs. 64-bit Windows
- Deploying Windows 7 – Part 10: Capturing and Deploying an Image of a Reference Computer
- Deploying Windows 7 – Part 11: Capturing an Existing Installation
- Deploying Windows 7 – Part 12: Planning for Application Compatibility
- Deploying Windows 7 – Part 13: Manual Migration from Windows XP to Windows 7
- Deploying Windows 7 – Part 14: Automated Migration from XP
- Deploying Windows 7 – Part 15: Configuring the MDT Database
- Deploying Windows 7 – Part 16: Using the MDT Database
- Deploying Windows 7 – Part 17: Deploying Applications Based on Make and Model
- Deploying Windows 7 – Part 18: Determining the UUID of a Computer
- Deploying Windows 7 – Part 19: Building a Custom WinPE Tools CD
- Deploying Windows 7 – Part 20: Securing MDT (Part 1)
- Deploying Windows 7 – Part 21: Securing MDT (Part 2)
- Deploying Windows 7 – Part 23: Managing Drivers – Introduction
- Deploying Windows 7 – Part 24: Managing Drivers – Issues and Approaches
- Deploying Windows 7 – Part 25: Managing Drivers – Selection Profiles
- Deploying Windows 7 – Part 26: Managing Drivers – By Make and Model
- Deploying Windows 7 – Part 27: Managing Drivers – Tips and Tricks
- Deploying Windows 7 – Part 28: Managing Software Updates
- Deploying Windows 7 – Part 29: Completing the LTI Deployment Infrastructure

Tip:
You can find more information about automating LTI deployment in the Windows 7 Resource Kit from Microsoft Press. I am the lead author for this Resource Kit and I also maintain the Unofficial Support Site for the Windows 7 Resource Kit with answers to questions posted by readers, as well as links to the latest resources on Windows 7 deployment, administration and troubleshooting.
In previous articles of this series we have examined how to configure and use the MDT database for Lite Touch deployments. For example, in article 16 we saw how you can use the Deployment Workbench to add new target computers to the database so you can customize deployment of Windows 7 based on the MAC address or UUID of each target computer. Doing this manually using the Deployment Workbench is tedious however—what if you have dozens or hundreds of computers you want to add to the database?
That’s where Windows PowerShell can be useful since it allows you to write scripts to automate tedious administrative tasks. While MDT 2010 now includes built-in PowerShell support, it doesn’t include cmdlets for manipulating the MDT database. However, Michael Niehaus the developer of MDT has created a separate PowerShell module you can use to add PowerShell support for manipulating the MDT database. This article shows how to import this module and use PowerShell to take a spreadsheet of target computer information and bulk import this information into the MDT database as new computer items.
Note:
This article assumes that you’re a PowerShell beginner with only minimal prior experience writing PowerShell scripts but with a bit of other programming experience.
Installing the PowerShell Module for MDT
Begin by downloading the compressed PowerShell module file named MDTDB.zip from this blog post by Michael Niehaus or by using this direct link. Right-click on the downloaded file, select Properties, and click Unblock. Then unzip the MDTDB.psm1 script file and copy it to a folder (here assumed to be C:\Scripts) on your MDT server.
Now open the PowerShell command shell and type Get-ExecutionPolicy to view the current execution policy on your server (see here for more information):

Figure 1: Viewing the current execution policy
If the current execution policy is Restricted, the MDTDB.psm1 script won’t run, so use the Set-ExecutionPolicy Unrestricted command to change the execution policy to Unrestricted like this:

Figure 2: Changing the execution policy to Unrestricted.
Now type Import-Module –name C:\Scripts\MDTDB.psm1 to add the MDT PowerShell module to the current PowerShell session as shown here:

Figure 3: Importing the MDT PowerShell module.
Note that the output from running the Import-Module command lists all the new PowerShell cmdlets we now have available for manipulating the MDT database. For example, in the figure above you can see the New-MDTComputer cmdlet which we’ll be using later in this article to add new computers to the database.
To verify that the module has been imported, type Get-Module as shown here:

Figure 4: Verifying that the module has been imported
Connecting to the MDT Database
Now we need to connect our PowerShell session to the MDT database. To do this, we will use the Connect-MDTDatabase cmdlet. To view the syntax for this cmdlet, type Get-Help Connect-MDTDatabase as shown here:

Figure 5: Viewing the syntax for Connect-MDTDatabase
Tip:
You can also find out more about using this cmdlet from Michael’s blog post.
To connect to a MDT database named MDT on a SQL Server instance named SQLEXPRESS on a MDT server named SEA-MDT-01, type this command:
Connect-MDTDatabase –sqlServer SEA-MDT-01 –instance SQLEXPRESS –database MDT
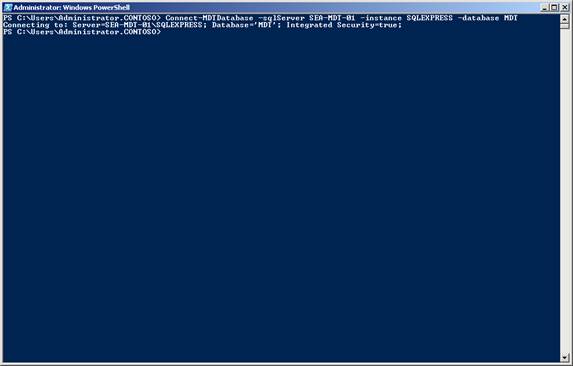
Figure 6: Connecting to the MDT database
Working with Computer Items
Let us begin by seeing whether there are already any computer items in the MDT database. To do this, we are going to use the Get-MDTComputer cmdlet, so let us use Get-Help to view the syntax for this cmdlet:

Figure 7: Viewing the syntax for Get-MDTComputer
To list all existing computer items in the database, simply type Get-MDTComputer like this:

Figure 8: Listing computers in the MDT database
The Get-MDTComputer cmdlet shows that there is one computer item in the database and that this computer item has a MAC address of EE:EE:EE:FF:FF:FF and ID number 2. The ID number is the key field for computer items. In other words, each computer item in the database will have a unique ID number.
If we open the Deployment Workbench we can see this computer item:

Figure 9: Viewing a computer item using the Workbench
We could delete this computer item using the Workbench, but let’s do this using PowerShell instead. If desired type Get-Help Remove-MDTComputer to display the syntax for deleting computer items. then type Remove-MDTComputer –id 2 –verbose to delete the computer item and display verbose details concerning the operation:

Figure 10: Removing a computer item from the database
Importing Computers into the Database
Now let us bulk import some computers into the database. Begin by creating an Excel spreadsheet with various columns for the name, UUID, MAC address and other properties of these computers. Each row of the spreadsheet will correspond to a single computer. For this walkthrough I’ve created a spreadsheet of a few computers in my lab:

Figure 11: Create a spreadsheet for your target computers
Now export this spreadsheet as a comma-delimited (CSV) text file (named C:\Data\machines.txt) which you can open in Notepad to view:

Figure 12: CSV file for target computers
Now use Import-Csv cmdlet to import the CSV file and assign it to the variable $machines like this:
$machines = Import-Csv C:\Data\machines.txt

Figure 13: Importing the CSV file into a variable
Typing $machines displays the imported information, which is stored as an array:

Figure 14: The computer information is stored as an array
You can type $machines.count to display the number of elements in this array:

Figure 15: The array has 3 elements, one for each computer
To display the first element of the array, you can type $machines[0] like this:
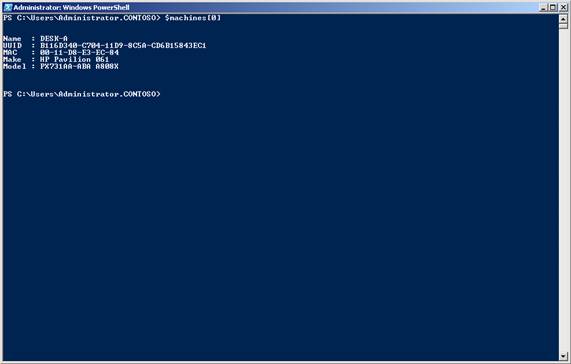
Figure 16: Displaying the first element of the array
As you can see from the figure above, the first element of the array contains the information about the first computer. To display only the name of this computer, type $machines[0].name like this:
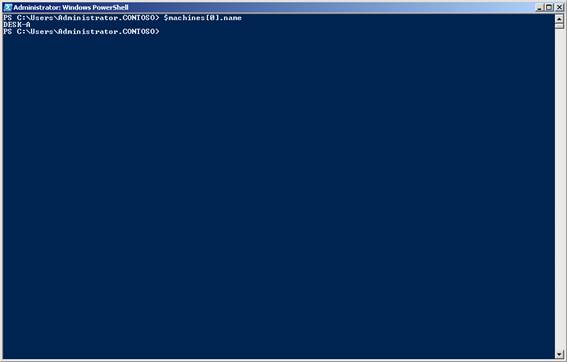
Figure 17: Displaying the name of the first computer
Adding the Imported Computers to the Database
Now that we know a bit about manipulating arrays, we are ready to import the information stored in the array variable $machines into our MDT database. To do this, we are going to be using the New-MDTComputer cmdlet so let’s display the syntax for this cmdlet:

Figure 18: View the syntax for New-MDTComputer
Remember from article 16 that computer items must be uniquely identified in the database using one (or more) of the following fields:
- Universally Unique Identifier (UUID)
- Asset tag
- Serial number
- MAC address
Let us add a computer item for the first computer in our spreadsheet using its MAC address as the identifier. To do this, we type the following command:
New-MDTComputer –macAddress $machines[0].mac –settings @{OSInstall=’YES’}
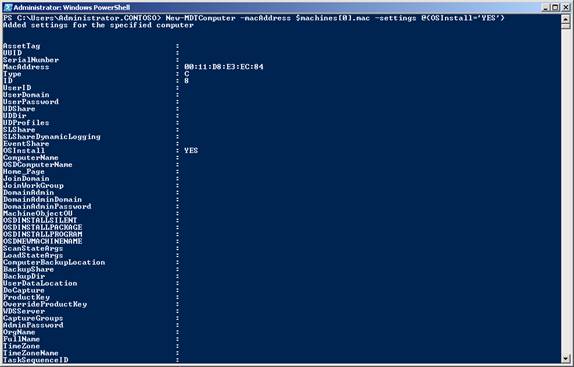
Figure 19: Adding the first computer to the database using its MAC address as identifier
Close and re-open the Workbench to refresh it and you should see the new computer item:

Figure 20: The new computer item has been added to the database
If you double-click on this computer item you can display its properties:
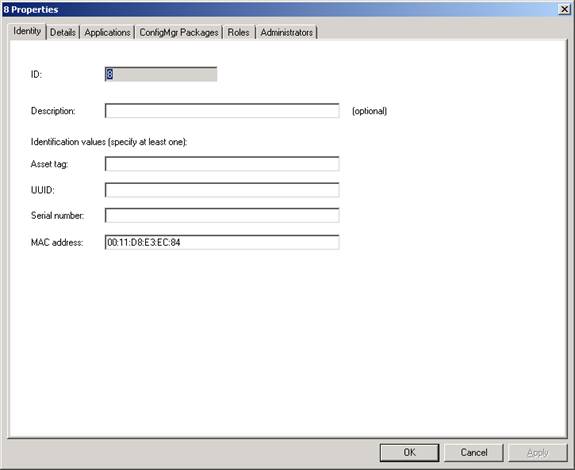
Figure 21: Properties of the new computer item
Selecting the Details tab shows that the OSinstall property has been set to YES as expected:

Figure 22: Detailed properties of the new computer item
However, note in the figure above that the OSDComputerName property of the new computer item has no value. The OSDComptuerName property specifies the name you want MDT to assign to the target computer, and if you refer back to Figure 11 you will see that we wanted this property set to DESK-A for this particular computer.
Let us see how to add a new computer to the database while also specifying the computer’s name. To show how to do this, let’s add a computer item for the second computer in our spreadsheet using its MAC address as the identifier and also specifying its name (which as you can see from the previous Figure 11 should be DESK-B). To do this, we type the following command:
New-MDTComputer –macAddress $machines[1].mac –settings @{OSInstall=’YES’;OSDComputerName=$machines[1].name}
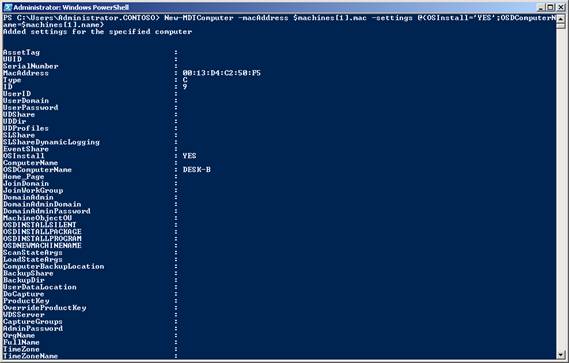
Figure 23: Adding the second computer to the database using its MAC address as identifier and specifying the computer’s name
If you close and reopen the Workbench, open the properties for the new computer, and select the Details tab, you can see that this time the OSDComputerName property has the expected value DESK-B assigned to it:

Figure 24: Detailed properties of the new computer item
Let us try one more example and add a computer item for the third computer in our spreadsheet using its MAC address as the identifier while also specifying the computer name, organization name, and user’s full name. To do this, we’ll type a single PowerShell command but continue it across several lines to make it more readable:
New-MDTComputer –macAddress $machines[2].mac –settings @{
OSInstall=’YES’;
OSDComputerName=$machines[2].name;
FullName=’Michael Allen’;
OrgName=’Contoso Ltd.’}

Figure 25: Adding the third computer to the database with several properties being specified
Note that in PowerShell you do not have to use any special line continuation character if the command breaks across an array specified by curly braces.
Close and reopen the Workbench, open the properties for the new computer, and select the Details tab to see that the expected properties have been configured:

Figure 26: Detailed properties of the new computer item
Bulk Creation of Computer Items in the Database
We now know how to use a single PowerShell command to create a new computer item in the MDT database and configure various properties of that item. Now let’s see how we can use a script to automate this process so we can bulk create lots of computers in the database in one step.
First, instead of typing separate commands to create each computer in the database, let’s use a For loop to iterate through the elements of the $machines array like this:
For ($i=1; $i -le $machines.count; $i++)
{
New-MDTComputer -macAddress $machines[$i-1].mac -settings @{ OSInstall=’YES’; OSDComputerName=$machines[$i-1].name;}
}

Figure 27: Using a For loop to add computers to the database
Note that the loop does not execute until you finish typing the closing brace—you do not need to use any line continuation characters like in VBScript.
The result of running this command can be seen by opening the Workbench:

Figure 28: Three computer items have been created using a single command
Now let’s turn all this into a script that does the following:
- Installs the MDT PowerShell module
- Connects to the MDT database
- Imports the CSV file of target computer info
- Creates computer items in the database including the names of the computers and the organization name Contoso Ltd.
To do this, type the following PowerShell script into Notepad:
Import-Module –name C:\Scripts\MDTDB.psm1
Connect-MDTDatabase –sqlServer SEA-MDT-01 –instance SQLEXPRESS –database MDT
$machines = Import-Csv C;\Data\machines.txt
For ($i=1; $i -le $machines.count; $i++)
{
New-MDTComputer -macAddress $machines[$i-1].mac -settings @{
OSInstall=’YES’;
OSDComputerName=$machines[$i-1].name;
OrgName=’Contoso Ltd.’
}
}
Now save this text file as Create.ps1 since PowerShell scripts must have the .ps1 file extension. Open the Workbench and delete any existing computer items in the database, then close the Workbench.
Now browse to your Create.ps1 file, right-click on it and select Run With PowerShell. The PowerShell command shell will be displayed for a moment and then will close. As an alternative to double-clicking on the .ps1 file, you can open the PowerShell command shell, change to the directory where the Create.ps1 file is located, and type Create.ps1 to run your script.
Now open the Workbench and you should see your new computer items. We’ve achieved our goal of being able to populate the MDT database with multiple computer items in one step.
Here’s a bonus for you. Administrators often want to name computers using some standard naming convention, and let’s say we want to name these three computers SEA-CLI-001, SEA-CLI-002 and SEA-CLI-003 instead of DESK-A, DESK-B and DESK-E. We can do this by modifying the above script with a bit of fancy string manipulation as follows:
Import-Module –name C:\Scripts\MDTDB.psm1
Connect-MDTDatabase –sqlServer SEA-MDT-01 –instance SQLEXPRESS –database MDT
$machines = Import-Csv C;\Data\machines.txt
For ($i=1; $i -le $machines.count; $i++)
{
$n = “{0:D3}” -f $i
New-MDTComputer -macAddress $machines[$i-1].mac -settings @{
OSInstall=’YES’;
OSDComputerName=’SEA-CLI-‘ + $n
OrgName=’Contoso Ltd.’
}
}
Save this script as Create2.ps1 and then run the script. When you example the Details tab of the properties of the computer items created by the script, you’ll see that the computers are named using the specified naming convention:
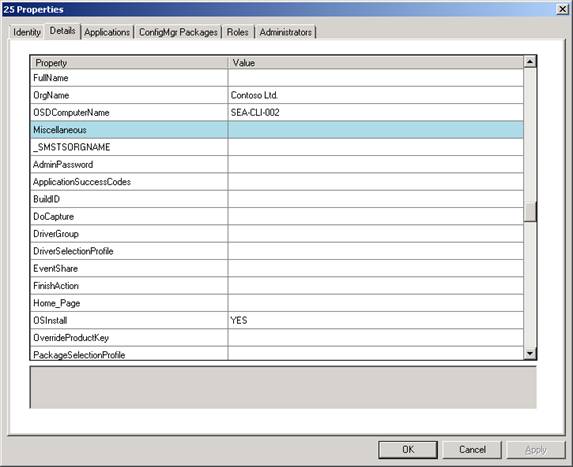
Figure 29: Creating computer items using a naming convention
Additional Resources
There are lots of good PowerShell resources out there, but for beginners I recommend you check out Chapter 13 of the Windows 7 Resource Kit which has a good introductory tutorial written by Ed Wilson a.k.a. The Scripting Guy.
If you would like to read previous articles in this series, please go to:
- Deploying Windows 7 – Part 1: Windows AIK 2.0 Enhancements
- Deploying Windows 7 – Part 2: Using DISM
- Deploying Windows 7 – Part 3: Understanding MAP 4.0
- Deploying Windows 7 – Part 4: Using MAP 4.0
- Deploying Windows 7 – Part 5: MDT 2010 Enhancements
- Deploying Windows 7 – Part 6: Light Touch using MDT 2010
- Deploying Windows 7 – Part 7: Automated LTI Deployment
- Deploying Windows 7 – Part 8: Understanding LTI Configuration Files
- Deploying Windows 7 – Part 9: Deploying 32-bit vs. 64-bit Windows
- Deploying Windows 7 – Part 10: Capturing and Deploying an Image of a Reference Computer
- Deploying Windows 7 – Part 11: Capturing an Existing Installation
- Deploying Windows 7 – Part 12: Planning for Application Compatibility
- Deploying Windows 7 – Part 13: Manual Migration from Windows XP to Windows 7
- Deploying Windows 7 – Part 14: Automated Migration from XP
- Deploying Windows 7 – Part 15: Configuring the MDT Database
- Deploying Windows 7 – Part 16: Using the MDT Database
- Deploying Windows 7 – Part 17: Deploying Applications Based on Make and Model
- Deploying Windows 7 – Part 18: Determining the UUID of a Computer
- Deploying Windows 7 – Part 19: Building a Custom WinPE Tools CD
- Deploying Windows 7 – Part 20: Securing MDT (Part 1)
- Deploying Windows 7 – Part 21: Securing MDT (Part 2)
- Deploying Windows 7 – Part 23: Managing Drivers – Introduction
- Deploying Windows 7 – Part 24: Managing Drivers – Issues and Approaches
- Deploying Windows 7 – Part 25: Managing Drivers – Selection Profiles
- Deploying Windows 7 – Part 26: Managing Drivers – By Make and Model
- Deploying Windows 7 – Part 27: Managing Drivers – Tips and Tricks
- Deploying Windows 7 – Part 28: Managing Software Updates
- Deploying Windows 7 – Part 29: Completing the LTI Deployment Infrastructure


