If you would like to read previous articles in this series, please go to:
- Deploying Windows 7 – Part 1: Windows AIK 2.0 Enhancements
- Deploying Windows 7 – Part 2: Using DISM
- Deploying Windows 7 – Part 3: Understanding MAP 4.0
- Deploying Windows 7 – Part 4: Using MAP 4.0
- Deploying Windows 7 – Part 5: MDT 2010 Enhancements
- Deploying Windows 7 – Part 6: Light Touch using MDT 2010
- Deploying Windows 7 – Part 7: Automated LTI Deployment
- Deploying Windows 7 – Part 8: Understanding LTI Configuration Files
- Deploying Windows 7 – Part 9: Deploying 32-bit vs. 64-bit Windows
- Deploying Windows 7 – Part 10: Capturing and Deploying an Image of a Reference Computer
- Deploying Windows 7 – Part 11: Capturing an Existing Installation
- Deploying Windows 7 – Part 12: Planning for Application Compatibility
- Deploying Windows 7 – Part 13: Manual Migration from Windows XP to Windows 7
- Deploying Windows 7 – Part 14: Automated Migration from XP
- Deploying Windows 7 – Part 15: Configuring the MDT Database
- Deploying Windows 7 – Part 16: Using the MDT Database
- Deploying Windows 7 – Part 17: Deploying Applications Based on Make and Model
- Deploying Windows 7 – Part 18: Determining the UUID of a Computer
- Deploying Windows 7 – Part 19: Building a Custom WinPE Tools CD
- Deploying Windows 7 – Part 20: Securing MDT (Part 1)
- Deploying Windows 7 – Part 21: Securing MDT (Part 2)
- Deploying Windows 7 – Part 22: Bulk Populating the MDT Database Using PowerShell
- Deploying Windows 7 – Part 23: Managing Drivers – Introduction
- Deploying Windows 7 – Part 24: Managing Drivers – Issues and Approaches
- Deploying Windows 7 – Part 25: Managing Drivers – Selection Profiles
- Deploying Windows 7 – Part 27: Managing Drivers – Tips and Tricks
- Deploying Windows 7 – Part 28: Managing Software Updates
- Deploying Windows 7 – Part 29: Completing the LTI Deployment Infrastructure

Tip:
You can find more information about automating LTI deployment in the Windows 7 Resource Kit from Microsoft Press. I am the lead author for this Resource Kit and I also maintain the Unofficial Support Site for the Windows 7 Resource Kit with answers to questions posted by readers, as well as links to the latest resources on Windows 7 deployment, administration and troubleshooting.
In the last few articles of this series we have been discussing how to use MDT 2010 to manage out-of-box drivers needed for Lite Touch deployment. We have learned why drivers complicate deployment and have examined two approaches to managing drivers:
- The “let Windows decide” approach where you import all your out-of-box drivers into the Out-of-Box Drivers folder of your deployment share and then let PnP enumeration on the target computers decide which drivers need to be downloaded from the deployment share and installed.
- The “let me decide” approach where you exercise control over which drivers are installed by creating a hierarchical folder structure within your deployment share to contain the different drivers needed for each deployment scenario.
The “let Windows decide” approach has the advantage of simplicity, but in order to make it work you need to build a deployment test lab with one of every type of make and model of computer in your production environment. Then every time you add a new or updated driver to the Out-of-Box Drivers folder of your deployment share, you need to retest deploying to every make and model to make sure the new or updated driver doesn’t cause problems with existing hardware. So the “let Windows decide” approach is easy to set up but can involve a lot of ongoing maintenance.
The “let me decide” approach on the other hand is more work to set up, especially if you create a complex folder structure and use lots of selection profiles and task sequences to manage how drivers are deployed to target computers. Once set up however, this approach can be easier to maintain in the long run since it can eliminate the kinds of problems that can occur when a computer ends up installing the wrong driver.
There’s a variation of the “let me decide” approach however that can make the job of managing drivers for your deployments even easier. This involves using driver groups instead of selection profiles, and that’s what this article is about.
Injecting Drivers by Make and Model
In the previous version MDT 2008 you could use driver groups to logically organize out-of-box drivers you import into your deployment share. For example, you could create one driver group for mass storage drivers, another for Windows PE images, and so on. Then you could associate a particular driver group with a particular task sequence to control which drivers get deployed using that task sequence.
In MDT 2010, you can’t create driver groups any longer using the Workbench because now you can create custom folders instead, which provide you with more flexibility that driver groups did previously. However, you can still define new driver groups using the DriverGroup property and use this property as a variable within your task sequence to control which drivers are deployed to a target computer based on the make and model of the computer.
Tip:
If you are unsure of the make/model of a particular computer, you can use the WMI script in Part 17 of this series to determine this information.
Here is how you can inject drivers during deployment based on the target computer’s make and model. Begin by creating a custom folder hierarchy beneath the Out-Of-Box Drivers folder of your deployment share that has a structure that looks like this:
Out-Of-Box Folders
Operating System
Make
Model
Model…
Make…
Operating System…
For example, for the last few articles we imagined a company that needed to deploy different versions of Windows to the following desktop systems:
- Dell Optiplex 580 systems that will need either Windows 7 x64 or Windows 7 x86 installed on them
- Dell Precision T3500 systems that will need Windows 7 x64 installed on them
- Hewlett-Packard Pro 3015 Microtower systems that will need either Windows 7 x64, Windows 7 x86 or Windows XP SP3 installed on them.
Figure 1 shows what the folder structure should look like for deploying Windows 7 x64 to these different systems:
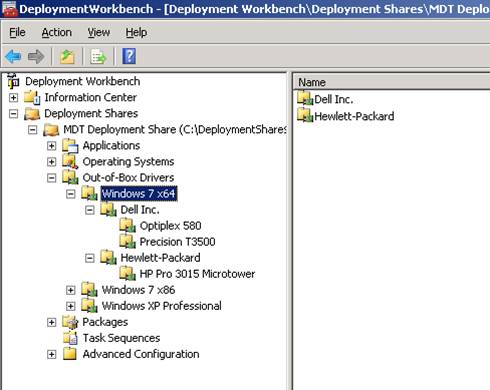
Figure 1: Folder structure for deploying Windows 7 x64 by Make and Model
You would also create similar folder structures beneath the Windows 7 x86 and Windows XP Professional folders. Then you import the necessary out-of-box drivers for each system into the appropriate folder once you’ve obtained these drivers from each vendor’s website. The result will look something like this (Figure 2):
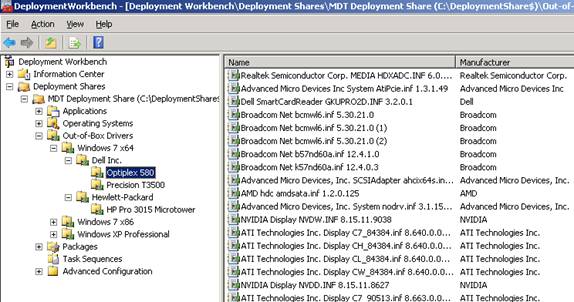
Figure 2: Imported out-of-box drivers for Dell Optiplex 580 systems
Now open the properties of the task sequence used for deploying Windows 7 x64 to target computers. Under the Preinstall task group, select the task named Configure that is just before the Inject Drivers task. Then click Add, select General, and select Set Task Sequence Variable as shown in Figure 3:
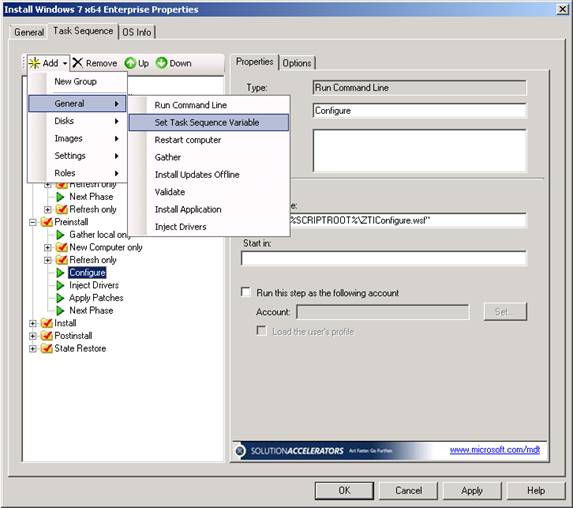
Figure 3: Create a task for setting a new task sequence variable just prior to the Inject Drivers task
Once the new Set Task Sequence Variable task has been created, specify DriverGroup001 as the name of the task sequence variable and assign this variable the value Windows 7 x64\%make%\%model% as shown in Figure 4:
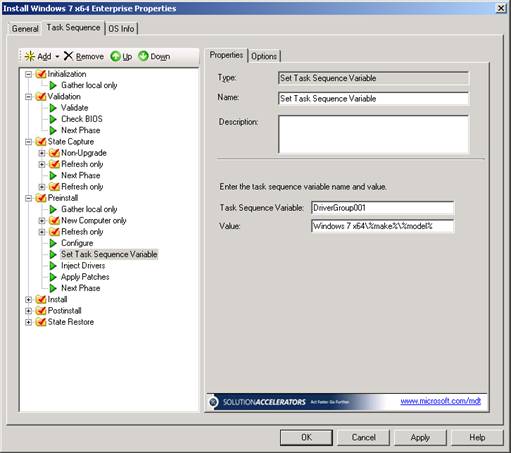
Figure 4: The new task sequence variable DriverGroup001 has the value Windows 7 x64\%make%\%model%
What happens when this task runs is that target computers whose Make is Dell Inc. and Model is Optiplex 580 have drivers in the folder Windows 7 x64\Dell Inc.\Optiplex 580 injected during deployment, computers whose Make is Dell Inc. and Model is Precision T3500 have drivers in the folder Windows 7 x64\Dell Inc.\Precision T3500 injected during deployment, and computers whose Make is Hewlett-Packard and Model is HP Pro 3015 Microtower have drivers in the folder Windows 7 x64\Hewlett-Packard\HP Pro 3015 Microtower injected during deployment. More accurately, only those drivers in these folders that PnP determines need to be injected are actually injected. But the bottom line is that using this approach, Dell Optiplex 580 systems cannot have Dell Precision T3500 or Hewlett-Packard Pro 3015 Microtower drivers injected by mistake. Each make and model system will receive only the drivers that are designed for it.
We’re not quite done however, because the next task Inject Drivers has the All Drivers selected by default, and MDT injects drivers based on the addition of the applicable driver group and selection profile. So if the driver group says only Dell Optiplex 580 drivers should be installed but the selection profile says all drivers should be installed, the result will be that all drivers are installed. Or more specifically, PnP will install drivers from the pool of all available drivers and not just those drivers designed for Dell Optiplex 580 systems, which means we’re back to the “let Windows decide” approach unless we can prevent the All Drivers selection profile from being applied. This is simple to do however, just select the Inject Drivers task in the Preinstall task group and change the selection profile from All Drivers to Nothing as shown in Figure 5:

Figure 5: Select the Nothing selection profile
Now if the driver group says only Dell Optiplex 580 drivers should be installed and the selection profile says no drivers should be installed, the result will be that only Dell Optiplex 580 drivers are installed, which is just what we want.
The key to making this approach work is that the custom folders you create for Make and Model must exactly match the Win32_ComputerSystem WMI class properties Manufacturer and Model respectively for each system. In the example above, the folder named Dell Inc. matches the Manufacturer property for the two systems, but older Dell computers might return Dell Computer Corporation or Dell Computer Corp. or some other value when the Manufacturer property is queried using WMI and if you were deploying to those systems you would have to create additional folders using these names.
Finally, the reason this approach is easier to maintain in the long run is because when, for example, an updated driver is released for Dell Optiplex 580 systems, you import the driver into the Optiplex 580 folder and then you only need to perform one test deployment (to a Dell Optiplex 580 computer) in your deployment test lab to ensure the new driver does not cause problems with this type of system. Contrast this with the “let Windows decide” approach where each time you update even a single driver you need to perform test deployments to all of your different types of systems.
If you would like to read previous articles in this series, please go to:
- Deploying Windows 7 – Part 1: Windows AIK 2.0 Enhancements
- Deploying Windows 7 – Part 2: Using DISM
- Deploying Windows 7 – Part 3: Understanding MAP 4.0
- Deploying Windows 7 – Part 4: Using MAP 4.0
- Deploying Windows 7 – Part 5: MDT 2010 Enhancements
- Deploying Windows 7 – Part 6: Light Touch using MDT 2010
- Deploying Windows 7 – Part 7: Automated LTI Deployment
- Deploying Windows 7 – Part 8: Understanding LTI Configuration Files
- Deploying Windows 7 – Part 9: Deploying 32-bit vs. 64-bit Windows
- Deploying Windows 7 – Part 10: Capturing and Deploying an Image of a Reference Computer
- Deploying Windows 7 – Part 11: Capturing an Existing Installation
- Deploying Windows 7 – Part 12: Planning for Application Compatibility
- Deploying Windows 7 – Part 13: Manual Migration from Windows XP to Windows 7
- Deploying Windows 7 – Part 14: Automated Migration from XP
- Deploying Windows 7 – Part 15: Configuring the MDT Database
- Deploying Windows 7 – Part 16: Using the MDT Database
- Deploying Windows 7 – Part 17: Deploying Applications Based on Make and Model
- Deploying Windows 7 – Part 18: Determining the UUID of a Computer
- Deploying Windows 7 – Part 19: Building a Custom WinPE Tools CD
- Deploying Windows 7 – Part 20: Securing MDT (Part 1)
- Deploying Windows 7 – Part 21: Securing MDT (Part 2)
- Deploying Windows 7 – Part 22: Bulk Populating the MDT Database Using PowerShell
- Deploying Windows 7 – Part 23: Managing Drivers – Introduction
- Deploying Windows 7 – Part 24: Managing Drivers – Issues and Approaches
- Deploying Windows 7 – Part 25: Managing Drivers – Selection Profiles
- Deploying Windows 7 – Part 27: Managing Drivers – Tips and Tricks
- Deploying Windows 7 – Part 28: Managing Software Updates
- Deploying Windows 7 – Part 29: Completing the LTI Deployment Infrastructure


