If you would like to read previous articles in this series, please go to:
- Deploying Windows 7 – Part 1: Windows AIK 2.0 Enhancements
- Deploying Windows 7 – Part 2: Using DISM
- Deploying Windows 7 – Part 3: Understanding MAP 4.0
- Deploying Windows 7 – Part 4: Using MAP 4.0
- Deploying Windows 7 – Part 5: MDT 2010 Enhancements
- Deploying Windows 7 – Part 6: Light Touch using MDT 2010
- Deploying Windows 7 – Part 7: Automated LTI Deployment
- Deploying Windows 7 – Part 8: Understanding LTI Configuration Files
- Deploying Windows 7 – Part 9: Deploying 32-bit vs. 64-bit Windows
- Deploying Windows 7 – Part 10: Capturing and Deploying an Image of a Reference Computer
- Deploying Windows 7 – Part 11: Capturing an Existing Installation
- Deploying Windows 7 – Part 12: Planning for Application Compatibility
- Deploying Windows 7 – Part 13: Manual Migration from Windows XP to Windows 7
- Deploying Windows 7 – Part 14: Automated Migration from XP
- Deploying Windows 7 – Part 15: Configuring the MDT Database
- Deploying Windows 7 – Part 16: Using the MDT Database
- Deploying Windows 7 – Part 17: Deploying Applications Based on Make and Model
- Deploying Windows 7 – Part 18: Determining the UUID of a Computer
- Deploying Windows 7 – Part 19: Building a Custom WinPE Tools CD
- Deploying Windows 7 – Part 20: Securing MDT (Part 1)
- Deploying Windows 7 – Part 21: Securing MDT (Part 2)
- Deploying Windows 7 – Part 22: Bulk Populating the MDT Database Using PowerShell
- Deploying Windows 7 – Part 23: Managing Drivers – Introduction
- Deploying Windows 7 – Part 24: Managing Drivers – Issues and Approaches
- Deploying Windows 7 – Part 25: Managing Drivers – Selection Profiles
- Deploying Windows 7 – Part 26: Managing Drivers – By Make and Model
- Deploying Windows 7 – Part 28: Managing Software Updates
- Deploying Windows 7 – Part 29: Completing the LTI Deployment Infrastructure

Tip:
You can find more information about automating LTI deployment in the Windows 7 Resource Kit from Microsoft Press. I am the lead author for this Resource Kit and I also maintain the Unofficial Support Site for the Windows 7 Resource Kit with answers to questions posted by readers, as well as links to the latest resources on Windows 7 deployment, administration and troubleshooting.
In the last few articles of this series we examined two approaches (“let Windows decide” and “let me decide”) that you can use for managing out-of-box drivers when performing Lite Touch deployment using MDT 2010. This article wraps up our discussion of managing drivers with some tips, tricks and a story. First the story, which was submitted to me by reader Tim Lors and which illustrates well the kind of headaches you can have when trying to manage drivers during deployment:
“More than a year ago, I wrote scripts that would install drivers on WinXP PCs. The problem I ran into choosing drivers was not related to the OS. It was a failure of the manufacturer to properly implement PnP between their driver inf file and the hardware itself. Specifically, the inf file would indicate it was the best driver for a certain piece of hardware when in fact it wouldn’t even function with that incarnation of hardware. The only method I found to actually get the right driver installed in these difficult cases was to compare the hardware PnP IDs to a list of known problematic drivers, and if I found a match I would manually chose the right driver based on additional criteria – usually the PC model number. The most common additional criteria needed for the “let me decide” choice was PC model number, but occasionally involved the BIOS version or the PnP subset ID, and in one rare case trial & error. Of course trial & error was difficult because once Windows installed what driver it believed to be the best choice, you had to isolate that ‘non-working’ driver from Windows, or it would just re-install it. Note this scenario occurred in an environment with almost 10,000 PCs covering more than 25 different models.”
Most IT pros I talk to who do deployments tell me that drivers are one of their biggest headaches, and the story above only serves to drive this point home. So having spent the last four articles in this series covering this subject, I’m going to end the discussion of drivers with some tips and tricks to help make things easier for you.
Finding Drivers
The first difficulty is to find the out-of-box drivers your systems might need. Some vendors make this job easier than others, and Dell is particularly to be commended in this respect because they make drivers available for each desktop system as a .cab file for each operating system. To download these .cab files, go to www.delltechcenter.com and in the scrolling menu listbox on the left select Home, Microsoft, Microsoft System Center, SCCM – System Center Configuration Manager, Dell Business Client Operating System Deployment, Dell Business Client Operating System Deployment – The .CAB Files and you’ll see the page shown in Figure 1:

Figure 1: Download drivers for Dell client systems as .cab files
Once you download a .cab file you can extract it into a folder, then you point to this folder when you import the driver into your deployment share.
Other vendors also have tools for downloading drivers but in my opinion they’re not as simple and helpful as Dell’s approach. Here are a few examples of these tools and where to find them:
Extracting INF files from EXEs
Sometimes a system vendor provides drivers for a device in the form of an .exe file instead of a .cab file. In that case, a great tool to have in your toolset is WinRAR which lets you extract the driver files from the .exe file to a folder. Remember, in order to import a driver MDT needs the .inf file and related files for the driver—you can’t import an .exe file as a driver.
Preventing Drivers from Being Injected
To prevent a particular driver you have imported from being injected (for example if your testing has determined that the driver causes problems when installed) just open the properties of the driver and clear the Enable This Driver checkbox (Figure 2):

Figure 2: You can enable or disable a driver to allow or prevent the driver being injected
Note that the above driver was designed for both 32- and 64-bit Windows. If you determine that it doesn’t work as intended for 64-bit Windows, you can leave the driver enabled but deselect the x64 checkbox to prevent it from being injected during deployment of 64-bit Windows.
If desired you can even disable all the drivers in a folder by disabling the folder (Figure 3):
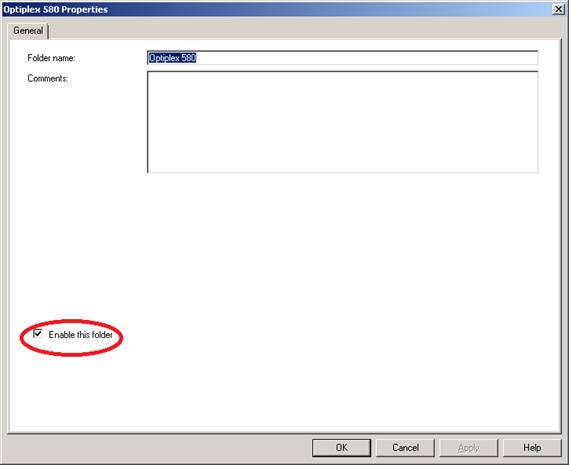
Figure 3: You can disable a custom folder in your deployment share
Managing Boot Drivers Using Selection Profiles
You can also use selection profiles to manage drivers during the Windows PE boot phase of LTI deployment. To do this, open the properties of your deployment share and select either the Windows PE x64 Components or Windows PE x86 Components tab to manage drivers for the architecture you of the operating system you are deploying (Figure 4):
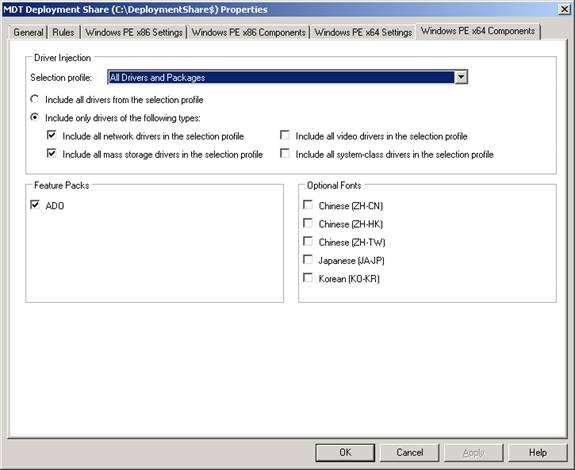
Figure 4: Managing drivers during the boot process of LTI deployment
By default, the All Drivers And Packages selection profile is selected here but only network and mass storage drivers from this selection profile are included in your Windows PE boot image. If needed you could create a custom selection profile that includes hardware-specific WinPE drivers for your target systems.
Using Multiple Driver Groups to Deploy By Make and Model
In the previous article of this series we saw how we could define a single driver group called DriverGroup001 and use this to manage drivers when deploying by make and model of the target computers. Keith Garner, a Deployment Specialist with Xtreme Consulting Group, has an excellent post that expands on this subject by showing how you can organize your drivers more efficiently and then use several driver groups to control how they are injected during deployment.
Another good post to read is this one about using model aliases by Michael Murgolo, a Senior Consultant with Microsoft Consulting Services.
Adding Drivers to an Image
You can use the DISM.exe command to add drivers to an offline image, just mount the image and use DISM with the /add-driver option (See article 2 in this series for information on how to use DISM.exe).
To add drivers to the driver store (that is, to pre-stage drivers so that they’ll be available when Windows detects a device has been attached which needs the driver) you can use the PnPutil.exe command. This can be useful for example if you have used the Microsoft Update Catalog to download a .cab file of drivers for a printer and want to pre-stage these drivers in your reference computer so that when you deploy it the drivers are available for installation. See here and here for more information on PnPutil.exe.
Maintain Driver Configurations When Capturing a Windows Image
Finally, if you are capturing a reference image and deploying onto identical hardware you can provide users with a faster first-boot experience by configuring the PersistAllDeviceInstalls setting in your answer file for sysprepping the reference computer. See this article on TechNet for details.
If you would like to read previous articles in this series, please go to:
- Deploying Windows 7 – Part 1: Windows AIK 2.0 Enhancements
- Deploying Windows 7 – Part 2: Using DISM
- Deploying Windows 7 – Part 3: Understanding MAP 4.0
- Deploying Windows 7 – Part 4: Using MAP 4.0
- Deploying Windows 7 – Part 5: MDT 2010 Enhancements
- Deploying Windows 7 – Part 6: Light Touch using MDT 2010
- Deploying Windows 7 – Part 7: Automated LTI Deployment
- Deploying Windows 7 – Part 8: Understanding LTI Configuration Files
- Deploying Windows 7 – Part 9: Deploying 32-bit vs. 64-bit Windows
- Deploying Windows 7 – Part 10: Capturing and Deploying an Image of a Reference Computer
- Deploying Windows 7 – Part 11: Capturing an Existing Installation
- Deploying Windows 7 – Part 12: Planning for Application Compatibility
- Deploying Windows 7 – Part 13: Manual Migration from Windows XP to Windows 7
- Deploying Windows 7 – Part 14: Automated Migration from XP
- Deploying Windows 7 – Part 15: Configuring the MDT Database
- Deploying Windows 7 – Part 16: Using the MDT Database
- Deploying Windows 7 – Part 17: Deploying Applications Based on Make and Model
- Deploying Windows 7 – Part 18: Determining the UUID of a Computer
- Deploying Windows 7 – Part 19: Building a Custom WinPE Tools CD
- Deploying Windows 7 – Part 20: Securing MDT (Part 1)
- Deploying Windows 7 – Part 21: Securing MDT (Part 2)
- Deploying Windows 7 – Part 22: Bulk Populating the MDT Database Using PowerShell
- Deploying Windows 7 – Part 23: Managing Drivers – Introduction
- Deploying Windows 7 – Part 24: Managing Drivers – Issues and Approaches
- Deploying Windows 7 – Part 25: Managing Drivers – Selection Profiles
- Deploying Windows 7 – Part 26: Managing Drivers – By Make and Model
- Deploying Windows 7 – Part 28: Managing Software Updates
- Deploying Windows 7 – Part 29: Completing the LTI Deployment Infrastructure


