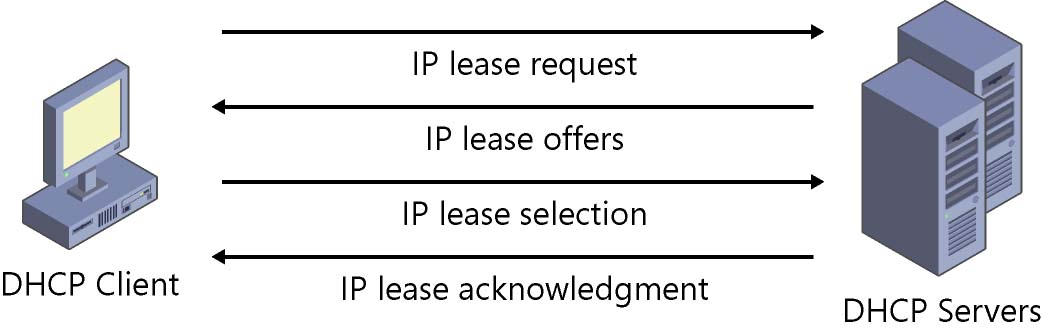
Have you ever wondered how communication happens over the Internet? Do you know how messages are delivered to your computer and not to others? Even the most seasoned IT pros may not know the ins-and-outs of how this works. Well, at the heart of it all, as many know, is the IP address, a unique identifier number that makes it easy to identify your device from any part of the world. It is similar to a postal address that delivers a letter/package to a particular real estate property. Now comes a key question. How are these IP addresses created? Who assigns it to denote a specific device or network? How long does this IP address last? If the IP address is the heart, then the Dynamic Host Configuration Protocol, or DHCP server, is part of the circulation system. DHCP is a network server that dynamically assigns IP addresses to every device on the network, so a device can communicate with other IP devices and networks. But like being a renter, you don’t own this DHCP-assigned IP address for all time, you only lease it.
Read on to learn all about it.

What is a DHCP lease time?
This DHCP-assigned IP address is not permanent and expires in about 24 hours. This is called DHCP lease time. Unless otherwise mentioned, the DHCP server assumes that all IP addresses are temporary and expire after some time.
The biggest advantage with DHCP lease time is that the same IP address is not stuck to a device forever and is available for other devices, too when needed.
Let’s take an example to better understand this scenario.
There are two devices on a network, computer A and computer B, and a DHCP server assigns an IP address to both the devices. The next day, you decide to use computer C instead of computer B.
Now, if the IP address is static, only computer B would be able to use a particular IP address, which is a waste of resources. But with the DHCP lease time, computer B’s IP address would have expired, and this can now be allocated to computer C or any other device on the network.
This is the fundamental advantage of having a DHCP lease time.
How to change DHCP lease time?
The standard DHCP lease time is 24 hours, but you can change it to meet your network’s needs.
For example, if you’re setting up a lease time on your restaurant’s WiFi network, you can restrict it to an hour or two while a guest office network could have about 12 hours.
The idea is that these connections are temporary, so freeing up the connections after a defined time will make your network faster and more efficient.
Moving on, let’s see how you can change the DHCP lease time. Remember, you need administrative access to your network to change this lease time.
Find the default lease time on Windows
The first step is to know what is the default DHCP lease time on your network. To do this:
- Open Command Prompt or PowerShell
- Type ipconfig /all
- This will bring up all the details of your IP address
- Look for “Lease Obtained” and “Lease Expired”
- The difference between the two values will give you the default DHCP lease time
![]()
Remember, the DHCP lease time can be less or more than 24 hours, depending on your network configuration.
Find the default lease time on macOS
If you’re using macOS, here are the broad steps.
- Open your Terminal
- First off, know the name of your device on the network. To get this information, type networksetup -listallhardwareports
- This should bring up the name of all devices on your network and their respective MAC address
- Next, type ipconfig getpacket device_name. This will show all the information related to your connection
- Look for lease time
This value will be in hexadecimal, so convert it to the standard numbers. Also, this value will be in seconds, so convert it to hours or minutes according to your preference.
Now, you’re all set to change the DHCP lease time.
Changing the lease time
The DHCP lease time can’t be changed on your device directly, as it is controlled by the router. So, you’ll need administrative access to the network router that handles the DHCP lease time.
Make changes to the router settings
To access the router, type your IP address in the web browser. You may need an admin password to access the router, depending on how it is set up. Also, check your router manuals for the exact steps to access it.
After you access the router’s details, look for a tab or an option called LAN settings or DHCP settings. If you can’t find it, check your user’s manual.
In this tab or page, look for a value called lease time. This can have different names too, so look for any value with the word “lease” in it. Most times, this value will be in seconds or minutes, depending on the router. So, make the necessary conversions to get the value in hours or minutes, depending on your preference.
Next, click on that value, and change it. And finally, save your settings.
Immediately, the new DHCP lease time will be applied to the devices connected to it. Go to Command Prompt and check if the new value is applied.
Reset your device
For some reason, if you still find the old DHCP lease time values on your device, make a forced change. For this, type ipconfig /release followed by ipconfig /renew. The first command releases the resources, while the second command establishes a new connection with the new DHCP lease time.
One thing to watch out for is IP address conflicts, which is essentially a mismatch between the settings on your router and device. If this is a persistent problem, consider moving to static IP addresses. Also, check your router settings in case your device is unable to connect to the Internet or communicate with other devices on your network.
Changing the lease time through the DHCP server
If you have a dedicated DHCP server to automatically assign IP addresses and other default network parameters, you can change the DHCP lease time through it as well.
To do this, access your DHCP server through your client from a Windows 10 system.
- Open the Run dialog box or Windows + R
- Type dhcpmgmt.msc and click OK
- Look for the DHCP scope for which you want to change the lease time and click on its properties
- Navigate to the “Lease Duration for DHCP clients” section
- Enter the lease time you want in the “Limited to” field
- Save your change and restart the client computer
Once your computer reboots, check if the DHCP lease time has changed.
In short, DHCP lease time determines the temporary IP address for a device. If you want to extend or reduce this time, you can do it through your router or access your DHCP server through the client installed on your machine.
Have you tried this before? Share your thoughts with us.
Featured image: Pixabay


Clean notes. Thankyou for this.
Thanks for this! I was able to change the lease time to one day but it is expiring during working hours. Is there any way to manipulate the schedule?
Thank you very much..I am from Bangladesh.