If you would like to be notified of when Deb Shinder releases the next part in this article series please sign up to our WindowSecurity.com Real Time Article Update newsletter.
If you would like to read the first part in this article series please go to DNS Security (Part 1): Issues in DNS Security.
Introduction
In part 1 of this multi-part series on DNS security, I went over some of the top issues pertaining to DNS security in order to increase your awareness of some of the common considerations that you will run into when you start to plan the security for your DNS infrastructure. Now we’ll move on to the next step: things you can do to secure your Windows DNS infrastructure prior to rolling out the “nuclear option,” which is to deploy DNSSEC in your environment. I recommend that you carry out these steps before you deploy DNSSEC because you will want to make sure your DNS infrastructure is stable and that you have a reasonable shakedown period after carrying out these basic security tasks before you bring out the big guns of DNSSEC.
In this article, then, we’ll take a look at the details of the following preliminary steps you can take to help secure your Windows DNS infrastructure:
- Decide who can resolve Internet host names
- Don’t co-locate internal and external zones
- Lock down the DNS cache
- Enable recursion only where needed
- Restrict DNS servers to listen on specific addresses
- Consider using a private root hints file
- Randomize your DNS source ports
- Be aware of the Global Query Block List
- Limit zone transfers
- Take advantage of Active Directory integrated zone security
Decide who can resolve Internet host names
It might seem basic, but it’s easy to overlook the fact that not everyone on the network needs to be able to resolve Internet host names. In most cases, your internal hosts only need to be able to resolve internal names and the only machines that need to be able to resolve Internet host names are gateway devices, such as web proxy servers or Winsock proxy servers (e.g., the TMG firewall). When you design your DNS name resolution infrastructure, you can configure the majority of your machines to use DNS servers that only host internal names and do not perform recursion for public names. Then you can configure a separate DNS infrastructure that does perform Internet name resolution for the machines that need to be able to resolve public host names. On those DNS servers, you can configure forwarding zones so that the web and Winsock proxies (and other machines that need to resolve internal host names) can resolve internal names as well.
Don’t co-locate internal and external zones
Organizations that deploy a split DNS infrastructure will use the same domain names for both internal and external name resolution. For example, if the name of your internal domain is corp.contoso.com, you would also use the same name, corp.contoso.com for external name resolution. The advantage of doing this is that hosts can resolve names to the appropriate addresses regardless of their location and users don’t need to reconfigure applications based on their current locations (either inside the network or outside the network).
While the split DNS infrastructure works fine and accomplishes what it’s supposed to accomplish, the problem I sometimes see (more typical of small businesses, but I’ve seen larger companies do the same thing) is that the company will host the internal and external names in the same zone. This can cause a potential security issue because an external attacker can potentially compromise the publicly accessible server and gain knowledge not only of all of your external names (which isn’t so much of an issue, since you want people to know your public names), but also the private names of machines on the intranet, which is something you do not want an attacker to know about.
This security problem is easily solved by using separate DNS servers and separate zones for internal and external names. Your external zone can be hosted by an ISP, or you can host it yourself on a DNS server located in a DMZ. The private zone stays on the intranet and is never exposed to external users.
Lock down the DNS cache
The DNS cache on the DNS server enables the DNS server to return the results of successful queries from a cache instead of needing to go out to other DNS servers to get the information again. Queries are typically answered from cache for the Time To Live (TTL) of the record that’s cached. This can significantly improve overall DNS performance because the server doesn’t have to go out and reissue queries for names that the DNS server has recently resolved successfully.
However, there are some attacks that are based on the ability to overwrite a cached record before the TTL has expired. You can help prevent these kinds of attacks by enabling cache locking on the DNS server. In addition, cache locking will help secure your server against cache poisoning attacks.
By default, Windows Server 2008 R2 DNS servers set a cache locking value of 100, which means that the DNS server will not overwrite the cached value until the TTL on the DNS record has expired. You can change this value if you like by using the dnscmd command:
dnscmd /Config /CacheLockingPercent<percent>
The percent value can range from 0 to 100.
Enable recursion only where it’s needed
Recursion is the process a DNS server uses to resolve names for which it is not authoritative. If the DNS server doesn’t contain a zone file that is authoritative for the domain in the query, the DNS server will forward the connection to other DNS servers using the process of recursion. The problem is that DNS servers that perform recursion are more vulnerable to denial of service (DoS) attacks. Because of this, you should disable recursion on the DNS server in your organization that will only answer queries for which they are authoritative – typically, this means queries for your internal resources.
You can disable recursion in the Properties dialog box of your DNS server, as seen in the figure below. Be aware that if you disable recursion, it will also disable all forwarders that you’ve configured.
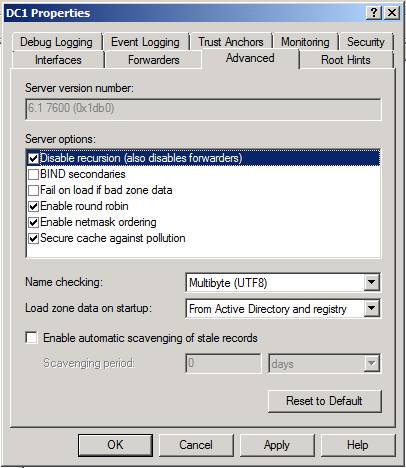
Figure 1
Restrict DNS servers to listen on specific addresses
Often a DNS server will have multiple IP addresses assigned to its single NIC, or the DNS server will have multiple NICs attached to it. The default setting is for the DNS server to listen for DNS queries on all interfaces and IP addresses bound to those interfaces. You can improve security and auditing a bit by locking down the interfaces and IP addresses on the DNS server that will accept DNS queries. The figure below shows the DNS server’s Properties dialog box where you can enforce this setting. Choose the Only the following IP addresses option and then remove the checkmarks from the checkboxes for which you don’t want the DNS server to accept queries.

Figure 2
Consider using a private root hints file
When a Windows Server 2008 R2 DNS server is running on a domain controller, root hints are obtained from the Active Directory first. If the DNS server is not running on a domain controller, then root hints are obtained from the cache.dns file that is located at %systemroot%\System32\Dns. Root hints are used to let the DNS server know where to start the recursion process. Root hints normally point to the Internet root DNS servers so that you can resolve public host names using recursion.
However, if you don’t need to resolve public host names, you can edit the root hints file so that it only contains DNS servers on your intranet. By doing this, you can avoid sending private information about possible internal host names to public DNS servers.
The figure below shows the Root Hints tab in the DNS server’s Properties dialog box. You can Add, Edit, Remove or Copy from Server root hints entries by using the buttons on this tab.
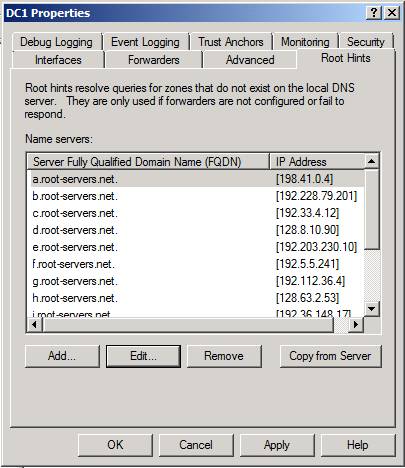
Figure 3
Randomize your DNS source ports
There are some DNS attacks that can take advantage of the predictability of the source port for DNS responses a computer sends out. The predictability can allow the attacker to hijack a response to a DNS client and send the client to a site under the attacker’s control. You can reduce the risk of this attack being successful by increasing the number of source ports available for randomization.
You do this by increasing the size of the socket pool. For Windows Server 2008 R2 DNS servers, the default size of the socket pool is 2500. You can increase the number of available sockets for randomization to a maximum value of 10,000.
Use the following dnscmd command to change the socket pool value:
dnscmd /Config /SocketPoolSize<value>
If you want to see the current size of the socket pool, then use this dnscmd command:
Dnscmd /Info /SocketPoolSize
You can also exclude ranges of ports used by the socket pool, using the followingdnscmd command:
dnscmd /Config /SocketPoolExcludedPortRanges<excluded port ranges>
Keep in mind that it will take more memory to support more sockets. On Windows Server 2008 R2, around 2.5 KB of memory is allocated for each socket, plus 7.2 KB of memory per receive buffer. The number of receive buffers is two on a single or dual processor server, and equal to the number of CPUs if more than two are present.
Be aware of the Global Query Block List
Since Windows Server 2003 R2, names could be excluded from being answered by the DNS server by adding them to the Global Query Block List. By default, the names WPAD and ISATAP are automatically included in the DNS server Global Query Block List. This means that even if you add a resource record for WPAD or ISATAP, the DNS server will not answer queries for those names.
You can enable or disable the Global Query Block list with the following dnscmd command:
dnscmd [<ServerName>] /config /enableglobalqueryblocklist 0|1
If you want to see what names are currently entered in the Global Query Block List, use the following dnscmd command:
dnscmd [<ServerName>] /config /enableglobalqueryblocklist 0|1
If you want to add a name to the list, use this command:
dnscmd [<ServerName>] /config /globalqueryblocklist [<name> [<name>]…]
Limit zone transfers
Attackers can find out all the names in your zone if you enable zone transfers. While this isn’t a major problem for public DNS zones, you should limit who can perform zone transfers for your private zones. Clients should not know more about your namespace than they need to in order to connect to the resources they need.
By default, zone transfers are not enabled. But if you want to enable them (not required for Active Directory integrated zones) you can go into the Properties dialog box of the zone and put a checkmark in the Allow zone transfers checkbox on the Zone Transfers tab. Then use the Only to the following servers option to list the IP addresses to which you want to allow zone transfers.

Figure 4
Take advantage of Active Directory integrated zone security
Active Directory integrated zones enable you to secure the registration of resource records when dynamic name registration is enabled. Members of the Active Directory domain can register their resource records dynamically while non-domain members will be unable to register their names. You can also use discretionary access control lists (DACLs) to control which computers are able to register or change their addressing information.
The figure below shows how you configure secure dynamic updates.

Figure 5
Summary
In this second part of a multi-part article, we took a look at some of the things you can do to help secure your Windows DNS infrastructure prior to pulling out the “big guns” and deploying DNSSEC. In the next part of this series, we’ll talk about DNSSEC for Windows Server 2008 R2 and what the process and procedures are for getting DNSSEC integrated into your environment. See you then! -Deb.
If you would like to be notified of when Deb Shinder releases the next part in this article series please sign up to our WindowSecurity.com Real Time Article Update newsletter.
If you would like to read the first part in this article series please go to DNS Security (Part 1): Issues in DNS Security.