When I was a kid, my favorite hobby was building electronic gadgets. While the other kids in my neighborhood were playing baseball, I could usually be found doing something that involved a soldering iron or a multimeter. As much as I used to enjoy tinkering with electronic projects, however, I eventually had to give it up. Lack of free time was certainly part of the reason why I walked away from my hobby, but the bigger reason was that advances in technology made do-it-yourself electronics impractical. Have you ever taken a look at the size of the components on a hard drive or a motherboard? They are tiny. Working with such small components is way beyond my skill level.
Over the last few years, the IoT trend began to take hold. IoT stands for Internet of Things, and refers to nontraditional, IP-enabled devices that can be connected to a computer network. While the IoT trend is noteworthy all by itself, the thing that I find really fascinating is that do-it-yourself IoT has begun to be an option.
If you can’t imagine building an IP-connected device from scratch, the good news is that you don’t have to. Although do-it-yourself IoT does require some skills, you do not have to be a master in the field of component-level electronics.
There are two platforms that have become really popular among the do-it-yourself IoT crowd. The first of these platforms is Raspberry Pi. Raspberry PI is a small computer that was originally created for the purpose of teaching computer science. Raspberry PI has since evolved into a platform favored by hobbyists, robotics engineers, and those who create IoT devices because of its ability to attach to external sensors and other components. Raspberry PI devices usually run a Debian-based Linux OS called Raspbian, and code running on this OS can be used to control Raspberry PI-based devices.
Another platform that is popular among the do-it-yourself IoT crowd is Arduino. Like Raspberry PI, Arduino is a small computer (actually, there are several different varieties of Arduino boards) that can interact with external devices such as motors and sensors.
Unfortunately, I have not yet had the opportunity to build a Raspberry PI-based project, but I have built a few projects that were based on Arduino. As such, I want to share with you a few pointers for getting started.
Do-it-yourself IoT: Pick the right board for the project

As previously mentioned, there are a variety of Arduino boards available. Not all Arduino boards are created equally, and so it is important to pick the right board for the job. Some Arduino boards are extremely small and lightweight. Others are a little bit larger, but may offer more ports that you can connect to external components. If your goal is to build an IoT device, then you might consider using the Arduino Uno WiFi board. It is an Arduino board that includes integrated WiFi connectivity. This saves you the trouble of trying to attach an Arduino board to a WiFi radio.
In some cases you may find that none of the available Arduino boards include enough ports to support all of the components that you will need for your project. In those types of situations, it is perfectly acceptable to leverage multiple Arduino boards. Using a single Arduino board definitely makes life easier, but it is relatively common for a single project to use multiple Arduino boards.
Start with a multiproject kit
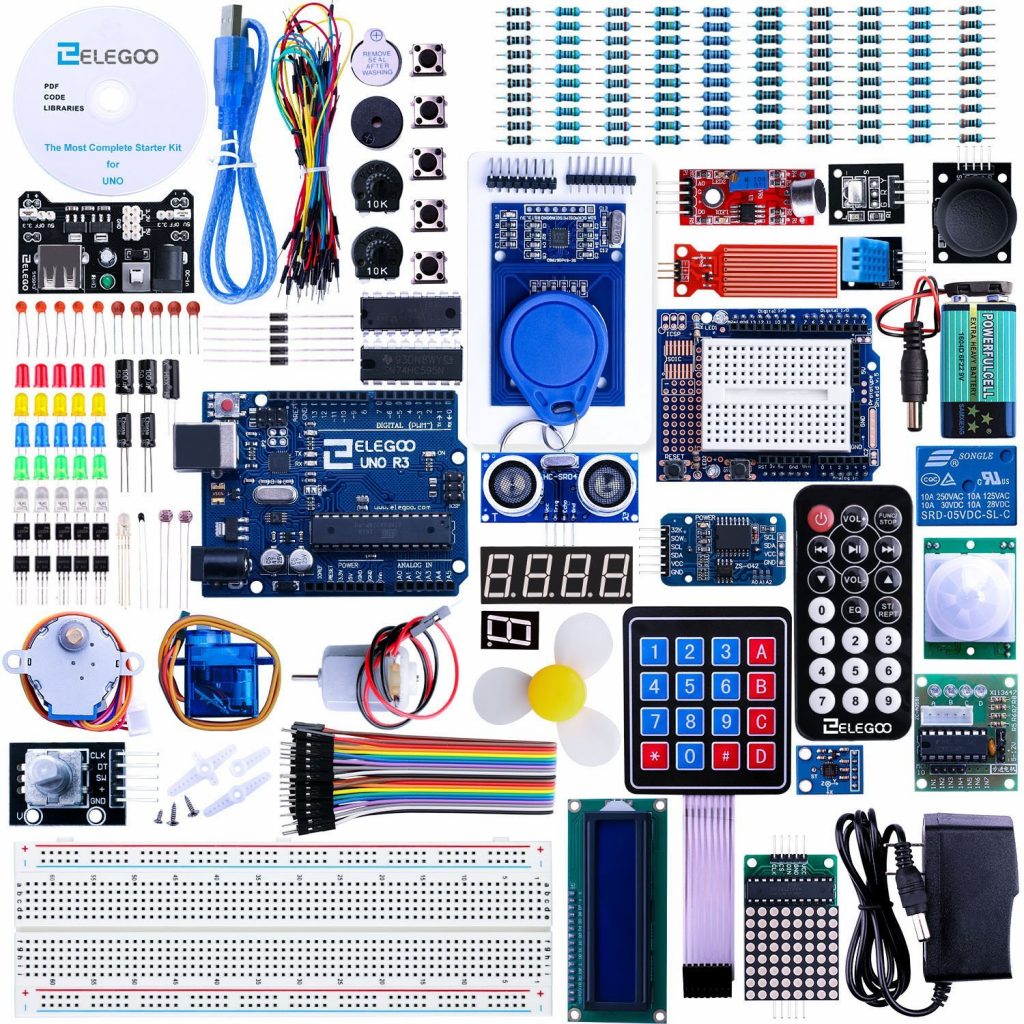
If you are new to the world of Arduino, then one of the easiest ways to get started is to purchase a multiproject kit. Last year, I was tasked with building an Arduino-based device. Since my experience with Arduino was extremely limited at the time, I ordered a project starter kit. The kit only cost about $50, but it included dozens of components that could be made to work with Arduino. The kit had everything from simple LED lights to more sophisticated components such as keypads, sonar sensors, RFID boards, and LED displays. Given the kit’s modest price, these components probably weren’t of the highest quality, but they were sufficient to give me a good understanding of what Arduino is capable of, and how to build various types of Arduino projects.
Take advantage of solderless breadboards
One of the key pieces of advice that I would give to anyone who is just starting out with Arduino is to make use of solderless breadboards whenever possible. A solderless breadboard is essentially a plug-and-play circuit board. You can plug components directly into a solderless breadboard, and then link those components together using jumper wires. The nice thing about a solderless breadboard is that it makes it really easy to make modifications to a project. Since none of the components are soldered together, you can switch out components on a whim.
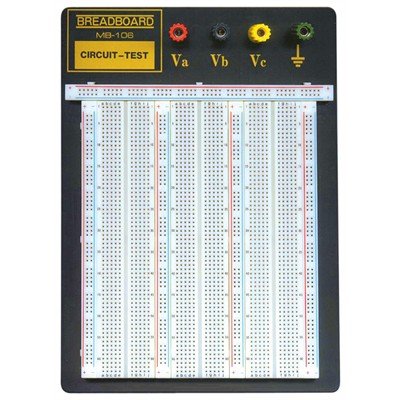
Most of the multiproject Arduino kits that I have seen include a solderless breadboard, but I would recommend getting your own. The solderless breadboards that are included in the starter kits seem to do a decent job, but depending on which kit you buy, the boards can be a little bit on the small side. Looking on Amazon, I found a solderless breadboard that was twice the size of the one that was included in the kit. Having all that extra space makes project building a lot easier.
Another bit of advice that I would pass along is to get some extra jumper wires. The Arduino starter kits usually include jumper wires, but the kits may only give you enough wire to build the projects that are described in the kit’s instructions. If you are planning on doing anything beyond what is in the instruction book, then you will probably end up needing some extra wires.
One more thing that you need to know is that even if you are working from a solderless breadboard, you might not be able to completely avoid using a soldering iron. Initially, I bought a few starter kits, and found that I was able to build all of the kit projects without ever having to touch a soldering iron. Once I had learned the basics however, I moved on to building some projects that went beyond the kit’s capabilities.
One of these projects required me to use a triple-axis accelerometer, which was not supplied with the kit. In order to connect the accelerometer to the solderless breadboard, I had to solder a series of pins to the accelerometer.
If you have never soldered before, then you will be happy to know that it isn’t that hard to do, but it does take some practice. I have found that I get the best results when I use a high-wattage soldering iron with a fine tip. I have also found it helpful to use a clamp to hold everything in place while I am soldering the joints. The clamp that I use has a built-in magnifying glass, which makes it easier to see the solder joint.
The trick to making a good solder joint is to use the soldering iron to get the joint hot before applying any solder. Once the joint is nice and hot, continue to hold the soldering iron to the joint, and then add the solder. You should use as little solder as possible. There are some excellent YouTube videos that can teach you how to solder.
It’s easier than you think
Building do-it-yourself IoT devices is easier than it might seem. Arduino and Raspberry PI have greatly simplified the process. The easiest way to begin dabbling with do-it-yourself IoT is to buy a starter kit, and work through the process of building some of the kit projects. Doing so will give you a good foundation for both the assembly and the programming of various devices.
Photo credit: Elegoo


