If you would like to read the other parts of this article series please go to:
- Eliminating Traditional Backups using native Exchange 2010 Functionality (Part 1)
- Eliminating Traditional Backups using native Exchange 2010 Functionality (Part 3)
- Eliminating Traditional Backups using native Exchange 2010 Functionality (Part 4)
Introduction
In part 1 of this multi-part article, I explained how Exchange have evolved over the years, when it comes to storage requirements, high availability, and backing up and recovering critical Exchange data. In addition, we had a look at the new single item recovery feature that can be enabled for a mailbox.
In this part 2, we will have a quick look at the litigation hold feature, and from there, jump over and take a step by step look at how easy it is to recover mail items for a user using the new mailbox search feature in Exchange 2010.
Litigation Hold
All Exchange 2010 mailboxes have a new “LitigationHoldEnabled” property which just like the new Single Item recovery property we looked at back in part 1 is disabled by default. Organizations that need to keep Exchange data for longer periods or even indefinitely can enable this property. Enabling Litigation Hold means that items never will be purged from the “Purges” subfolder, which of course results mailboxes growing considerably in size over time.
To enable litigation hold for a mailbox, use the following command:
Set-Mailbox –Identity hew –LitigationHoldEnabled $true

Figure 1: Default setting for Litigation Hold
For a user that sends/receives approximately 100 messages per workday, you can expect the mailbox size to grow 1.4 GB per year or approximately 700 MB every 6 months. That might sound like a lot when enabled for thousands of users, and yes I agree but that’s where personal archives and retention policies comes into the picture. When enabling a personal archive for a user mailbox, the default archive policy that is applied will automatically move items older than two years to the personal archive, which in Exchange 2010 RTM is stored in the same database as the primary mailbox of the user. But with Exchange 2010 SP1 which will be released later this year, the archive can also be stored in a separate database or even in the cloud. Exchange data held in the personal archive will not be synchronized to the OST file when running Outlook in cached mode, which means end users shouldn’t see a performance degrade in Outlook no matter the size of the mailbox.
But what about the size of the databases, they will become insanely huge with litigation hold enabled won’t they? Well with support for up to 100 mailbox databases per Exchange 2010 Mailbox server and support for up to 2 TB mailbox databases (when having at least 2 database copies), this should not be an issue. Okay then what if I need to restore the whole database from backup then? With a combination, if an increased deleted item retention window and single item recovery enabled for the mailboxes within the organization, this should not be necessary. Does this sound too good to be true? Actually it doesn’t, but I agree that there may be organizations that rarely experience store logical corruption (which by the way typically is caused by third party applications manipulating the data), and if you are one of these organizations, lagged copies comes to the rescue. I will cover lagged copies in detail in Part 3 and 4 of this multi-part article.
The Recoverable Items folder is configured with a recoverable items quota (by default 30 GB) and recoverable items warning quota (by default 20 GB). The idea behind these quotas is to prevent against potential denial of service (DoS) attacks where large amounts of data are placed in the Recoverable Items folder. If the recoverable items warning quota and recoverable items quota is reached, a daily warning will be logged in the application log and if the organization uses MOM, this will trigger a daily MOM alert as well.
But it’s important to note that if legal hold is enabled for the mailbox, these quotas will be ignored and an alert will not be triggered when quotas are reached. This means that it’s important you carefully monitor disk drive space for databases containing mailboxes with Litigation Hold enabled.
As you can see in Figure 2 and 3, these quota settings are configured on the database level, but can also be configured on the mailbox level if required.
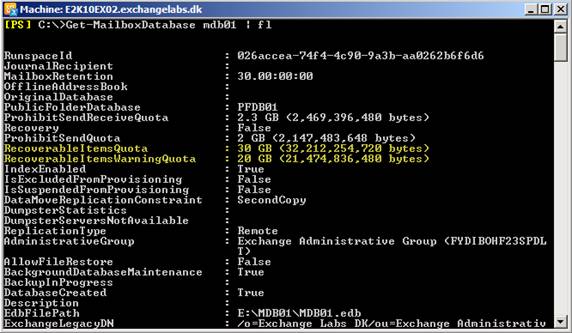
Figure 2: Recoverable Items and Recoverable Items Warning quota settings on the mailbox database level
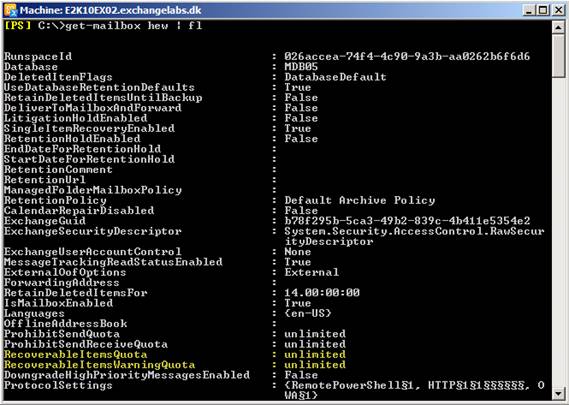
Figure 3: Recoverable Items and Recoverable Items Warning quota settings on the mailbox level
Restoring a Single item from a User Mailbox
Okay let me show you how easy it is to restore a mail item that was deleted from a user mailbox as well as removed from the Recoverable Items folder.
Let’s set the scene by pretending we are an end user and open our mailbox using OWA 2010. From here we delete a super important mail with subject “E14 Rocks” from the Inbox.

Figure 4: Deleting message from Inbox
Then we switch to the Deleted Items folder and delete the message from there.

Figure 5: Delete item from Deleted Items folder
The mail item has now made it into the Recoverable Items folder, so let’s access the Recoverable Items folder by right-clicking on the Deleted Items folder and select “Recover Deleted items”.
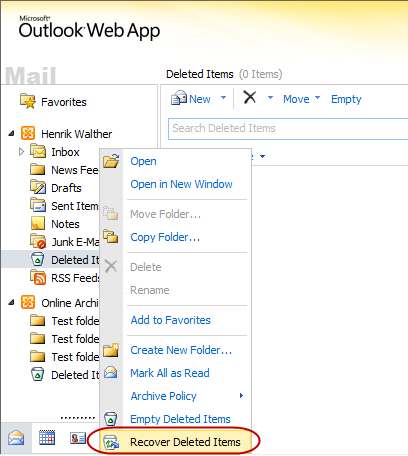
Figure 6: Accessing Recover Deleted Items
From the recoverabel items folder, we delete or more specifically purge the message.
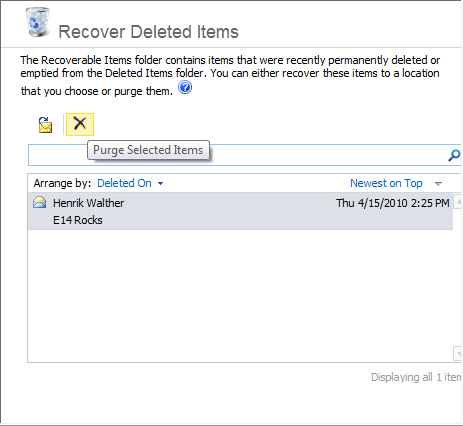
Figure 7: Purging the item from the Recoverable Items folder
We will get the warning shown in Figure 8. Click “OK”.
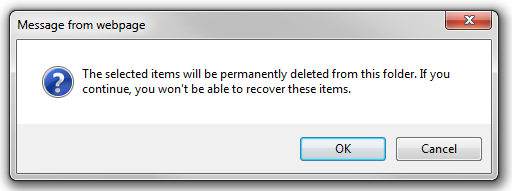
Figure 8: Confirmation message
The message is now completely deleted seen from the end user perspective. We now contact the service desk and ask if they can restore this super important message.
Assigning Mailbox Search Permissions to a Service Desk person
Now let’s switch to administrator mode for a while. In order to restore the message for the user, the service desk person needs to have the proper permissions assigned. So let’s logon to OWA using a user account that has Exchange Organization Administrator rights, and from here access the Exchange Control Panel (ECP). In ECP select to manage “My Organization” as shown in Figure 9.

Figure 9: Switching to mange My Organization
Under “Users and Groups” select “Administrator Roles” then double-click on the “Discovery Management” role group.

Figure 10: Opening the property page for the Discovery Management role group
Now add either the user account of the specific Service Desk person or add a group that he belongs to.
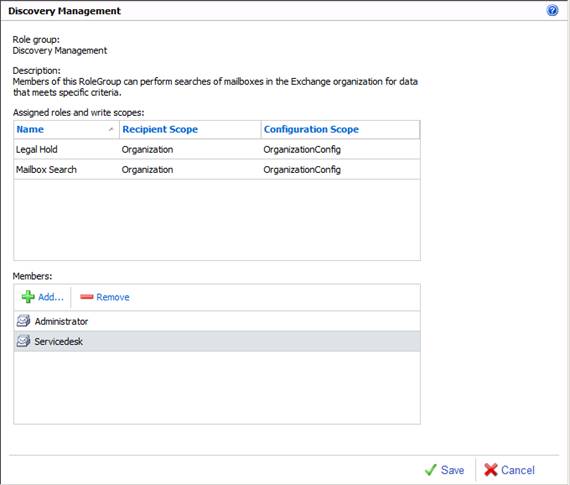
Figure 11: Adding the Service Desk user to the Discovery Management role group
Alternatively you can add the user or group to the discover management group using this command:
Add-RoleGroupMember -Identity “Discovery Management” -Member “Service Desk”
Now let’s switch over and pretend we are a Service Desk user. As the Service Desk user, we logon on to our mailbox using OWA 2010. In OWA 2010, we open ECP and select to manage “My Organization” followed by clicking “Reporting” in the left pane. We then click “New” as shown in Figure 12.

Figure 12: Creating a new mailbox search
In the New Mailbox Search window, we can search for messages using different criterias. Since we know the subject of the particular message we want to restore, let’s enter “E14 Rocks” in the keywords text field.

Figure 13: Entering key words used in the Mailbox Search
We now need to select the mailbox which we want to search as well as specify a name for the restored folder. Finally, we must specify the discovery mailbox in which we want to store the search result. The default discovery mailbox created by Exchange 2010 setup should be fine under normal circumstances. When we have selected everything required, click “Save”.

Figure 14: Adding the mailbox that should be searched and entering the name of the restore folder
The mailbox search will now begin and since we are searching a rather small mailbox, it should finish within a few seconds.

Figure 15: Mailbox Search in progress
The search has now completed with success.
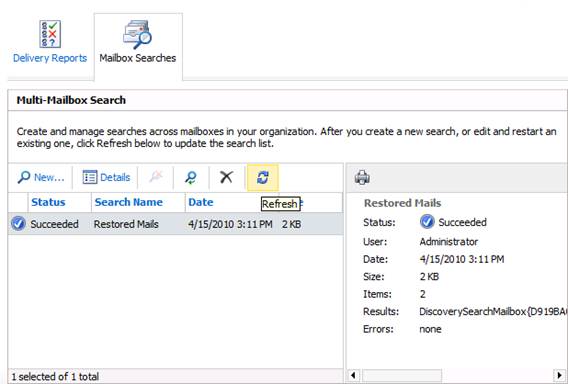
Figure 16: Mailbox search completed
Under “Restore Mails” click on the “Open” link.
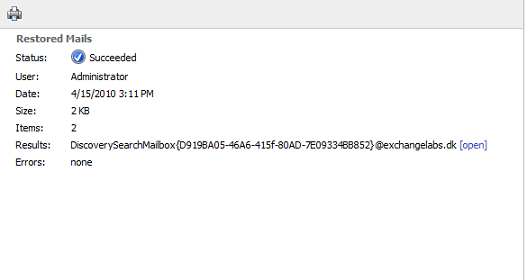
Figure 17: Clicking on the “Open” link to see the recovered data
The discovery mailbox will now be opened and here we see a “Restored Mails” folder which we can expand all the way down to a “Purges” folder shown in Figure 18.

Figure 18: The lost mail item has been recovered and can be forwarded to user
We can now go on and forward the message (preferably as an attachment) to the user and the restore task is done. Easy right?
But not as easy as when using the Exchange Management Shell (EMS). Here we just need to run two commands and that’s it. First, we need to perform a search against the user’s mailbox (target mailbox) using the following command:
Search-Mailbox hew –TargetMailbox “Discovery Search Mailbox” –SearchDumpster –SearchQuery “E14 Rocks” – TargetFolder “Recovered for HEW”

Figure 19: Performing a Mailbox Search using the Exchange Management Shell
Notice in the above command that we only perform the search against the dumpster by using the –SearchDumpster parameter.
Now that we have the search result in the discovery mailbox, we can do a search against the discovery mailbox and specify the user’s mailbox as the target mailbox. For this we need to run the following command:
Search-Mailbox “Discovery Search Mailbox” –TargetMailbox hew –SearchQuery “E14 Rocks” – TargetFolder “Recovered by Service Desk”

Figure 20: Moving the restore data to the user mailbox
By using the above search method we can skip the step of forwarding the message on to the user as it’s copied directly between the mailboxes.
Switching back to end user mode. We can now logon to our mailbox using OWA 2010 and find the restored message.
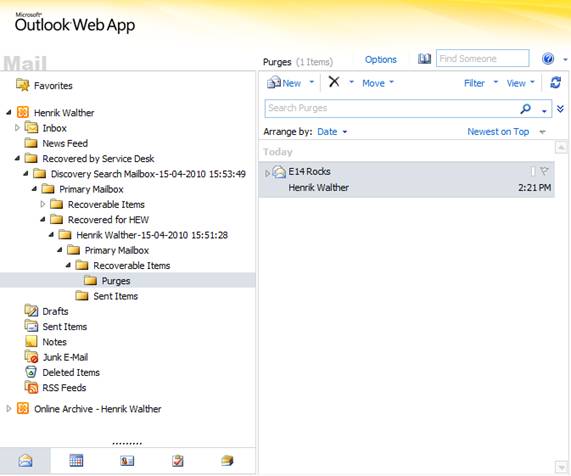
Figure 21: Mail item restored into user’s mailbox
We have covered the steps you need to follow in order to restore one or more messages for a user wihtout having to perform a restore from a traditional point in time from a previous backup. As long as the message is still within the deleted items retention window configured on the mailbox database or mailbox itself, you can follow the above steps.
In part 3 which will be published in a near future, we will take a closer look at lagged database copies as well as how they are configured.
If you would like to read the other parts of this article series please go to:
- Eliminating Traditional Backups using native Exchange 2010 Functionality (Part 1)
- Eliminating Traditional Backups using native Exchange 2010 Functionality (Part 3)
- Eliminating Traditional Backups using native Exchange 2010 Functionality (Part 4)


