If you would like to read the other parts of this article series please go to
- Eliminating Traditional Backups using native Exchange 2010 Functionality (Part 1)
- Eliminating Traditional Backups using native Exchange 2010 Functionality (Part 2)
- Eliminating Traditional Backups using native Exchange 2010 Functionality (Part 4)
Introduction
In part 2 of this multi-part article, we had a quick look at the litigation hold feature and from there jumped over and took a step by step look at how easy it is to recover mail items for a user using the new mailbox search feature in Exchange 2010.
In this part 3, I will provide you with the gory details on how and why you might be one of the organizations that can benefit from using lagged database copies. In addition, I will also show you how to configure lagged databases copies in a step by step fashion.
Lagged Database Copies
The Standby Continuous Replication (SCR) feature that was introduced with Exchange 2007 SP1, gave us the option of replicating one or more databases from a stand-alone mailbox server, cluster continuous replication (CCR) cluster, or single copy cluster (SCC) to a target stand-alone mailbox server or standby cluster (CCR or SCC failover cluster where only the passive clustered mailbox role has been installed). SCR could both be used for replicating storage groups locally in a datacenter or remotely to servers located in a secondary or backup datacenter.
In addition to being able to replicate data to multiple targets per storage group, SCR also introduced the concept of replay lag time and truncation lag time. With replay lag time you could configure the Microsoft Exchange Replication service to wait for a specified amount of time before log files that had been copied from the SCR source to the SCR target(s) were replayed. The default value for replay lag time was 24 hours and could be configured with a value of up to 7 days (if configured to 0 seconds there was a 50 log files lag time so that a reseed was not required when a lossy failover occurs). The idea with replay lag time was to have a database from back in time, which could be used to recover if active database copy/copies on the SCR source server(s) were struck by logical corruption. This way you can stop replication before the logical corruption is replicated to the SCR target server(s) and thereby prevent loosing data.
Truncation lag time could be used to specify how long the Microsoft Exchange Replication service should wait before truncating (deleting) the log files that had been copied to the SCR target server (s) and replayed into the copy of the database(s). The maximum allowable setting for truncation lag time is 7 days and the minimum is 0 seconds, which will remove the truncation delay completely. With truncation lag time you could recover from failures that affected the log files on the SCR source server(s).
Exchange 2010 Database Availability Groups (DAGs) also supports replay lag time and truncation lag time just like SCR in Exchange 2007 SP1. And actually, they work pretty much the same way although controlled via a new cmdlet which is the Set-MailboxDatabaseCopy cmdlet.
But with new versions, features are improved and it is no different with Exchange 2010. For instance, the replay lag time option now has a maximum setting of 14 days instead of 7 days as was the case with Exchange 2007 SP1. Also bear in mind that unlike SCR in Exchange 2007 SP1, replay lag time in Exchange 2010 doesn’t have a hard-coded replay lag of 50 log files (even when set to 0 seconds).
As you can see in Figure 1 both replay and truncation lag time are disabled by default.

Figure 1: Default Replay and Truncation Lag time setting for a Mailbox database
The purpose with replay and truncation lag time in Exchange 2010 is pretty much the same as with SCR in Exchange 2007 SP1. They are there to protect against database logical corruption and store logical corruption (well at least store logical corruption).
Often an organization would not have the need for lagged database copies since having multiple non-lagged copies of each mailbox database combined with single items recovery and rentention policies is typically sufficient. A lagged database copy is only interesting in the rare cases where an organization experience logical corruption, specifically store logical corruption as database logical corruption is taken care of by the the lost flush detection mechanism, which is a new ESE database improvement in Exchange 2010. The lost flush detection mechanism (in combination with single database page restore feature) basically makes sure the database is in good shape, which eliminates the logical corruption that would occur with databases in older versions of Exchange.
Store logical corruption is when an amount of data is corrupted, or more specifically added, deleted, or modified in a way that a user did not expect. Corruption is perhaps a wrong termonology as store logical corruption typically is experienced in situations where a 3rd party server or client application executes a series of valid MAPI operations against a database and this results in “corrupted” data or loss of a significant amount of data seen from the end user perspective. Although single item recovery should protect against most store logical corruption scenarios, there may be rare situations where it makes more sense to recover the data via a lagged database copy instead of via the single item recovery feature. Consider lagged database copies an additional “nice to have” safety.
What about lagged Public Folder Databases?
Since public folder databases in Exchange 2010 cannot be protected using continuous replication, it is not possible to configure lagged public folder database copies.
You must instead use traditional public folder replication mechanisms to protect public folder databases combined with a deleted item retention window that makes sense in your organization. Also bear in mind that public folder databases does not leverage the new single item recovery functionality that mailbox database does. They use the “good” old deleted items retention feature we know from Exchange 2007 and earlier versions of Exchange.
Database Copies and Log Truncation
When you have more than one copy of a mailbox database, log truncation behaves differently from when you have only one copy of a database. The log truncation behavior in Exchange 2010 is very similar to the one we know from Clustered Continuous Replication (CCR) based cluster in Exchange 2007. That is the truncation of log files is dependent on the replay lag time and truncation lag time for the database copy.
Let’s take an example. If you have three non-lagged copies of a mailbox database, the log files generated on the server holding the active database won’t be truncated unless the following criteria are met:
- All log files have been replayed to the two passive database copies
- The database/log files have been backed up by an Exchange aware backup application or circular logging has been enabled for the mailbox database. Since the purpose of this multi-part article is to show you how tradtional point in time backups can be eliminated using native Exchange 2010 functionality, we will of course enable circular logging (see next section)
- Log files must be below checkpoint for the database (that is the minimum log file required for recovery)
If you in addition to the three non-lagged database copies have one lagged database copy, the following criteria must also be met in order for truncation to occur for the lagged database copy:
- The log files must be older than the configure replay lag time and truncation lag time
- The log files must have been truncated on the active database copy
And don’t worry the Exchange Replication service is clever enough to know it should truncate log files for all non-lagged copies even though there’s a huge replay queue on the lagged database copy. The logs only need to be processed by the inspector on the lagged copy.
Enabling Continuous Circular Logging
When choosing to go backup-less (which really is a wrong terminology as the lagged database copy can be considered a point in time backup), log files will not be truncated as this is usually done by the backup solution as mentioned in the previous section. So it’s important to enable circular logging for all databases stored on the mailbox servers in such a scenario. This can be done by opening the property page for each database. Here you click “Maintenance” and check “Enable circular logging” as shown in Figure 2.

Figure 2: Enabling Circular Logging
Bear in mind that there’s a significant difference in enabling circular logging for a single non-DAG protected mailbox database and a DAG protected mailbox database. When enabling circular logging for a DAG-protected database, continuous circular logging will be used. Again see the previous section on how log truncation works for DAG-protected databases.
Configuring a Lagged Database Copy
Let’s move on and configure a lagged database copy so I can show you how lagged database copies works and how you recover data from these database types. In my specific lab environment, I have three database copies for each of the 12 mailbox databases in my environment. Each database copy is stored on their own single 7200 RPM SATA class disk. Said in another way I use a RAID-less or more specifically a JBOD storage approach. In addition, I do not run any point in time backups against the databases.
For simplicity, I will only configure a lagged database copy for a database named MDB01. The first step is of course to add the mailbox server that will store the lagged database copy to the database availability group (DAG). In this article we will do so using the GUI. So let us open the EMC and expand “Organization Configuration” followed by selecting “Mailbox” and then the “Database Availability Groups” tab. From here we will right-click on the DAG and select “Manage Database Availability Group Membership” on the context menu. This brings up the wizard shown in Figure 3.
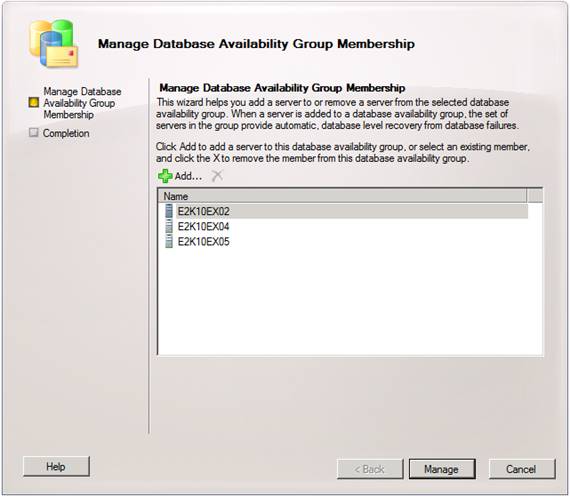
Figure 3: Added the Mailbox Server that will store the lagged database copy to the DAG
Here we need to click “Add” and then select the mailbox server we want to add to the DAG followed by clicking “OK”.

Figure 4: Selecting the Mailbox Server that should be added
After a few minutes the wizard should have added the new mailbox server to the DAG as shown in Figure 5.

Figure 5: Mailbox Server added with success
So far so good.
Before we add a lagged database copy to MDB01, let’s take a look at the settings for MDB01. We can do so by running the following command:
Get-MailboxDatabase MDB01 | FL

Figure 6: Database Copies, Replay Lag and Truncation Lag time for each
As you can see there are three database copies spread out over three mailbox servers and none of them are lagged.
Now let’ add the lagged database copy by running the following command:
Add-MailboxDatabaseCopy MDB01 –MailboxServer E2K10EX10 –ReplayLagTime 14.00:00:00

Figure 7: Seeding the new database copy
MDB will now be seeded to the mailbox server E2K10EX10. Depending on the size of the database this can takes several minutes. Also, as you can see we have configured it with a lag of 14 days, which is the maximum lag time we can configure.
The lagged database copy is now configured and from now on all log files generated on the active database copy will be replicated to the two non-lagged database copies as well as the lagged database copy. If we take a look at MDB01 in the EMC, we can see that the Replay Queue Length for the lagged database copy grows. In Figure 8, 422 log files has been replicated to the lagged database copy so far and each log file will be kept in the replay queue until they are older than 14 days.
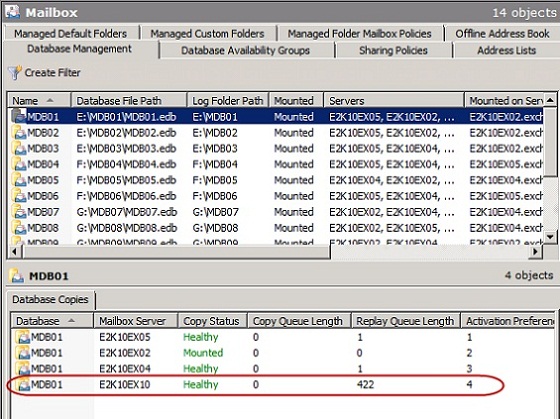
Figure 8: Outstanding logs in the Replay Queue
From Figure 9 and 10, we can also see that the EDB file for the lagged database copy is smaller than the non-lagged database copies. This is of course the case as the 422 log files hasn’t been replayed into the lagged database copy.
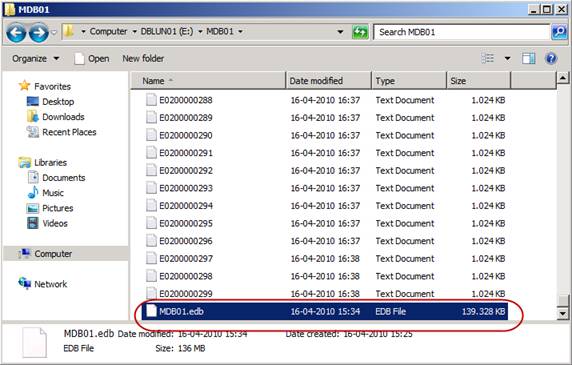
Figure 9: EDB file for lagged Database copy
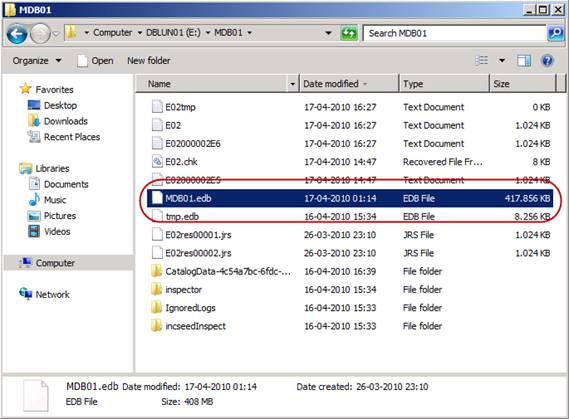
Figure 10: EDB file for active Database copy
Blocking Activation for Lagged Database Copy
In addition to enabling circular logging when going backup-less, you also want any lagged database copies to be blocked from possible activation. You would not want to allow failovers to a lagged database copy as this could result in losing the 14 day lag (although they typically will be blocked by the long replay queue).
In order to block a database from getting activated, you use a so called activation policy. It’s not possible to use the EMC to set this, but using the EMS, you can use the Suspend-MailboxDatabaseCopy cmdlet for this purpose. Yes correct, this cmdlet is typically used for suspending replication for a database copy, but when run with a special –ActivationOnly parameter, you can block a database copy from being changed to the active database copy.
In my lab environment I’m interested in blocking the lagged copy associated with MDB01 (stored on E2K10EX10) from ever being activated during a failover. For this, we use the following command:
Suspend-MailboxDatabaseCopy –Identity MDB01\E2K10Ex10 -ActivationOnly
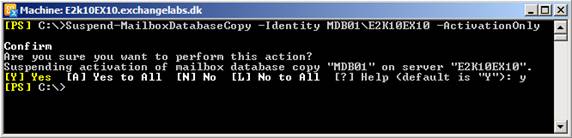
Figure 11: Blocking a database copy from being activated
When the cmdlet is run with the ActivationOnly parameter, the database copy cannot be activated until the following command is run:
Resume-MailboxDatabaseCopy –Identity MDB01\E2K10EX10

Figure 12: Unblocking a database copy from being activated
Ok so what if a Mailbox server is dedicated specifically for storing lagged database copies, and we want to block all databases on this particular DAG member from being activated. Will I need to run the above command against all lagged database copies on the server? Fortunately this is not the case. We have a similar command that works on the server level. If you want to block a DAG member instead, use the Set-MailboxServer with the DatabaseCopyAutoActivationPolicy parameter.
For instance, if I wanted to block DAG member E2K10EX10 from having any database copies activated, I would use the following command:
Set-MailboxServer –Identity E2K10EX10 – DatabaseCopyAutoActivationPolicy Blocked

Figure 13: Blocking a DAG member from being activated
We have now configured our lagged database copy and part 3 of this multi-part article ends here. However, you can look forward to part 4, where I will show you how to recover mail items from a point in time using a lagged database copy.
If you would like to read the other parts of this article series please go to


