If you would like to read the other parts in this article series please go to:
Introduction
In part 2 of this multi-part article, where I walked you through how to enable forms-based authentication for external and internal Outlook Web App 2010 (OWA 2010) users where Exchange 2010 is published using Forefront TMG 2010, we created and configured the new web site and the OWA/ECP virtual directories. We also re-configured the HTTPS virtual service on the load balancers, so that it pointed to the IP address associated with the new web site. Finally, we verified that access to the new OWA and ECP virtual directories worked as expected.
In this part 3, we’ll continue where we left off in part 2. We will fix the services, depending on the Exchange topology and namespaces used for each Exchange services we have broken back in part 2.
Fixing Broken Exchange Services
Back in part 2 of this multi-part article, we re-configured the load balancer in each datacenter so that the HTTPS virtual service was pointed to the IP address assigned with the new web site. In this specific environment, there’s only a single HTTPS virtual service configured on each load balancer and traffic to all Exchange services that are accessed via HTTPS goes through this single HTTPS virtual service.
Because HTTPS virtual service now points to the new web site created back in part 2, all requests to HTTPS based Exchange services are directed to the new web site. Since the new web site only hosts an OWA and ECP virtual directory (and a couple of OWA specific virtual directory for legacy coexistence purposes), we have broken internal access to autodiscover, Exchange Web Services, Offline Address Book, Out of Office and Exchange ActiveSync as the virtual directories for these services exists underneath the Default Web Site.
So how do we fix this mess? Well, this is actually pretty simple. We can introduce a new namespace for these services in each datacenter. In this article, we’ll add a two new FQDNs (services-1.exchangeonline.dk and services-2.exchangeonline.dk) to the existing SAN certificate. When the new SAN certificate has been reissued, we can install it on the four Exchange 2010 multi-role servers and assign it to the respective services. Since we use reverse SSL/SSL bridging, we should also remember to import this certificate on the load balancers. Not that the current HTTPS virtual service will need the two new FQDNs, but merely for the sake of using the same version of the certificate all way round.
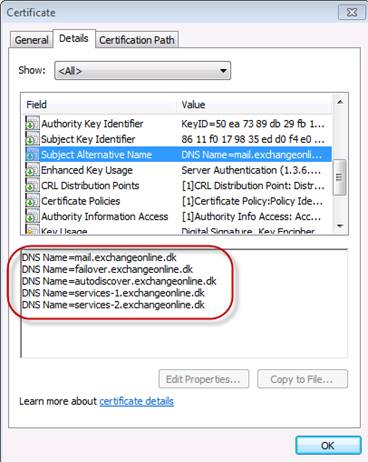
Figure 1: SAN List on New Certificate
When the new certificate has been installed, we needed to create an extra HTTPS virtual service on the load balancers and then change the URL for the above mentioned Exchange services to point to the IP address associated with this virtual service.
First, we create the new virtual service. As you already know I use Load Master load balancers from Kemp Technologies in this multi-part article. One cool feature in the Load Master UI is the possibility of duplicating an existing virtual service. So we’ll open the property page of the existing HTTPS virtual service and click “Duplicate VIP” in the upper right corner as shown in Figure 2.

Figure 2: Duplicating an existing virtual service
After having clicked on the “Duplicate VIP” button, we’ll need to enter the IP address (VIP) that should be associated with the new virtual service. We’ll use IP address “192.168.2.192” on the load balancer in the primary datacenter and “192.168.6.192” on the load balancer in the failover datacenter.
When the IP address has been entered, click “Duplicate VIP” (Figure 3).

Figure 3: Specifying the IP address that should be used with the new virtual service
We’re now presented with the property page for the new virtual service. Since we have duplicated an existing virtual service, the new service will (except for the service nickname) have the exact same basic settings as the source virtual service and these can be changed as needed.
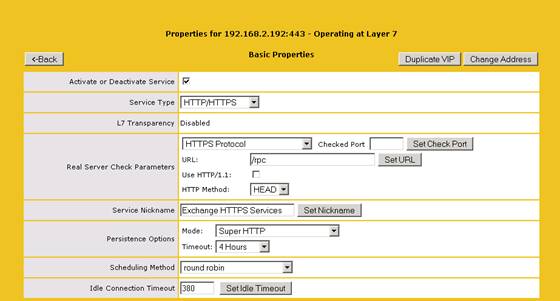
Figure 4: Basic properties for the new virtual service
Scrolling down to the next section reveals that the certificate installed on the source virtual service hasn’t been copied over. Since this is an HTTPS virtual service, we need to click “Add New” and import the SAN certificate.

Figure 5: Adding the SAN ceritficate to the new HTTPS virtual service
When certificate has been installed make sure that both SSL Acceleration “Enabled” and “Reencrypt” is ticked (Figure 6).

Figure 6: SSL Acceleration and Reencryption enabled
Now, let’s drill further down on the virtual service property page. More specifically down to the “Real Servers for this Virtual Service” section. As shown in Figure 7, the new virtual service point to the IP address assigned with the new web site we created back in part 2.

Figure 7: Virtual Service points to the IP address assigned with the new web site
Delete both entries then click “Add New” and add the IP address assigned with the Default Web Site. In this case for the primary datacenter, this is “192.168.2.221” on EX01 and “192.168.2.222” on EX02. In the failover datacenter, it’s “192.168.6.221” and “192.168.6.222”.

Figure 8: Adding the correct target IP addressed for the new HTTPS virtual service
Okay, we’re now done with the load balancer side of things. Next step is to add records for the new namespace to the internal DNS.
Creating Records in Internal DNS for the New Namespaces
With the new HTTPS virtual service created and configured, time has come to create two new DNS records in the internal DNS. One named “services-1.exchangeonline.dk” which will point to the new virtual service on the load balancer in the primary datacenter and one named “services-2.exchangeonline.dk” that points to the new virtula service on the load balancer in the failover datacenter.
Remember that these should be A-records and have a time to live (TTL) of 5 minutes in case you need to perform a datacenter switchover.
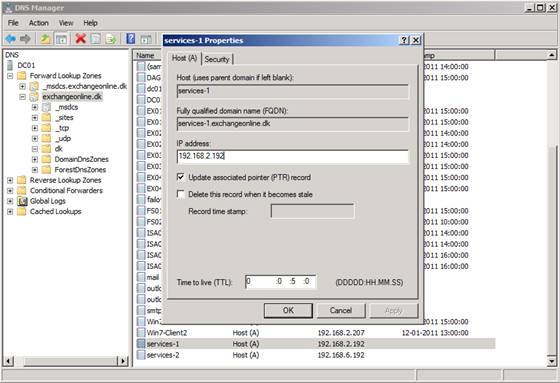
Figure 9: Creating DNS records for the new namespaces in internal DNS
After having created the DNS recrods, you should now get a reply when pinging “services-1.exchangeonline.dk” and “services-2.exchangeonline.dk” as shown in Figure 10.
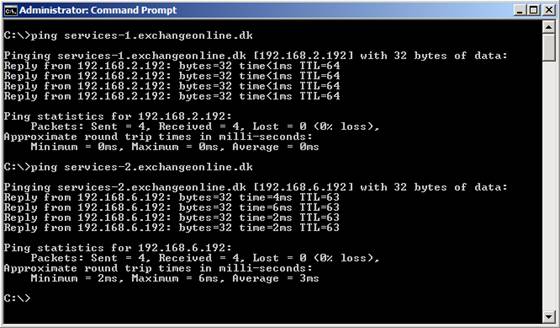
Figure 10: Pinging the new DNS records created in internal DNS
Alrighty, we can now move on and change the internal URLs for the respective Exchange services that should go through the new HTTPS virtual service.
Changing the Internal URL for the Broken Exchange Services
Now that we have a HTTPS virtual service that doesn’t point to the additional web site we created back in part 2, we need to change the URL/URI for the Exchange services that needs to hit the Default Web Site.
Internal Autodiscover URI
Currently the Internal Autodiscover URI points to “https://mail.exchangeonline.dk /Autodiscover/Autodiscover.xml” in both datacenters.
Note:
The AutoDiscoverInternalUri on CAS servers in the failover datacenter could also have pointed at “https://failover.exchangelabs.dk/autodiscover/autodiscover.xml” but by doing so you can easily end up in a situation where SCP’s aren’t reachable during a site failover. Also, cross-site traffic caused by autodiscover has a minor impact on the WAN link since autodiscover requests consists of small XML based text files. Said in another way, it’s a good best practice to point CAS servers in each datacenter to the same internal autodiscover URI.
To have the internal autodiscover URI updated to point to services-1.exchangeonline.dk, issue the following command on all four Exchange 2010 multi-role servers:
Set-ClientAccessServer –Identity EX01 -AutoDiscoverServiceInternalUri:https://Services-1.exchangeonline.dk/Autodiscover/Autodiscover.xml
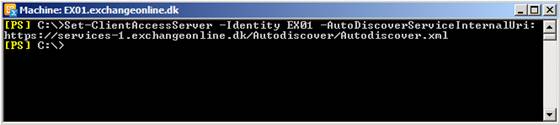
Figure 11: Updating the Internal Autodiscover URI
Exchange Web Services (EWS)
To update the internal URL for the Exchange Web Services (EWS) virtual directory, we should use the following commands:
Primary Datacenter:
Set-WebServicesVirtualDirectory -Identity “EX01\EWS (Default Web Site)” -InternalUrl https://services-1.exchangeonline.dk/ews/exchange.asmx
Set-WebServicesVirtualDirectory -Identity “EX03\EWS (Default Web Site)” -InternalUrl https://services-1.exchangeonline.dk/ews/exchange.asmx
Failover Datacenter:
Set-WebServicesVirtualDirectory -Identity “EX02\EWS (Default Web Site)” -InternalUrl https:// services-2.exchangeonline.dk/ews/exchange.asmx
Set-WebServicesVirtualDirectory -Identity “EX04\EWS (Default Web Site)” -InternalUrl https://services-2.exchangeonline.dk/ews/exchange.asmx

Figure 12: Updating the Exchange Web Services virtual directory
Offline Address Book (OAB)
To update the internal URL for the Offline Address Book virtual directory, we should use the following commands:
Primary Datacenter:
Set-OABVirtualDirectory -Identity “EX01\oab (Default Web Site)” -InternalUrl https://services-1.exchangeonline.dk/oab
Set-OABVirtualDirectory -Identity “EX03\oab (Default Web Site)” -InternalUrl https://services-1.exchangeonline.dk/oab
Failover Datacenter:
Set-OABVirtualDirectory -Identity “EX02\oab (Default Web Site)” -InternalUrl https://services-2.exchangeonline.dk/oab
Set-OABVirtualDirectory -Identity “EX04\oab (Default Web Site)” -InternalUrl https://services-2.exchangeonline.dk/oab

Figure 13: Updating the Exchange Web Services virtual directory
Exchange ActiveSync (EAS)
To update the internal URL for the Exchange ActiveSync (EAS) virtual directory, we should use the following commands:
Primary Datacenter:
Set-ActivesyncVirtualDirectory -Identity EX01\Microsoft-Server-ActiveSync (Default Web Site)” -InternalURL https://services-1.exchangeonline.dk/Microsoft-Server-Activesync
Set-ActivesyncVirtualDirectory -Identity “EX03\Microsoft-Server-ActiveSync (Default Web Site)” -InternalURL https://services-1.exchangeonline.dk/Microsoft-Server-Activesync
Failover Datacenter:
Set-ActivesyncVirtualDirectory -Identity “EX02\Microsoft-Server-ActiveSync (Default Web Site)” -InternalURL https://services-2.exchangeonline.dk/Microsoft-Server-Activesync
Set-ActivesyncVirtualDirectory -Identity “EX04\Microsoft-Server-ActiveSync (Default Web Site)” -InternalURL https://services-2.exchangeonline.dk/Microsoft-Server-Activesync
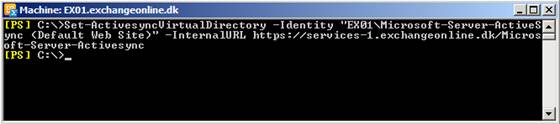
Figure 14: Updating the Exchange ActiveSync virtual directory
After having updating the internal URLs for the above virtual directories, it’s recommeende to launch an Outlook 2007/2010 client and verify that you can access OOF settings, download the OAB and view free/busy information for other users in the Exchange organization.

Figure 15: Accessing OOF Settings
If you still experience issues, you may also want to launch “Test E-Mail AutoConfiguration” in Outlook (by holding down CTRL and right-clicking on the Outlook icon in the System tray) and perform and autodiscover test to see whether each service points to the correct URL.

Figure 16: Testing service URL using “Test E-mail AutoConfiguration”
Offering Windows integrated & Basic Authentication for internal OWA/ECP Users
With the introduction of the additional HTTPS virtual service, you will also be able to offer internal OWA and ECP users Windows integrated and/or Basic authentication. You just need to point them to the new namespace. In order to make the experience as good as possible, this could for instance be accomplished by adding the respective links to the Intranet or by pushing the OWA links to the desktop using a group policy.
Also, remember that in order to get an SSO experience, the new namespace must be added to the trusted zone in the Internet browsers used on each workstation.
With that part 3 of this multi-part article ends. But it doesn’t stop here. In part 4, we’ll take a closer look at how to publish the configured scenario using Forefront TMG 2010.
If you would like to read the other parts in this article series please go to:


