If you would like to read the other parts in this article series please go to:
Introduction
In part 3 of this multi-part article, where I walk you through how to enable forms-based authentication for external and internal Outlook Web App 2010 (OWA 2010) users where Exchange 2010 is published using Forefront TMG 2010, we, depending on the Exchange topology and namespaces used for each Exchange service, fixed the Exchange services we broke back in part 2. With part 3, we ended up with the behavior require by the organization, when it comes to accessing OWA and ECP from an internal client.
In this part 4, we’ll continue where we left of in part 3. We’ll look at the current behavior we have for OWA/ECP and talk about how we want to load balance OWA/ECP for external users going through Forefront TMG 2010. Finally, we’ll import the respective SAN certificate on the Forefront TMG 2010 Servers.
Recap of the Exchange 2010 OWA/ECP Behaviour
So currently Exchange 2010 users accessing OWA or ECP from an internal client can do so via the “https://mail.exchangeonline.dk/owa“ and “https://mail.exchangeonline.dk/ecp“ and will be presented with the FBA logon page as shown in Figure 1.
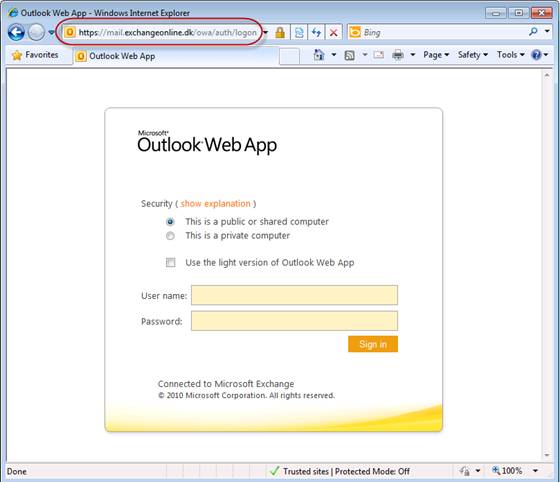
Figure 1: OWA FBA Logon Page presented to Internal Users
This was our primary goal. But we also let users that wish to do so connect to OWA via “https://services-1.exchangeonline.dk/owa” and ECP via “https://services-1.exchangeonline.dk/ecp“. When internal users use these URLs they will be automatically logged into OWA using the credentials that were used to log on to the client machine (if FQDN used to access OWA/ECP is in the browser’s local intranet zone as shown in Figure 2).

Figure 2: Outlook Web App 2010 URLs added to the Local intranet site in Internet Explorer
If the URLs are not in the browser’s local intranet zone, the user will be asked to enter his username and password as shown in Figure 3.

Figure 3: Accessing OWA 2010 using Basic authentication
Forefront TMG 2010 Solution
With the internal configuration completed, it’s time to focus on the Forefront TMG 2010 side of things. But before we do so, let me quickly describe the Forefront TMG 2010 solution used in this multi-part article.
We have a total of four Forefront TMG 2010 servers. Two in each datacenter. In both datacenters, the two Forefront TMG 2010 servers have been configured in a stand-alone array.
In case we need to perform a datacenter switchover from the primary datacenter to the failover datacenter, we need to update external DNS to point to the Forefront TMG 2010 stand-alone array in the failover datacenter. Because of this we will create identical web publishing rules on both TMG 2010 stand-alone arrays. Only difference is we’ll use the “mail.exchangeonline.dk” namespace on the TGM stand-alone array in the primary datacenter and the “failover.exchangeonline.dk” namespace on the TMG 2010 stand-alone array in the failover datacenter. In addition, the web publishing rules will of course point to the local Exchange 2010 multi-role servers (Figure 4) or the load balancer solution (Figure 5). We’ll discuss the pros and cons of each approach later in this multi-part article.
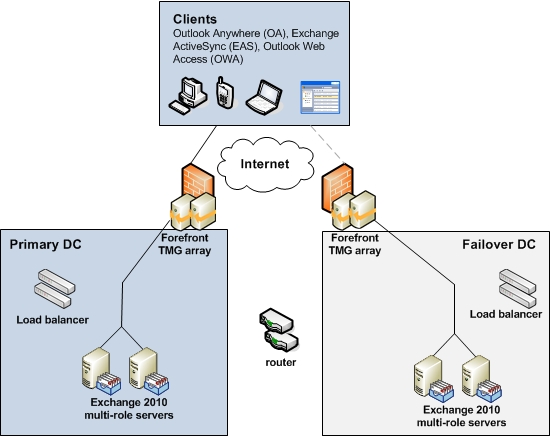
Figure 4: Pointing Forefront TMG Web Publishing rules at the Exchange 2010 Multi-role Servers

Figure 5: Pointing Forefront TMG Web Publishing rules at the Load Balancer Solution
Importing the New SAN Certificate to Forefront TMG 2010
The first thing we need to do is to import the new SAN certificate to the personal store on all four Forefront TMG 2010 servers (remember you need to include the private key in order for TMG to inspect the HTTPS packets).
To import the certificate on the TMG 2010 servers, copy the exported SAN certificate from one of the Exchange 2010 servers to TMG 2010 and then import it into the personal store (computer account) using the Certificates MMC snap-in. This is done by first opening an empty MMC by clicking “Start” > “Run” and typing “MMC.exe”. In the empty MMC console, click “File” > “Add/Remove Snap-in” (Figure 6).

Figure 6: Clicking Add/Remove Snap-in in Empty MMC console
Now select “Certificates” under “Available snap-ins” and click the “Add” button (Figure 7).

Figure 7: Selecting the Certificates snap-in
Now make sure to select “Computer account” then click “Next” (Figure 8).

Figure 8: Selecting Computer account
Select ”Local computer” and click “Finish” (Figure 9) and “OK”.

Figure 9: Selecting Local computer
Expand “Certificates” and right-click on “Personal”. In the context menu, select “All Tasks” > “Import” as shown in Figure 10.

Figure 10: Clicking Import in the context menu
On the certificate import wizard welcome page, click “Next” (Figure 11).

Figure 11: Welcome to the Certicate Import Wizard
On the “File to import” page, click “Browse” (Figure 12).

Figure 12: File to Import
Now navigate to the folder containing the certificate you wish to import and then click on the cetificate followed by click “Open” (Figure 13).

Figure 13: Pointing at the certificate that needs to be imported
Enter the password that has been used to protect the certifcate and click “Next” (Figure 14).
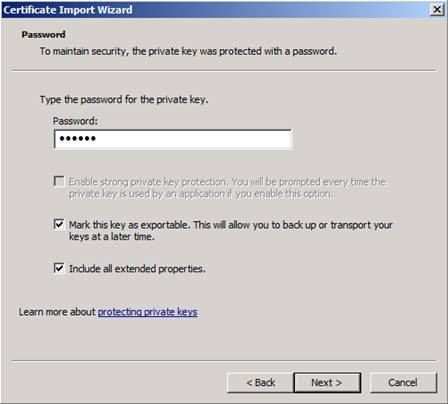
Figure 14: Entering the password that has been used to protect the certificate
Make sure “Place all certificates in the following store” is selected and then click “Next”.

Figure 15: Certificate Store
Now click “Finish” to exit the certificate import wizard (Figure 16).

Figure 16: Completing the Import Certificate Wizard
As can be seen in Figure 17, we now have imported the certificate we need for the Forefront TMG 2010 web publishing rules.
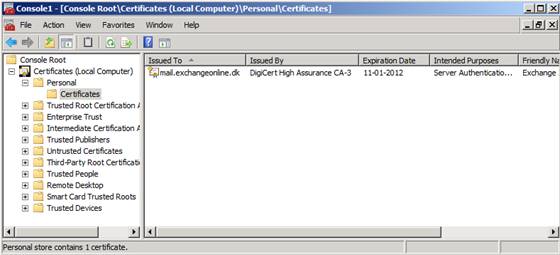
Figure 17: SAN Certificate now imported to the person computer account store
Bear in mind that even though we now have imported the required certificate, it doesn’t mean we have the necessary intermediate certificate. So please make sure the certificate chain isn’t broken.
If you use certificates from Digicert, you can use a nice little utility to check this and even repair any issues it may find (Figure 18).

Figure 18: Digicert Certificate Utility
The above steps should be completed on all four Forefront TMG 2010 servers.
Should I Publish the Exchange 2010 Servers or the Load Balancer?
The time has come to create the OWA/ECP web publishing rule. But first we need to decide whether we want to publish our load balancer solution or the Exchange 2010 multi-role servers. For midsize to large enterprise customers, I ususally recommend publishing the Exchange 2010 servers directly and thereby take advantage of the Forefront TMG 2010 web farm load balancing functioanality. This provides the best distribution of incoming client access traffic. You see, if you chose to publish the load balancer, the client access requests that are proxied from Forefront TMG to the load balancer would all appear to come from the same source IP address and hence the same client. This means that the load balancer would send all client requests coming from Forefront TMG to the same Exchange 2010 server.
This is default behaviour and controlled under the “To” tab of a web publishing rule as shown in Figure 19.

Figure 19: Requests appear to come from the Forefront TMG computer
As can be seen you have the option to change the “Proxy request to published site” from “Requests appear to come from the Forefront TMG computer” to “Requests appear to come from the original client”, but for this to work you would need to set the Forefront TMG server as the default gateway on the Exchange 2010 servers, which is far from ideal in most enterprise environments (especially when using DSR with your load balancer solution).
If you’re fine with not having external client requests that come in via Forefront TMG distributed across the Exchange 2010 servers, then go ahead and publish the load blaancer VIP. One advantage of doing so is that all client traffic follows the same common path. Which makes it easier to troubleshoot client access connectivity issues.
However, if you’re a midsized to large enterprise, then I recommend you publish the Exchange 2010 servers directly using the web farm load balancing functioanlity in Forefront TMG 2010. This is the approach we will follow in this article.
Important:
If you choose to publish the load balancer please bear in mind that tou need to publish the virtual service that points to the IP address associated with the Default Web Site in IIS not the new web site we created.
We have reached the end of part 4, but things don’t stop here. Part 5 will be published sooner than you think.
If you would like to read the other parts in this article series please go to:


