If you missed the first part in this article series please read Enabling Secure FTP Access Through ISA 2006 Firewalls (Part 1).
This article has been edited by Dr. Thomas Shinder.
WARNING:
The ISA Firewall, officially, does not support the FTPS protocol because protocol negotiations are encrypted and thus no application filter can process these negotiations. This article series provides a viable workaround. However, a side effect of the method described in these articles is that no unencrypted (FTP) connections will work. An alternative to our solution is to create a custom Server Protocol Definition for FTPS, and then use Pesach Shelnizt’s technique to prevenet conflicts with the default FTP Server Protocol Definition.
Introduction
In part 1 of this two part series, we demonstrated a problem with secure FTP server publishing using the ISA 2006 firewall. Using network sniffers, we say that the TLS negotation attempt by the client was denied, but it was not denied by the published FTP server. Instead, we saw that the security negotiation attempt was denied by the ISA firewall. The ISA firewall has an FTP applciation layer filter to support FTP connections, but it is not configurable (in contrast to the SMTP filter, which does enable some level of configuration). Because the built-in FTP application layer filter on the ISA firewall does not support TLS negotiation, you need to disable the FTP application layer filter either for the entire rule set, or for specific rules. We prefer to disable the FTP filter for specific rules due to the fact that SecureNAT clients will not be able to use the FTP protocol for outbound access if the filter is disabled globally. After disabling the FTP application filter, we demosntrated that the secure FTP connection was successfully established through the ISA firewall to the published IIS 7.0 secure FTP server. However, there is one more step – while we have enabled a secure FTP connection, we have not yet enabled secure data transfer over the channel. In this article, part 2 of this series, we’ll go over what you need to do to enable data transfer over the secure FTP link.
Every FTP story has two sides. The authentication channel is only the first part of the story. After we authenticate with the FTP server, we need to list directories and transfer files, this is done over a secondary data channel.

Figure 1
As you can see above, the authentication process runs well but the system hangs on command 150 Opening Binary mode data connection, and if we wait long enough we eventually get a time out.
Let’s have a look at what is happening on the wire:

Figure 2
As we saw earlier, you can see the TCP three way handshake packets, then the FTP authentication stream starts and at the end of the trace we can see a number of TCP handshake packets that are building up the data channel.

Figure 3
FTP’s data channel is a second TCP connection that opens. During the authentication process the FTP server sends the FTP client information about a dynamic secondary port it should open. After that, the client opens a socket on this secondary port and establishes the data connection. It Is important to note that this secondary port is a random dynamic high port. Up until Windows Vista, high ports where dynamically chosen starting at port 1024 up until 5000. But as of Windows Vista, Microsoft has changed the random port selection, that is why the random port you are seeing here is set to 49198 TCP. If you want more info on the changes made to random port selector, follow this link. This KB article shows that Windows Vista and Windows Server 2008 use a dynamic port range of 49152 through 65535.
By default, the ISA firewall’s FTP application filter takes care of the random port used for the secondary connection by dynamically opening ports when clients connect to a published FTP server. However, because we needed to disable the application filter to pass the Auth TLS command we will need to manually compensate for the absence of the FTP application filter on the ISA firewall.
Step 1:
The first thing we will want to do is manipulate the way the FTP server allocates random ports. We want to move away from the random port assignment and control what ports are used. As a second setting, we will also need to tell the FTPS server what the public IP address is of our ISA firewall.
The place to do this is in the IIS configuration window. To set the static ports you have to be on the server node not the website level, as seen in the figure below. Double click on the FTP Firewall Support icon.

Figure 4
You can enter any port range here but for this example we will go for 5000-5003 > then press Apply, as seen in the figure below.


Figure 5/6
Step 2:
The second thing we must do is set the ip address on the web site level. Expand Sites and click on Default Web Site. Then double click on the FTP Firewall Support icon.

Figure 7
Enter the public IP address that you’re using for the listener on your FTP Server Publishing Rule on the ISA firewall. Then click Apply.


Figure 8/9
For some reason, my experience has been that hitting Apply does not cause these changes to become active. The best thing to do is restart the Microsoft FTP Service from the Services management console.

Figure 10
Step 3:
The last thing we will need to do is configure our FTP Server Publishing Rule on the ISA firewall. Here we will add our port range as the primary connection ports. When you go to edit the FTP Server Publishing Rule, you will see that you are unable to modify the Parameters. This is because this is a default protocol definition and Microsoft does not allow you to modify these definitions.

Figure 11
To solve this problem, we will create our own FTPS server Protocol Definition. So head back to the Traffic tab and click New.

Figure 12
Enter a name for the new Protocol Definition on the Welcome to the New Protocol Definition Wizard page. In this example we will name the Protocol Definition FTPS. Click Next.

Figure 13
On the Primary Connection Information page, click the New button.

Figure 14
In the New/Edit Protocol Connection dialog box, select TCP for the Protocol type. Set the Direction for Inbound and set the port range From 21 To 21. Click OK.

Figure 15
Click New again on the Primary Connection Information page. Set the Protocol type to TCP. Set the Direction to Inbound and set the Port Range to From 5000 To 5003. Click OK.

Figure 16
You will see the new primary connection on the Primary Connection Information page. Click Next.

Figure 17
Select No on the Secondary Connections page and click Next.

Figure 18
Click Finish on the Completing the New Protocol Definition Wizard page.

Figure 19
On the Traffic tab, you will see that our new Protocol Definition is now seen in the Allow network traffic using the following protocol drop down list.

Figure 20
Click Apply to save the changes and update the firewall policy. Click OK in the Saving Configuration Changes dialog box.
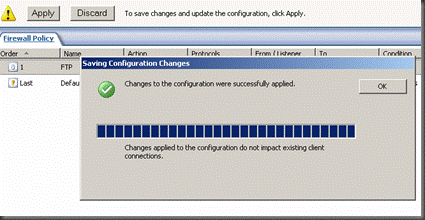
Figure 21
Step 4:
Head back out to the FTP client and retry the connection, you should see the connection work now.
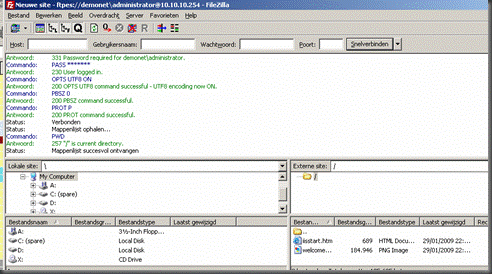
Figure 22
Summary
In this article, part 2 of our two part series on publishing secure FTP servers, we saw that while we could establish a connection to authenticate with the published FTP server using the default FTP Protocol Definition, we could not establish a data connection. In order to support the data connection, we first had to make change to the FTPS server, so that we limited the high ports used for the connection; we also had to configure the FTP server with the IP address on the external interface of the ISA firewall used for the listener on the FTPS Server Publishing Rule. After making the changes on the FTPS server, we changed our FTPS Server Publishing Rule so that it would use a new FTPS server Protocol Definition. After making the changes, we demonstrated that the FTPS client connection to the FTPS server was successful.
If you missed the first part in this article series please read Enabling Secure FTP Access Through ISA 2006 Firewalls (Part 1).


