If you would like to read the first part in this article series please go to Exchange 2007 Mailbox Access Auditing (Part 1).
Introduction
This is the second and final part of an article series on the new mailbox access auditing feature introduced in Exchange 2007 Service Pack 2. In part one we looked at enabling the feature using the Exchange Management Shell and then went on to looking at the events recorded when a user accesses their own mailbox as well as the mailbox of a different user. Here, in part two, we will complete our look at this new feature by covering how to use the Exchange Management Shell to enable auditing as well as looking at the events recorded by the Message Access and Send As logging categories. However, we will start part two by looking at how we can bypass auditing for specific accounts.
Bypassing Auditing
In part one of this two-part article series we saw how a new Exchange auditing event log entry was created when one user accessed the mailbox of another user. After reading this, you may have wondered what happens in those cases where the service account of an application, such as a backup application, accesses all mailboxes as part of its normal operations. Surely in such cases many Exchange auditing event log entries will be created as the application does it work? Fortunately, this situation has been catered for via the Bypass Auditing right which is an extension to the schema performed during the installation of Exchange 2007 Service Pack 2. In the aforementioned situation, the Bypass Auditing right is granted to the account used by the backup application. By granting the Bypass Auditing right to an account, no logging events will occur for this account.
The Bypass Auditing right needs to be granted to an account against each relevant mailbox database. If you have spread your users’ mailboxes randomly across all databases then clearly you will need to ensure that this right is granted against all mailbox databases. To grant the Bypass Auditing right you can use the Add-ADPermission cmdlet. In the example cmdlet below, the service account neilhobson\svc-backup has been granted the Bypass Auditing right against all mailbox databases because the results of the Get-MailboxDatabase cmdlet, which will return all databases, has been piped into the cmdlet to add the necessary rights. Here is the example cmdlet:
Get-MailboxDatabase | Add-ADPermission -User neilhobson\svc-backup –ExtendedRights ms-exch-store-bypass-access-auditing –InheritanceType all
You can see the results of running this cmdlet in Figure 8 where the right has been granted against all four mailbox databases on the server called E2K7.

Figure 8: Adding The Bypass Auditing Right
Management Shell Configuration
Also in part one of this article we saw how to use the Exchange Management Console to configure the diagnostics logging level. Obviously it is also possible to use the Exchange Management Shell to do this and so here we will take a look at how to do this.
In Figure 4 in part one of this article, we saw how to set the Folder Access diagnostics logging category that is found under the MSExchangeIS\9000 Private category. To do the same thing in the Exchange Management Shell, you must first use the Set-Location cmdlet to point to the registry location that is used to alter the diagnostics logging level. In PowerShell, the Set-Location cmdlet is used to navigate through not only the file system, but also the registry. The full registry path required to set the diagnostics logging level is:
HKLM\SYSTEM\CurrentControlSet\Services\MSExchangeIS\Diagnostics\9000 Private
In Figure 9 below you can see the various values that are present in this registry key; we will refer back to these a little later in this article.

Figure 9: The 9000 Private Registry Key
The first cmdlet you need to run is shown immediately below. This sets the Exchange Management Shell so that it’s now working in the specified registry location.
Set-Location “HKLM:\System\CurrentControlSet\Services\MSExchangeIS\Diagnostics\9000 Private”
Once you have executed this cmdlet, your cursor should change from the regular folder prompt to be the registry location prompt. In Figure 9 above you can see that the Folder Access category has a full value name of 9074 Folder Access, with a specified Data value of 0. The value name is important as this is the name we now need to specify when changing the data value. To alter the value of this registry setting we need to use the Set-ItemProperty cmdlet with the Path, Name and Value parameters. For the path, we just need to use the local path which is specified as a period (.). For the name, we need to use the value name of 9074 Folder Access as discussed previously. Finally, for the value we need to specify our required diagnostics logging level which in part one of this article was specified as Medium.
To set the diagnostics logging level to a value of Lowest, use a value of 0.
For a level of Low, use 1.
For the Medium level, use 3.
Finally, for the High level, use 5.
Therefore, the cmdlet that we now require to run is as follows:
Set-ItemProperty –Path . –Name “9074 Folder Access” –Value 3
If all goes well, the cursor should simply move straight to the next line. To prove that the setting has been made, simply run the Get-ItemProperty cmdlet with the Path parameter specified as a period (.) as shown here:
Get-ItemProperty –Path .
The results will look similar to that shown in Figure 10 below. The cmdlets used above may not necessarily be the most intuitive to use if you’re not too familiar with PowerShell but if you plan on scripting the build of your Exchange 2007 servers these cmdlets can easily be added to any PowerShell script.
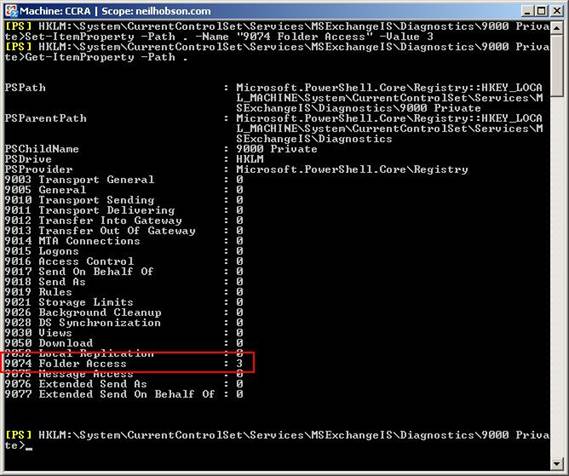
Figure 10: Registry Set Via Exchange Management Shell
Additional Client Information
As I stated in part one of this article series, you can begin to see additional client information within the event log description text of the event log entry recorded when a folder is accessed by another user. The full client information displayed in the event log entry shown in Figure 6 in part one of this article series is as follows:
Machine Name: CCR-SRV1
Address: 192.168.50.50
Process Name: w3wp.exe
Process Id: 0
Application Id: Client=OWA
As you can see, it is fairly clear from this information that Mark has accessed Rob’s folder from Outlook Web Access running on the server CCR-SRV1 that has an IP address of 192.168.50.50. If Outlook is used as the client application, expect the process name to be OUTLOOK.EXE rather than w3wp.exe as shown above.
Event Log Levels
In part one of this article series we saw how the event log level was set to Medium for folder access. We saw how this was set in the Manage Diagnostics Logging Properties wizard, a reminder of which is pictured in Figure 11 below.

Figure 11: Manage Diagnostics Logging Properties
You can also see in Figure 11 that there are five different event log levels starting at Lowest and ending at Expert. The different event log levels will naturally record differing amounts of information into the event log. The medium level is sufficient to capture access to normal user mailbox folders; it’s really not necessary to select any level higher than this unless you want to capture access to information in the non-IPM subtree or folders such as the mailbox root folder that is also known as the Top of Information Store as you can see in Figure 12.
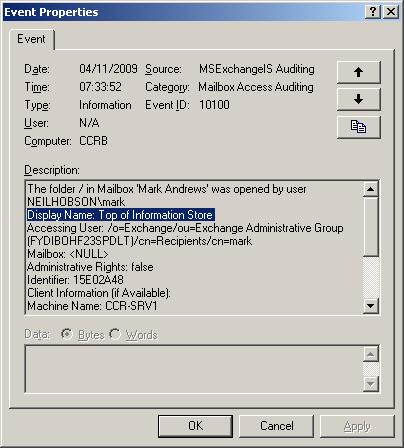
Figure 12: Event ID 10100 – Mailbox Root Folder
Auditing Other Areas
Similar event log entries are recorded for the other categories of Message Access, Extended Send As and Extended Send On Behalf Of. For example, if the Message Access category is set to a level of Medium and Mark accesses a message in Rob’s mailbox, event ID 10102 is recorded as you can see in Figure 13. You will notice from Figure 13 that the message ID of the message that was accessed is revealed, along with other important information such as the folder that contained the message, the distinguished name of the accessing user as well as the distinguished name of the owning mailbox. The event log entry also includes the same client information that you saw earlier in this article.
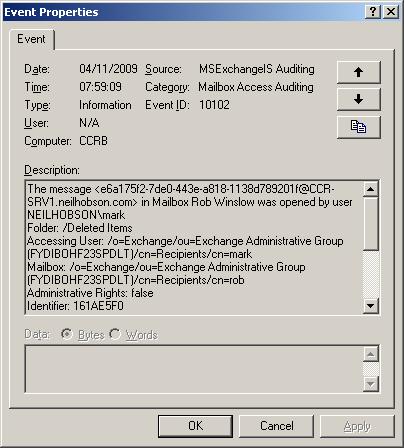
Figure 13: Event ID 10102 – Message Access
When auditing the Extended Send As category, the event log event ID changes to 10106 and the category changes to Send As as you can see from the example entry in Figure 14. Here you can see that the event log description reveals the distinguished names of the users involved in the transaction and that Mark has sent a message as if it came from Rob.
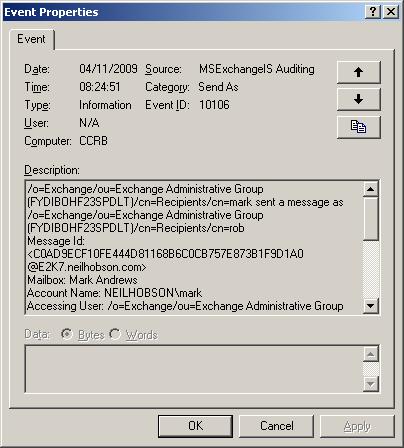
Figure 14: Event ID 10106 – Send As
Summary
That completes our two-part look at the new mailbox access auditing feature of Exchange 2007 Service Pack 2. This is a very powerful feature that can quickly fill your event logs with a lot of information, so clearly planning how you are going to enable this feature is important. What is also important is planning on how long you are going to retain the event logs once you’ve captured this information.
If you would like to read the first part in this article series please go to Exchange 2007 Mailbox Access Auditing (Part 1).