Introduction
Exchange Server 2010 Edge Role provides a way to place Exchange Servers in the perimeter network (aka DMZ) that route messages from external to the internal messaging system and vice versa. The edge server role existed from Exchange 2007 and reaches its second release with Exchange Server 2010.
Designing Edge Server Implementations
If an administrator decides to implement relay servers that will typically reside in the DMZ and choose to create them based on Window Servers, then Exchange Server Edge Roles may be the appropriate solution, particularly when the company uses Exchange Servers as their primary messaging environment. Additionally, it might be very interesting to choose Exchange as relay servers.
An Exchange Edge server is a Windows Server 2003 or 2008/R2 based system that is not member of a domain, however, it is a member of a workgroup. This is the most important design thing; otherwise the Active Directory Domain would need to cross internal firewalls, which is quite unsafe.
Edge Servers are a specific design of Hub Transport Servers that don’t rely on Active Directory, their “Directory Service” is the “Active Directory Lightweight Directory Service (ADLDS), which probably was better known as “Active Directory in Application Mode (ADAM).
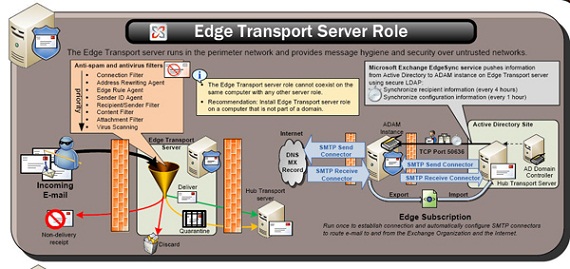
Figure 1: Exchange Edge Server Concepts & Design
The setup of an Edge Server is quite easy and straight forward; you would only need to choose the correct role in the Exchange Server Setup Utility.
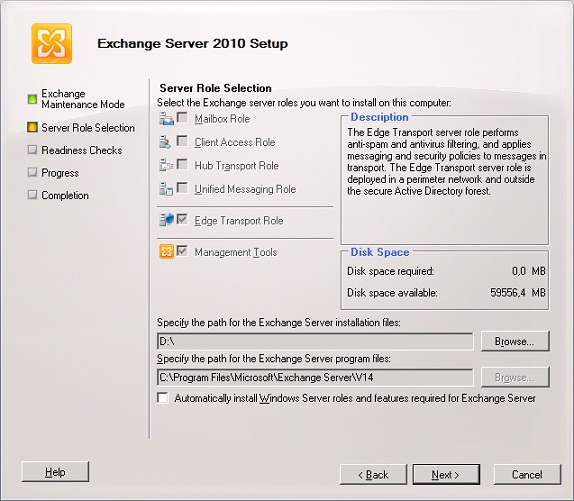
Figure 2: Choose the correct Role in SETUP.EXE
The Edge Server system provides the following functions:
-
Accept incoming Email from external
-
Accept outgoing Email from internal
-
Check if Email is SPAM and probably delete or reject it
-
Check if Email is Virus infected and probably delete the virus or reject the mail
-
Check if Email is for an existing user and probably reject the email
When implementing Edge Servers, a very importing decision is to choose a suitable Antivirus & Antispam solution which is specifically designed for Edge Servers, but in general the most well-known Antivirus Solutions provide this support.
To setup an Edge Server Role using the command line, the syntax is as follows:
Setup.com /roles:EdgeTransport /InstallWindowsComponents
The parameter /InstallWindowsComponents makes sure that missing Windows componects are added automatically to the SETUP component. After a successful installation it is recommended to install the latest cumulative update, as of now this is CU6 and can be downloaded here:
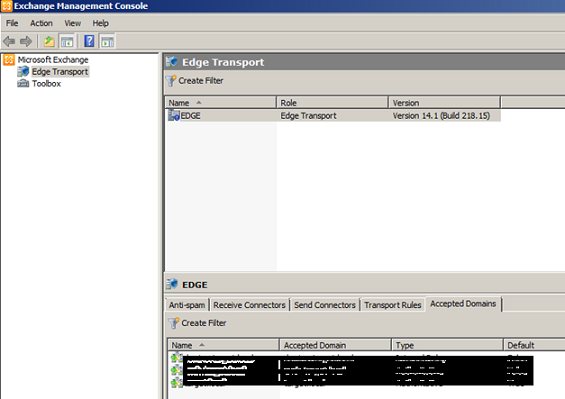
Figure 3: Edge Server Console in action
As you can see above, there is no difference in Exchange Server Console. The properties of each server are:
-
Anti-Spam (for enabling Content Filtering, IP Allow List, IP Allow List Providers, IP Block List, IP Block List Providers, Recipient Filtering, Sender Filtering, Sender ID and Sender Reputation)
-
Receive Connectors (for configuring from which IP address emails are accepted)
-
Send Connectors (for configuring where to send internet emails to)
-
Transport Rules (for modifying emails before sending them to the internet)
-
Accepted Domains (routable domains for which Exchange is responsible)
The following ports need to be opened on the firewalls (Edge or backend Firewall):
| Source | Destination | Port | Protocol | |
| Edge Server | è | Internet | 25 | SMTP (TCP) |
| Edge Server | è | internal | 25 | SMTP (TCP) |
| Internet | è | Edge Server | 25 | SMTP (TCP) |
| Intranet | è | Edge Server | 25 | SMTP (TCP) |
| Hub-Server | è | Edge Server | 50636 | User Defined(TCP) |
Table 1
High Availability
In general companies need to provide high available messaging solutions. Due to Exchange Server Edge Roles operate on Windows Sockets (IP address + IP port) the easiest way to provide high availability is through “Network Load Balancing”. For Exchange Edge this is the only and supported concept.
There are two ways to provide “Load Balancing”:
- Hardware Load Balancer
- Software Load Balancer
With the underlying Windows Operating System you still have a “Software Load Balancer” included called “Network Load Balancing”, so in general this is your first choice if no company internal concepts omit it. Windows Network Load Balancing is supported for single network interface card or those with two network interface cards. The configuration of NLB is nearly the same and quite easy using the NLB Configuration Wizard. If you would like to configure using the command line, then WLBS.EXE or NLB.EXE will become handy.
After another (second) installation of Exchange Server Edge Role with default configuration is quite easy to finish. To configure your second Edge Server the same as the first one, you can transfer the configuration quite easy.
-
Export the configuration using the following command line:
./ExportEdgeConfig -cloneConfigData:”C:\CloneConfigData.xml” -
Modify the XML and replace the name of Edge Server1 with the one of Edge Server2.
-
Validate Configuration and create a new answer file.
./ImportEdgeConfig -CloneConfigData:”C:\CloneConfigData.xml” -IsImport $false -CloneConfigAnswer:”C:\CloneConfigAnswer.xml” -
Import the modified configuration using the following command line:
./ImportEdgeConfig -CloneConfigData:”C:\CloneConfigData.xml” -IsImport $true -CloneConfigAnswer:”C:\CloneConfigAnswer.xml”
Enable Edge Server Synchronization
To finally enable Edge Server Synchronization, you need the following PowerShell command on your Edge Server(s):
New-EdgeSubscription –FileName “C:\Edgeinfo.xml”
Now, we need to copy the Edge subscription file to the Hub Transport server in Exchange Management Console and click “New Edge Subscription>New Edge Subscription Wizard”. If you experience any errors, the application log will help you troubleshoot the issue.
To enable a full synchronization we need the following cmdlets in Exchange Management Shell:
Start-EdgeSynchronization -Server <Hub> -TargetServer<Edge> -ForceFullSync
Conclusion
As you have seen above, the configuration of Exchange Edge Servers for relaying emails to and from the internet is quite easy and straight forward; although, you cannot configure it completely from the Management Console.
If you still experience any questions, please don’t hesitate to contact me.


