Welcome to Part 3 of our series on building an Exchange 2019 environment from scratch. In Part 2, we looked at installing all the prerequisites for Exchange 2019, and we did the full PowerShell prerequisite install manually instead of letting the setup do that for us. In this part, where we will use unattended installation mode, we are going to focus on the following:
- Running the command to PrepareAD.
- Running the command to PrepareSchema.
- Running the Exchange 2019 unattended installation.
In Part 2, I spoke about the 2x commands above. Below, you will see how it’s run.
Take note: If you do want to have one of these Exchange versions, you need to install it in your environment and then run the command below. To prepare AD, you need to run the following command from an elevated command prompt:
Setup /IacceptExchangeServerLicenseTerms /PrepareAD
It will look like the setup has started, but it’s simply getting the environment ready for Exchange 2019:
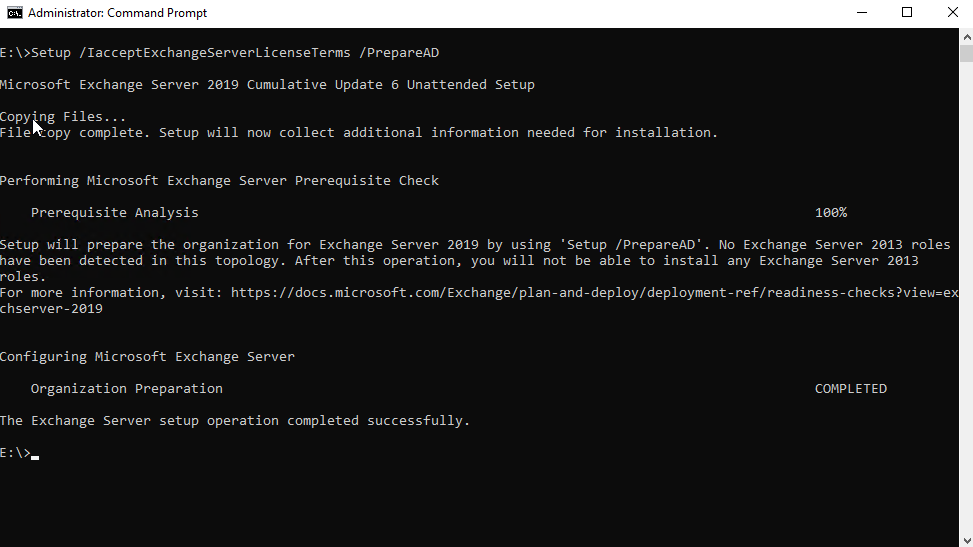
As you can see, the preparation was successful. Take note of the warning that you now cannot introduce Exchange 2013 or Exchange 2016 in the environment.
Exchange unattended installation mode: Preparing the schema
Now let’s move on to preparing the schema. Don’t forget that the user account that you are running the install with has to have schema admin rights. Within the same elevated command prompt, type in the following command and then press enter:
Setup /IacceptExchangeServerLicenseTerms /PrepareSchema

As shown above, the setup has successfully extended the schema. As this is a lab in Azure, replication is pretty quick, but in your production or lab environment, it might take a bit longer.
Now we can run the unattended installation setup from the same elevated command prompt. Do this by running the following command:
Setup.EXE /Mode:Install /IAcceptExchangeServerLicenseTerms /Roles:MB
Let’s explain what is happening in the command above. We are setting the mode to install, and we are accepting the license terms. If you do not have this, the setup will fail and let you know, and lastly, we want to install the mailbox role, so we put in MB.
If we didn’t install the PowerShell prerequisites as per Part 2 of our series, we could have run the command as follows:
Setup.EXE /Mode:Install /InstallWindowsComponents /IAcceptExchangeServerLicenseTerms /Roles:MB
Notice that the extra part /InstallWindowsComponents is listed above. Whatever commands works for you — decide what you want to run.
Running the Exchange 2019 unattended installation
Now we can start our unattended setup and then sit back and make a cup of coffee while it does the installation. The following will be installed:
- Languages.
- Management tools.
- Mailbox Role: Transport service.
- Mailbox role: Client access service.
- Mailbox role: Mailbox service.
- Mailbox role: Front end transport service.
- Mailbox role: Client access frontend service.
Take note: In the screenshot below. If this was an Exchange 2019 installation coexisting with Exchange 2016 and you had Mapi over HTTP disabled, you will get a warning that it is the recommended client connectivity protocol. You should enable it, however, because we are doing a clean install. It gets enabled by default, so remember that your clients need to be on the newer versions to work with it or they will fall back to RPC.
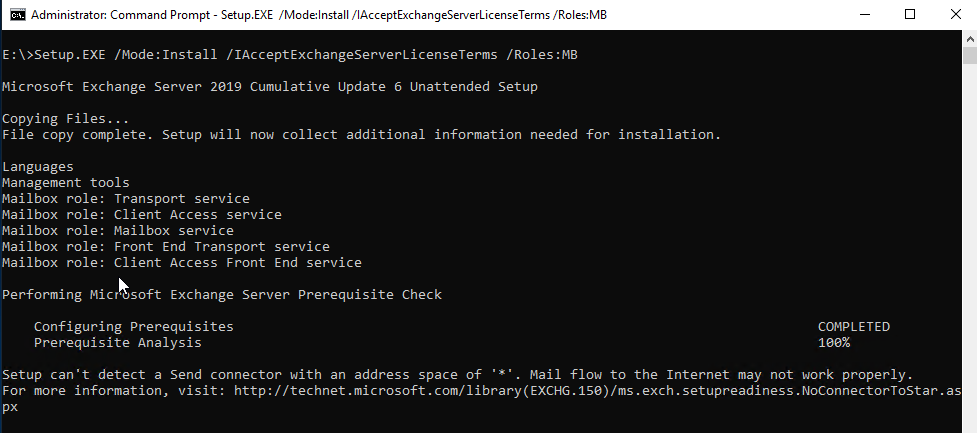
Also take note of the warning that it could not find a send connector. That is because we do not have Exchange installed yet to configure one, which we will cover in later parts of the series.
One thing to mention here: In the screenshot below, you will notice that it says “Copying Exchange Files” and it stays on 16 percent for some time and then moves to 100 percent and stays there as well. This is normal, so please do not think that the setup is broken and cancel it and attempt it again as you will then run into issues that Exchange is partly installed and then have to do a cleanup or recovery.

Be patient — Exchange requires a lot of patience. Once you come back from your coffee break, the parts listed above will complete pretty quickly. I have found that the last item, “Finalizing Setup” in both Exchange 2016 and Exchange 2019, seems to take a little while to finish as well.
Once the setup has completed, you will have a command prompt window similar to the one below:

And we’re done (almost!)
There you have it, a new installation of Exchange 2019 in your environment. I would recommend rebooting your server before making any other changes so you do not get any false/positives that the Exchange Admin Center won’t work, etc.
Even though your setup is complete, the actual setup of your URLs and configuration of Exchange Server 2019 still has to take place. Here are a few highlighted items that we will look at in Part 4 of our building an Exchange 2019 environment from scratch series:
- Licensing Exchange 2019.
- Configuration of URLs.
- Turning off access to the Exchange Admin Center (EAC) due to the attack on it.
- Creating your CSR and submitting it to a third-party provider so you can secure Exchange.
- Configuring storage.
- Installing an additional server.
- Creating a Database Availability Group (DAG).
On a final note, if this is a production server, make sure that your configurations are done before putting the users on so that they have a good experience with Exchange.
More to come
There’s more to do in building an Exchange 2019 environment from scratch, so stay tuned for more articles in this series.
Featured image: Shutterstock


