Introduction
For compliancy reasons it can be useful if your company has certain rules on how to store information and how long this information needs to be stored. This is not only valid for paper files, but also for digital files and e-mail messages.
Starting with Exchange Server 2007, Microsoft had a preset functionality built into the product that could help manage your digital information, i.e. your e-mail message. The amount of information received by users can be overwhelming, and the technology can help you manage this amount of information. This is what Microsoft calls “Messaging Records Management” or MRM.
Managed Folders
Exchange Server 2007 has a feature called “Managed Folders” which is the first version of MRM. Managed Folders are folders in your inbox with certain rules or policies. For example, you can create folders that will keep information for one year, for 5 years or even more. When the retention time has expired you can define that messages will be permanently deleted or “marked as past retention” for example. Using Managed Folders it is now possible to help users deal with their amount of digital information, while on the other hand comply with certain policies.
Note:
Before you start implementing Managed Folders be sure you are fully backed up by your legal department because you are working with company information that might potentially be deleted!
To implement Management Folders you have to follow three steps:
- Create the Managed Folders
- Create Managed Content Settings
- Create the Managed Folders Mailbox Policies
- Assign Policies to Mailboxes
To create Managed Folders in Exchange Server 2007 you have to open the Exchange Management Console and navigate to the Mailbox option in the Organization Configuration. There are two tabs available:
- Managed Default Folders – This is for managing the Default Folders, like the Inbox, Calendar, Sent Items or the Entire Mailbox.
- Managed Custom Folders – This is for creating Custom Folders in the Mailbox for special purposes. These folders will be visible in the Inbox in a special folder called “Managed Folders”.
In this example we will create a Custom Folder for the Finance Department. In this folder messages can be stored, but they will be deleted after 2 years. Select the Managed Customer Folders tab and in the Actions Pane click on “New Managed Custom Folder…”. After the wizard has opened, assign the new folder a name and enter a comment that will be shown in Outlook when a user selects this folder:
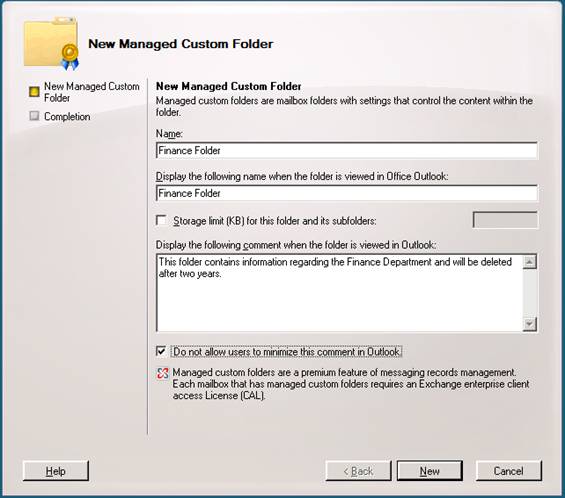
Figure 1: Click New to create the folder in the Exchange Management Console
The second step is to create the Managed Content settings. In step you actually define what’s going to happen with the messages stored inside the Managed Folder, and in this example we’ll create a setting that will delete the contents after 2 years (2 years = 720 days).
Right Click the new Custom Folder and select “New Managed Content Settings”.

Figure 2
Click Next to Continue. When needed, you can specify a journaling mailbox that will receive a journal copy of all messages that are moved to this particular Managed Folder. Review the Configuration Summary and everything is okay click New to actually create the Managed Content Settings.
The third step is to create the Managed Folders Mailbox Policy. In this step we will create a policy that contains the Managed Folder and the accompanying Content Settings we created in the first two steps. This policy can then be assigned to particular mailboxes.
In the Organization Configuration in the Exchange Management Console select the Mailbox Option and select the “Managed Folder Mailbox Policies” tab. In the Actions Pane select the “New Managed Folder Mailbox Policy”. In the wizard, enter a Mailbox Policy Name and specify the Managed Folders that will be included in this policy. Select the “Finance Folder” and click New to create the new Managed Folder Mailbox Policy.

Figure 3
The final step is to assign the new Managed Folder Mailbox Policy to a Mailbox. In the Exchange Management Console select a Mailbox and open its properties. Select the Mailbox Settings tab and select the “Messaging Records Management” and click Properties.
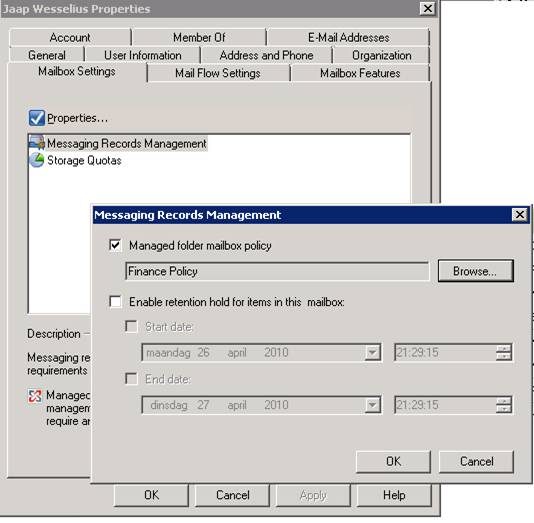
Figure 4
In the Messaging Records Management pop-up that appears click Browse and select the Finance Policy, click OK twice to close all boxes. A warning is displayed saying that this feature is fully supported by Outlook 2007 but that older clients do not have all functionality to support this feature set:

Figure 5
Click Yes to continue and close all property boxes. The Managed Folder is now assigned to the Mailbox and all we have to do now is to start the Managed Folder assistant. Open the Exchange Management Shell and enter the following command:
Start-ManagedFolderAssistant
However, you have to be aware that you start the Managed Folder Assistant on the Mailbox Server where the actual Mailbox exists! When you open the Mailbox with Outlook Web Access, for example, you will see the new Managed Folder including the comments we have set in an earlier step.

Figure 6
When the user moves messages from his mailbox into the Finance Folder the messages will be kept for two years. After two years the messages will be permanently deleted. When you create new Mailboxes you can select a Managed Folder to apply during the actual creation so the new Mailboxes will have right Managed Folders immediately.
Retention Policies
In Exchange Server 2010, Microsoft implemented Messaging Records Management version 2, which is built on the concept of Retention Policies. With Retention Policies it is possible to apply one or more so called Policy Tags to messages or folders. In these Policy Tags you can define what Exchange has to do with messages that are tagged with these tags, like delete a message, move it to the Deleted Items Folders or move it to the Personal Archive. There are three types of Policy Tags available:
- Default Policy Tag – the Default Policy Tag is applied to all items that do not have a Retention Policy applied, either directly or inherited.
- Retention Policy Tag – These are Policy Tags that are meant for default folders, like the Inbox, Deleted Items etc.
- Personal Tag – These are custom tags that are used by Outlook 2010 and Outlook Web App. Users can select these tags and apply them to custom folders and individual messages.
Using Policy Tags, it is possible to specify what has to happen to an item with this specific Policy Tag. The following options are available when the item reaches its retention time:
- MoveToArchive – The item is moved to the Personal Archive.
- MoveToDeletedItems – The item is moved to the Deleted Items folder.
- DeleteAndAllowRecovery – The item is moved to the Deleted Items folder and is stored in the Dumpster. When needed it can be recovered from the Dumpster.
- PermanentlyDelete – The item is permanently deleted, both from the inbox and it is removed from the Dumpster. It cannot be recovered from the Dumpster.
- MarkAsPastRetentionLimit – the item is marked as past its retention time. Using Outlook or Outlook Web App will show this message with a strikethrough font.
Before you start working with Retention Policies you have to know, especially when you want to use the “MoveToArchive” option, that the Personal Archive is not compatible with Managed Folders! The first step is to create the Policy Tags. Unfortunately, in Exchange Server 2010 RTM this is only possible in the Exchange Management Shell. So, to create a Policy Tag for the Finance Department with a retention time of 1 year we have to open the Exchange Management Shell and enter the following command:
New-RetentionPolicyTag “Finance-Default” -Type All -RetentionEnabled $true -AgeLimitForRetention 720 -RetentionActionPermanentlyDelete -IsPrimary $true
This command creates a Retention Policy Tag, and when applied to a mailbox (as part of a Retention Policy) all messages that are not tagged are deleted after 720 days (2 years)
To create a Personal Tag, i.e. a Tag that can be used by users to tag items in their Mailbox enter the following command in the Exchange Management Shell:
New-RetentionPolicyTag “Business Critical” -Type Personal -Comment “Use this tag for all business critical mail” -RetentionEnabled $true -AgeLimitForRetention 2556 -RetentionActionPermanentlyDelete
This Tag will make sure that items will be permanently deleted after 7 years. The next step is to create a Retention Policy that will have these two Retention Policy Tags. To accomplish this open the Exchange Management Shell and enter the following command:
New-RetentionPolicy –Name “Finance and Business” –RetentionPolicyTagLinks “finance-default”,”business critical”
The last step is to include this RetentionPolicy in a particular mailbox. Use the following Exchange Management Shell Command:
Set-Mailbox –identity <<mailbox>> -RetentionPolicy “Finance and Business”
Now when you open Outlook 2010 or Outlook Web App and you open a message it is possible to assign the Business Critical tag to this message:

Figure 7
It is also possible to create Policy Tags that will delete items from the Deleted Items folders in for example 30 days. Just delete items and they will be automatically deleted. No more personal garbage collection, but also no longer users that keep items in their Deleted Items for years. You can also delete a Policy Tag that will move all items from the Mailbox into the Personal Archive. So, in time you will see your complete folder structure from your Inbox appear in the Personal Archive. This will definitely keep the Mailbox size, and therefore the .OST file much smaller. And, most important, you can create Policies and Policy Tags to handle messages according your companies legal policies. Retention Policies and Policy Tags will make you compliant with that.


