Exchange 2000 Postmaster@IP And Abuse@IP Mailboxes
By Lee Derbyshire
Introduction
The problem of junk email seems to be spiralling out of control, and more and more companies are resorting to email domain blacklists in an effort to control the flood of unwanted messages. As a result, many Exchange admins will inadvertently find their servers blacklisted. Usually, all that is required is to secure your server against open relay, and all is well again.
Sometimes, however, you might find yourself on a list whose conditions are somewhat stricter than others. And you will have to jump through a few more hoops to get yourself removed from it.
One such requirement is for your email domain to have two special addresses , postmaster@[xxx.xxx.xxx.xxx] and abuse@[xxx.xxx.xxx.xxx] , which will allow anyone to send email to the administrator of the domain and expect that it will be delivered, regardless of whether or not the domain has functioning DNS. Unfortunately, MS Exchange has never made any provision for these special recipients out of the box, and in Exchange 2000 it is not particularly easy to add them manually.
If you find yourself in the position of having to add these addresses, or even if you just want to do it to be ‘on the safe side’, then this article will describe how it can be done.
Procedure
You may first want to confirm that your server is, indeed, incapable of receiving mail destined for these addresses. You can’t do it in Outlook because it will just get confused if you try to send an email to, say, postmaster@[192.168.1.3] (although Outlook Express is perfectly happy to do so). The best way to do it is to use Telnet to open a connection to your server on port 25 (SMTP) and use standard SMTP commands to send a test message to the server. You can open a telnet session from your Start menu by using the Run dialog as shown in figure 1 and entering the telnet command. The IP address of your server will be different to mine, so throughout the rest of this article you will need to substitute your own IP address instead of 192.168.1.3 .
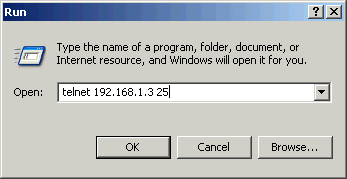
Fig. 1 – Starting a Telnet session from the Start menu.
When you have an open telnet session to your server, you can send a test message to it by using the HELO, MAIL FROM:, RCPT TO: and DATA commands as shown in figure 2. Type QUIT when you have finished.
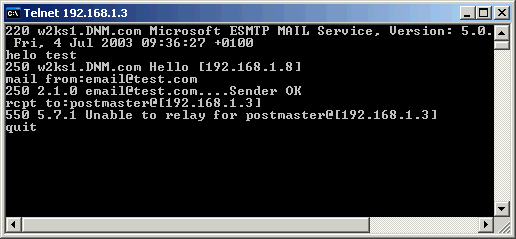
Fig. 2 – An unsuccessful attempt to email postmaster using Telnet.
If you see the expected 550 response to the RCPT TO: command as shown above, then you will need to follow the instructions described here. If, on the other hand, you get a 250 response, then someone has already beaten you to it and you need go no further.
There are two stages to the process:
- Persuade Exchange to accept email for the domain [xxx.xxx.xxx.xxx] (i.e. your subnet address).
- Assign the postmaster@ and abuse@ email addresses to the relevant mailbox(es).
Stage 1 requires a straightforward application of the Exchange System Manager, but there a two quite different approaches to stage 2:
The first approach (described in this article) requires the use of the Windows 2000 ADSI Edit utility to add the required email addresses to an existing user’s details. We will add them to the Administrator user, since someone is likely to be checking this mailbox routinely. However, incautious use of ADSI Edit can reduce your precious Exchange server to a beige-coloured brick, so if you are not familiar with its operation, do not attempt to use it.
If you do not wish to use ADSI Edit, you will need to create two users named ‘postmaster’ and ‘abuse’, and let automatic email address generation create the addresses for you. The reason you can’t simply use the Active Directory Users and Computers tool to add the addresses to an existing mailbox is that it simply won’t allow you to create email address containing the [ and ] characters.
To get Exchange to receive email addressed to [xxx.xxx.xxx.xxx], you need to add the IP address as a domain to the Default Recipient Policy using the Exchange System Manager. Start the ESM, and locate the Default Recipient Policy as shown in figure 3:
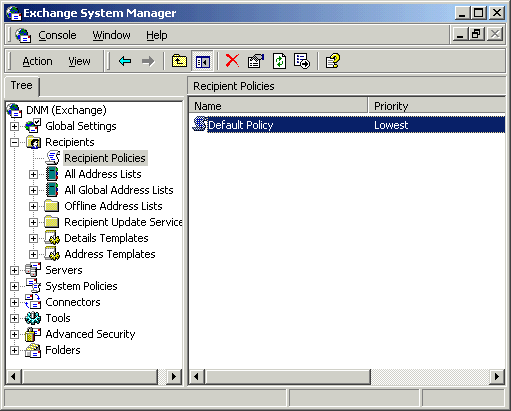
Fig. 3 – Locating the Default Recipient Policy in ESM.
Double-click the Default Recipient Policy to reveal its properties as shown in figure 4:
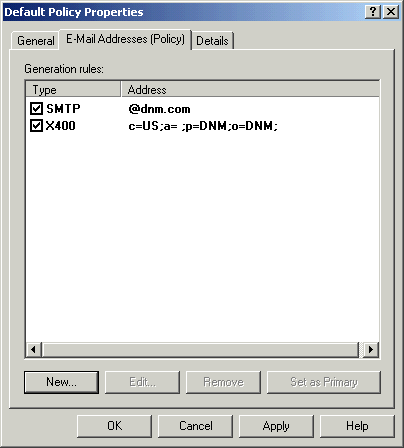
Fig. 4 – Email Addresses for the Default Recipient Policy.
You should see your existing domain listed here, but you need to add the server’s IP address as a domain. Click the ‘New…’ button to reveal the ‘New E-mail Address’ dialog shown in figure 5:
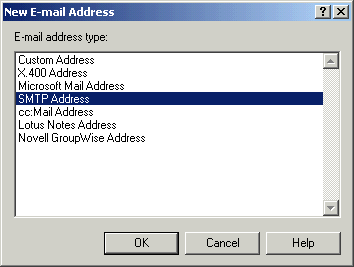
Fig. 5 – The ‘New E-mail Address’ dialog.
Add the IP address as a domain in the form @[xxx.xxx.xxx.xxx] (where xxx.xxx.xxx.xxx is your own server’s IP address) as shown in figure 6:
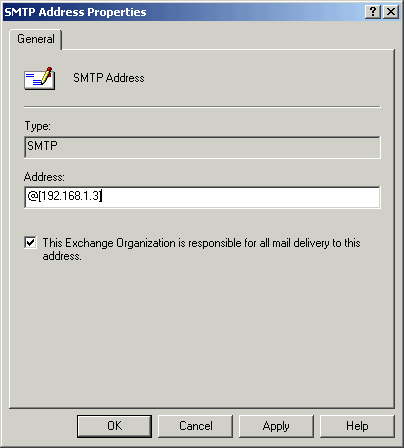
Fig. 6 – Adding the IP address as a domain.
Click OK to add it to the list, and make sure the checkbox to the left is checked. Unfortunately, this means that all users will now get an email address @[xxx.xxx.xxx.xxx] added to their profile, but you will be unable to receive email for this domain if you do not check it. The Default Policy property dialog should now look something like figure 7:
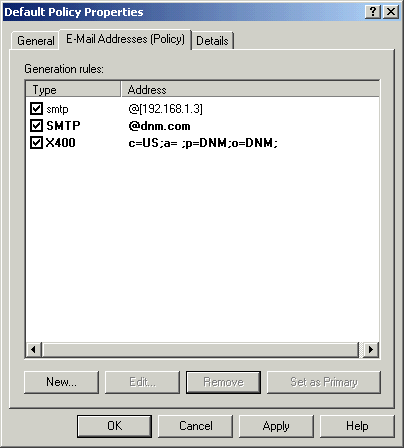
Fig. 7 – The Default Policy properties with the new domain added.
You will be asked (figure 8) if you want to create a new email address @[xxx.xxx.xxx.xxx] for all your existing users. You do not need to do so, but as previously mentioned, all new users will get this address added (although you can safely remove them later).

Fig. 8 – Address generation query dialog.
Now your Exchange system will accept email addressed to its IP address. Next, we need to add the required email address to the relevant user. I’m using the Administrator’s mailbox, since this will probably be regularly checked for things like virus scanner notifications, badly addressed messages, and so on. Unfortunately, the Active Directory Users and Computers tool will not accept email address with the [ or ] characters, so you need to hard code the addresses with the ADSI Edit utility. Like I have already said; misuse of ADSI Edit can really upset your server, so please proceed only if you are familiar with its operation. Locate the user that you are going to add the addresses to (in this example, Administrator) and view its properties as shown in figure 9:
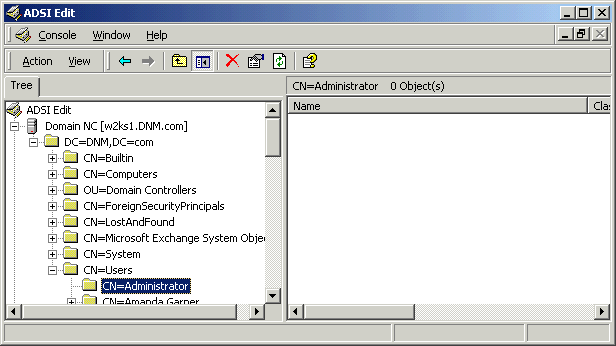
Fig. 9 – ADSI Edit showing the properties of the Administrator user.
Select the property named ‘proxyAddresses’ from the drop-down box to reveal a string containing the email addresses for the user, as shown in figure 10:

Fig. 10 – The proxyAddresses field in ADSI Edit.
Type SMTP:postmaster@[xxx.xxx.xxx.xxx] in the Edit Attribute field (remember that xxx.xxx.xxx.xxx represents your IP address), and click Add to insert it into the string as shown in figure 11. Repeat the operation for the abuse@ address.
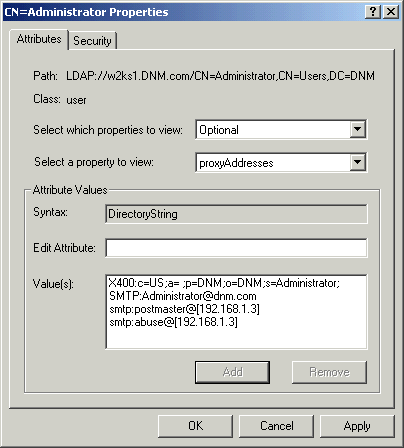
Fig. 11 – The postmaster@ and abuse@ address in ADSI Edit.
Now when you look at the Administrator’s email address in Active Directory Users and Computers, you will see the two extra email addresses as shown in figure 12. You would not have been able to add these addresses using this utility, although you can edit them once they’re in there.
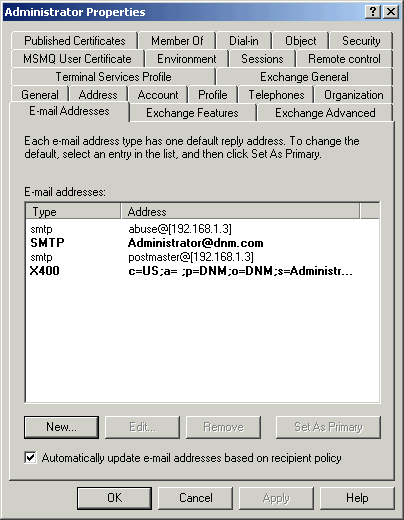
Fig. 12 – The postmaster@ and abuse@ address in ADUC
Now if you try to send an email to postmaster@[IP address] (using telnet as before), the mail is sent successfully as shown in figure 13:
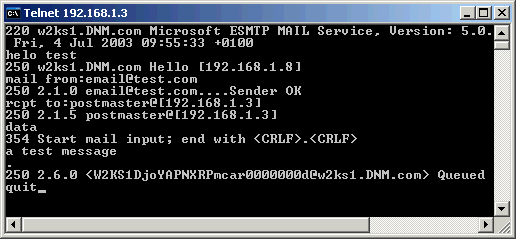
Fig. 13 – A successful attempt to email postmaster using Telnet.
And, as final proof that the email reached its destination, here is the email message in the Administrator’s mailbox being opened in Outlook:
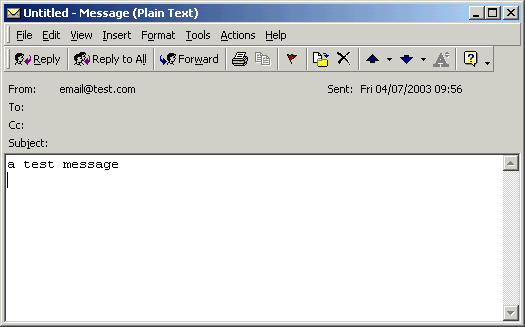
Fig. 14 – The test message in MS Outlook.


