If you would like to be notified when Deb Shinder releases the next part of this article series please sign up to the WindowsNetworking.com Real time article update newsletter.
If you would like to read the first part in this article series please go to The Forefront Unified Access Gateway DirectAccess Wizard – Part 1: A little Background about DirectAccess and the UAG DirectAccess Wizard.
Introduction
In the first part of this series on the UAG DirectAccess wizard, we went over some of the basic concepts behind DirectAccess and discussed some of the advantages of using UAG as your DirectAccess server solution. I want to note that if you can not use UAG as your DirectAccess server solution, you can always use the Windows DirectAccess solution; this does not require any additional software, since DirectAccess is built right into Windows Server 2008 R2. However, in the enterprise environment we would expect that UAG will be used in the majority of cases because of the high availability and centralized configuration options only available with UAG DirectAccess.
Let’s now take a look at the UAG DirectAccess wizard. I have confirmed a UAG DirectAccess array that has two DirectAccess servers in it and have already enabled NLB for the array. We won’t go into the NLB configuration in this discussion, but I will write about how to configure a DirectAccess NLB array in the future. In this article we’ll just look at the wizard and what’s included in the wizard.
Note:
This article does not address all of the steps required in deploying a working DirectAccess solution. There are a number of infrastructure components that need to be in place before DirectAccess can start working. These include certificates, a Network Location Server, and possibly an IPv6 infrastructure (depending on what your design goals are for your deployment). All of that is for another article (or two) on another day.
Now let’s get back to the wizard. On your UAG server, open the UAG console. In the left pane of the UAG console, click the DirectAccess node. In the right pane of the console you’ll see the Forefront UAG DirectAccess Configuration pane, as seen in Figure 1 below.

Figure 1
Click the button in the Clients section (the name on the button will be Configure if you have not configured DirectAccess yet, and it will be Edit if you have already configured DirectAccess on the server. In this example, we have already configured the array, so it says Edit, as shown in Figure 2).

Figure 2
On the UAG DirectAccess Client Configuration page, enter the name of the group or groups of computers to which your DirectAccess client computer accounts belong. You will have to create these groups yourself, as the DirectAccess wizard does not do this for you. After you have created the DirectAccess client group or groups, you use this page to add those groups, as shown in Figure 3. The DirectAccess GPOs will be applied to these groups using Group Policy security filtering. Click the Add button and you see the Select Group dialog box. This is where you enter the group or groups that contain the machines that you want to be DirectAccess clients.

Figure 3
The next step is to configure the DirectAccess server settings. Click the button in the DirectAccess Server section to configure connectivity and security policies for the UAG DirectAccess server, as shown in Figure 4.

Figure 4
If you have configured a UAG DirectAccess array, the first step on the UAG DirectAccess ServerConfiguration wizard will be to assess whether or not your array can support NLB. Notice that there are two options on this page:
- Windows Network Load Balancing – When you select this option, High Availability (HA) will be enabled using the integrated NLB feature included with Windows, which has been customized to work with DirectAccess. Note that while UAG supports unicast, multicast, and IGMP multicast NLB, if you want to enable NLB for the DirectAccess array, you will have to use unicast. If you want to deploy UAG DirectAccess in a virtual environment, Hyper-V supports unicast NLB.
- External Load Balancing – Use this option if you want to use an external load balancer. In this case, the NLB features will not be enabled.
There is a validation component to this, and if everything is in place, you’ll see it say at the bottom: The array has all the required prerequisites for the selected Load Balancing method, as shown in Figure 5.
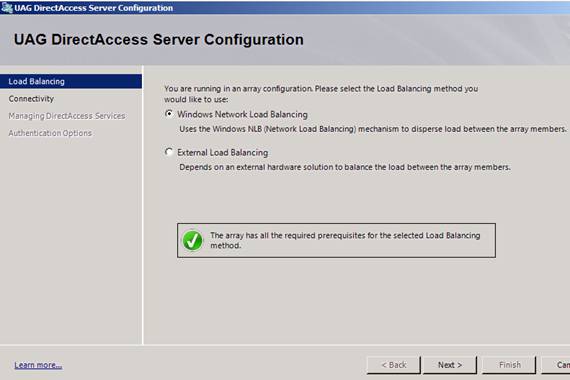
Figure 5
On the Connectivity page of the UAG DirectAccess Server Configuration page, you need to configure the IP addresses used on the internal and external interfaces of the UAG server. On the Internet-facing section, select the first of the two consecutive IP addresses on the external interface of the UAG server. Two consecutive public IP addresses are required for Teredo to work, and if you don’t configure the UAG server or array to use two consecutive public IP addresses, the wizard will call out an error condition and you won’t be able to continue. Notice that after you select the first address, the second address appears.
In the Internal section, select the IP address on the internal interface of the UAG DirectAccess server. In almost all cases, you’ll have a single IP address on the internal interface. If you are using native IPv6 addressing, you’ll have the option to select an Internal IPv6address. If not, then the UAG DirectAccess server will be configured as an ISATAP router and will assign itself an IPv6 ISATAP address.
There is an important note at the bottom of the page: ISATAP IPv6 transition technologies will be enabled on the UAG DirectAccess server. Register the DNS name ISATP with [addresses]on the DNS in all domains to enable IPv6 connectivity on these domains. In addition ensure that ISATAP is not blocked in the Global Query Block List on all DNS servers, as shown in Figure 6. This is important information, because the ISATAP hosts on the internal network need to be able to resolve the name ISATAP to an IP address on the internal interface of the UAG DirectAccess server in order to obtain information about how to configure their own ISATAP adapters. In order to do this, the ISATAP hosts on the internal network need to resolve the name ISATAP. By default, Windows DNS servers will drop queries to the name ISATAP, so you need to use the dndcmd command to enable queries for ISATP. You can find more information on how to do this here.

Figure 6
On the next page of the wizard, you have the option to enable DNS64 and NAT64, as shown in Figure 7. These two technologies allow you to have IPv4 only hosts on the Internal network. If you don’t have these IPv6 to IPv4 protocol translator technologies enabled, the DirectAccess client on the Internet won’t be able to communicate with IPv4 only servers or services. That’s because the DirectAccess client always uses IPv6 to communicate with resources through the UAG DirectAccess server. However, the UAG DirectAccess server that has DNS64 and NAT64 enabled will be able to “spoof” the addresses of the IPv4 only servers and allow the DirectAccess clients to communicate with those IPv4 only servers.
In most cases you will want to leave these technologies enabled. However, if you have a native IPv6 infrastructure on your corporate network, you won’t need these, and you can reduce overhead by turning them off.
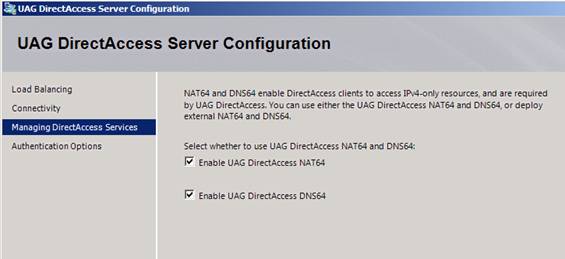
Figure 7
On the Authentication Options page of the UAG DirectAccess Server Configuration page, select the certificates that are used as the root certificate to verify certificates sent by DirectAccess clients and for the IP-HTTPS listener.
In the Browse and select a root or intermediate certificate that verifies certificates sent by DirectAccess clients section, you can select either Use root certificate or Use intermediate certificate, as shown in Figure 8. After making that selection, you then click the Browse button and select the certificate, as seen in Figure 9 below.
In the Select the certificate that authenticates the UAG DirectAccess server to a client connecting using IP-HTTPS section, click the Browse button to select the certificate that will be used by the IP-HTTPS listener. Note that the DirectAccess wizard does not create this certificate – you will need to create this certificate before running the DirectAccess wizard.
There are two more options available on this page:
- Clients that log on using a PKI smart card – This option, when selected, will force users to use a smart card with the user’s certificate contained on the smart card. Microsoft uses this option for their own DirectAccess deployment.
- Computers that comply with your organization’s NAP policy – If you have NAP deployed on your network, the DirectAccess client computer will only be allowed network access if it passes the security checks performed by your NAP policies.
Note that your smart card and NAP infrastructures need to be in place before they will work with DirectAccess. The DirectAccess wizard does not configure these services, but if they are in place, the UAG DirectAccess server will work with them if you select these options.

Figure 8

Figure 9
The next step is to configure the Infrastructure servers. Click the Edit button in the Infrastructure servers section to identify the infrastructure servers, such as DNS, domain controllers, and management servers required by DirectAccess clients, as shown in Figure 10.

Figure 10
In the Infrastructure Server Configuration wizard, on the Network Location Server page, enter the FQDN of the Network Location Server (NLS). The DirectAccess client uses the NLS to determine whether it’s on the corpnet or off the corpnet. If the DirectAccess client can connect to the NLS using an SSL connection, then it assumes that it is on the corpnet and turns off its DirectAccess client components. If the DirectAccess client cannot connect to the NLS server using an SSL connection, then it assumes that it is off the corporate network, and will turn on its DirectAccess client components and connect to the network through the UAG DirectAccess sever.
In the Figure 11 below, you can see that the NLS server URL has been configured. You can click the Validate button to confirm that you’re able to connect to the NLS server. As it says on this page, it is recommended that you use a high availability network location sever, since if the HTTPS URL is unavailable, client connectivity will be disrupted. This is an important point and you must make sure that your NLS servers are highly available; otherwise DirectAccess clients that are moved to the corpnet will not be able to connect to key resources, such as domain controllers, depending on your deployment.
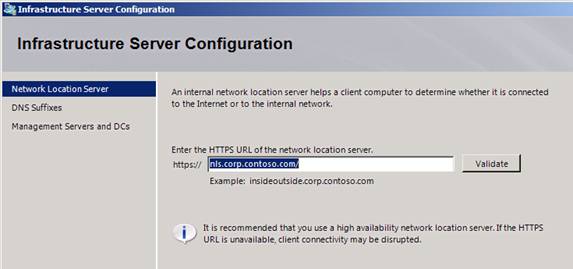
Figure 11
On the DNS Suffixes page, you can configure the DNS suffixes for names that should be sent over the DirectAccess tunnel. The DirectAccess wizard will automatically configure key entries for you, but you can add more if you like. This is the configuration interface for the Name Resolution Policy Table (NRPT), which the DirectAccess client uses to determine which names should be resolved to names for resources on the corpnet, and which names should be resolved as resources available on the Internet. For a detailed account of how the DirectAccess client uses the NRPT, check out Tom’s blog post on this subject in The Edge Man Blog over here.
There are also three options at the bottom of this page that determine how name resolution should be handled in the event that there is name query failure, as shown in Figure 12. These are:
- Only use local name resolution if the name does not exist in DNS (most restrictive)
- Fall back to local name resolution if the name does not exist in DNS or the DNS servers are unreachable when the client computer is on a private network (recommended)
- Fall back to local name resolution for any kind of DNS resolution error (least secure)
I should note here that “local name resolution” refers to resolution of single-label names. If the query failure is for a FQDN, there is no fallback for name resolution. Tom talks about the details of these options in his blog post, so if you need more information, make sure to check out the link above.

Figure 12
On the Management Servers and DCs page, you can configure which machines are management servers and domain controllers that need to be reachable by the DirectAccess client when the DirectAccess client is connecting over the DirectAccess IPsec tunnels over the Internet. Notice that the UAG DirectAccess wizard will automatically detect the domain controllers, as seen in the Figure 13 below. If you want to add more domains or more servers (such as SCCM or other management servers) you can use the Add Server button or the Add Domain button.
One important thing to be aware of is that the machines listed on this page are accessible over the infrastructure tunnel. The DirectAccess client establishes the infrastructure tunnel before the user logs onto the computer, using computer certificate and NTLMv2 authentication with the computer’s account in Active Directory. The infrastructure tunnel is a bidirectional tunnel, so that the DirectAccess client is reachable from the corpnet, and if IT needs to connect to the DirectAccess client for management or control, they can do that over the infrastructure tunnel even when the user is not logged on. There are some other requirements to get this “manage out” connectivity to work the way you want, but we’ll discuss those issues in a future article on “how to manage out DirectAccess clients”.

Figure 13
Hang in there; we’re almost done. The last step is to configure the Application Servers. Click the Edit button in the Application Servers section, as shown in Figure 14, to select application servers that might require additional authentication or encryption.

Figure 14
On the Application Server Configuration page, you have two options:
- Require end-to-edge authentication and encryption – This option establishes a secure IPsec tunnel between the DirectAccess client and the UAG DirectAccess server. After terminating the connection at the UAG DirectAccess sever, the communications are passed “in the clear” on the corpnet.
- Require end-to-end authentication and encryption to specified application servers – This option allows you to take advantage of IPsec transport mode connections between the DirectAccess client and destination servers on the corpnet. If there are servers on the corpnet that require a secure connection from end to end, then select this option, as shown in Figure 15, and select the server for which the end to end secure connection is required.
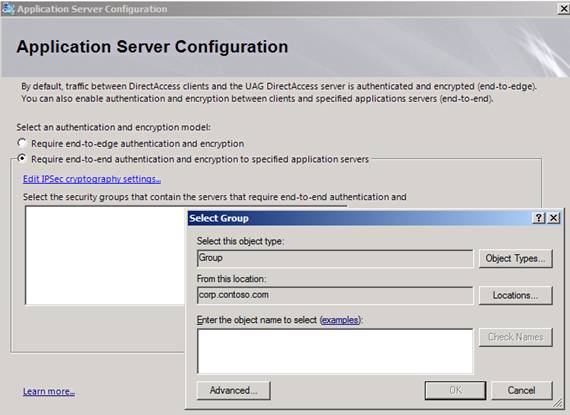
Figure 15
When you click the Edit IPsec cryptography settings link, you will see the default IPsec settings for the end-to-end tunnel between the DirectAccess client and the secure servers on the corpnet. Notice in Figure 16 that ESP is the default protocol, SHA-256 is used at the integrity algorithm (hash protocol) and NULL encryption is used. NULL encryption is the default, so that intermediate devices on your network will be able to inspect the communications if required. As with the hashing algorithm, you can change the encryption scheme if you like.
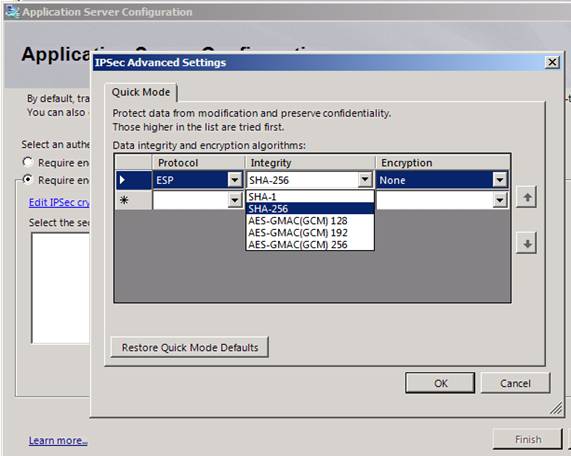
Figure 16
After you’re finished, click the Generate Policies button, shown in Figure 17, and GPO objects and settings will be configured by the wizard. After that happens, you can press a button to deploy the GPOs (the UAG Wizard does this for you, but you also have the option to do it yourself if you prefer). Remember to activate the configuration after you’ve deployed the GPOs; I have forgotten to do this and then had to troubleshoot the problem because my connectivity didn’t work J

Figure 17
Summary
In this article, we went over the UAG DirectAccess wizard and explained the options that are available to you. While the UAG DirectAccess wizard does a lot of the heavy lifting for you, there’s still plenty you need to do on the back end to make it work. It’s not that any of this back end work is that difficult, but it has to be in place before your DirectAccess solution works. In the next article in this series, we’ll talk about this back-end infrastructure so that you’ll know what’s required and see that it’s not nearly as difficult as some might lead you to believe. See you then! –Deb.
If you would like to be notified when Deb Shinder releases the next part of this article series please sign up to the WindowsNetworking.com Real time article update newsletter.
If you would like to read the first part in this article series please go to The Forefront Unified Access Gateway DirectAccess Wizard – Part 1: A little Background about DirectAccess and the UAG DirectAccess Wizard.


