Having your own FTP server gives a ton of benefits. For starters, it is private and you have complete control over who is accessing it and what is being transferred.
It is also fast, though the exact speed depends on your Internet connection. Besides, there is no restriction whatsoever on the amount and type of data you can store or transfer. Due to these benefits, many people prefer to set up their own FTP server.
If you’re one of them, the good news is Windows offers feature that makes it easy to set up and manage your own FTP server.
In this guide, we’ll talk about the setup process and how you can manage a FTP server on Windows 10. If you have older operating systems, the process is more or less similar.
Setting up an FTP server in Windows 10
Below are step-by-step instructions on how you can setup an FTP server in Windows 10.
Installing an FTP server on Windows 10
- Open the Power User menu and navigate to “programs and features” section. You can use the Windows + X keyboard shortcut to get to the Power User menu.
- On the left pane, you’ll find an option called “turn Windows features on or off.” Click the link.

- You’ll get a list of folders. Expand the folder called “Internet information services” and check the “FTP server” option.

- Make sure to check the option called “FTP extensibility” as well
- Below “Internet information services” folder, you’ll find another folder called “Web management tools.” Check that folder too, and leave the default options.
- Finally, click the OK button to start the installation.
- Once the installation is done, click the close button.
Configuring an FTP server on Windows 10
Once you have installed the FTP server, the next step is to configure it. The steps for this process are as follows.
- Open power user menu with Windows + X shortcut.
- Open administrative tools.
- Double-click Internet information services (IIS) manager.
- In the next window, expand the folders on your left side pane and navigate to “sites.”
- Right-click “sites” and choose “add FTP site” option. This will create an FTP connection for you.
- Give a name to your site and enter the path of the FTP folder that you want to use to send and receive files. Alternately, you can also choose to create a new folder to store your FTP files. Just depends on your personal preferences.
- Click “next.”
- In this screen, change SSL setting to “no SSL.” Leave the other default settings.
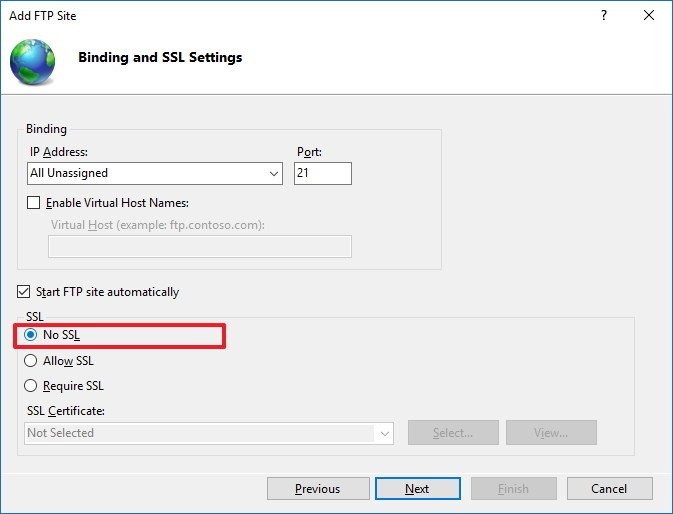
- If you’re configuring a business site, make sure to choose “require SSL” option, as it will add an extra layer of security to the transfer.
- Click “next” and you’ll get the authentication screen.
- Navigate to the authentication section of this screen, and select the “basic” option.
- In the authorization section, type “specified users” from the drop-down menu.
- In the text box below, type the email ID of your Windows 10 account to give you access to the FTP server. You can add more users too if you like.
- In the permission section, check both read and write boxes.
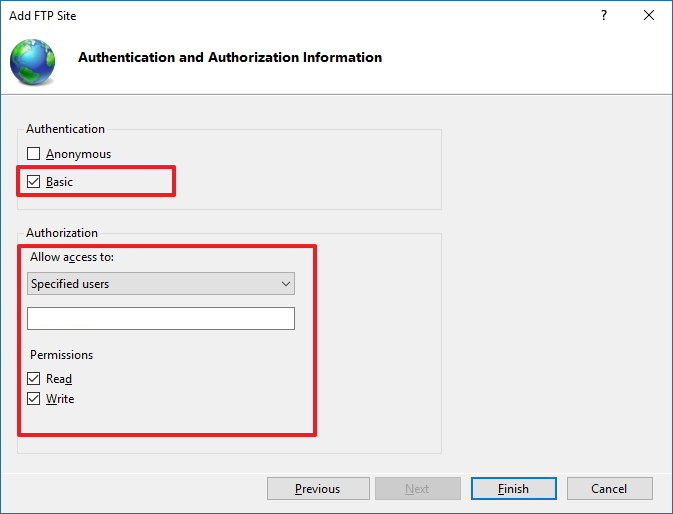
- Finally, click “finish.”
With this, you’re done setting up an FTP server on your Windows 10 machine.
However, you’ll have to do some more things to start using FTP server to send and receive files.
Allowing FTP to pass through Windows Firewall
Windows Firewall doesn’t allow connections to access the FTP server. This means you’ll have to specifically tell the firewall to give access to this server. You can do that with the following steps.
- Search for Windows firewall in Windows start menu and press “enter.”
- On the left-side pane, you’ll see “allow an app or feature through Windows Firewall” option. Click on it.
- When the next window opens, click on “change settings” button.
- From the list, check “FTP server” and allow it on both private and public networks.
- Once done, click OK
That’s it. Now, you should be able to connect to your FTP server from your local network.
External connections
The above steps will allow you to connect to the newly created FTP server from your local network. But if you want to access it through the Internet or from another PC, you’ll have to configure it separately.
Setting up external connections
If you want to reach your FTP server through the Internet, do the following configuration.
- Open command prompt.
- Type “ipconfig” command and press enter.
- Note down the default gateway IP address. Typically, it starts with 192 and looks something like this, 192.168.1.1.
- Next, open the default web browser and type the router’s IP address. Press enter.
- You’ll get a prompt for credentials. Enter your router username and password.
- Navigate to WAN or NAT settings and here you’ll find “port forwarding” section. The exact location differs from router to router, so you’ll have to search for this setting.
- Next, create a new port forwarding with the following details
- Service name – give a name to your service. It can be anything like “FTP_server” or “my_ftp_Server” or just about anything you like.
- Port range — Use only port 21.
- Local IP – Type ipconfig again and the IP address of IPv4 is your local IP. Enter that value here.
- Local port – Use 21 again. No other port should be used.
- Protocol — Enter TCP.
- Once you’ve configured port forwarding, apply the changes.
This should allow you to access FTP server through the Internet and also from other PCs
Now that your FTP server is set up, configured, and accessible from other computers, you start sending and receiving files.
Next, we’ll see how you can upload and download files from your FTP server.
Uploading files on FTP server
To upload files on your FTP server,
- Open file explorer
- On the address bar, type your FTP address in the format “FTP://xxx.xxx.xxx.xxx.”
- You’ll get a prompt for username and password. Enter your credentials.
- You can even choose to save your password by checking the “save password” option.
- Click “log on.”
After you log in, you can upload or download files. Typically, it will be like another drive on your computer.
You can also use other programs like Filezilla to access your FTP server.
Now, you might wonder how useful an FTP server is if it can be accessed only by you to upload and download files. Though you can do it all on your drive itself, why even go through the process of setting up and configuring an FTP server.
Well, the advantage is you can add as many users as you like and you can allow them to access your server. You can even give specific permissions to each user.
Configuring multiple users
As with setup and configuration, there are multiple procedures involved to allow other users to access your FTP server.
Create multiple FTP accounts
To allow other users to access your FTP server, you have to create separate Windows 10 account for each user. To do that:
- Open settings app. You can do that with Windows key + I.
- Click accounts.
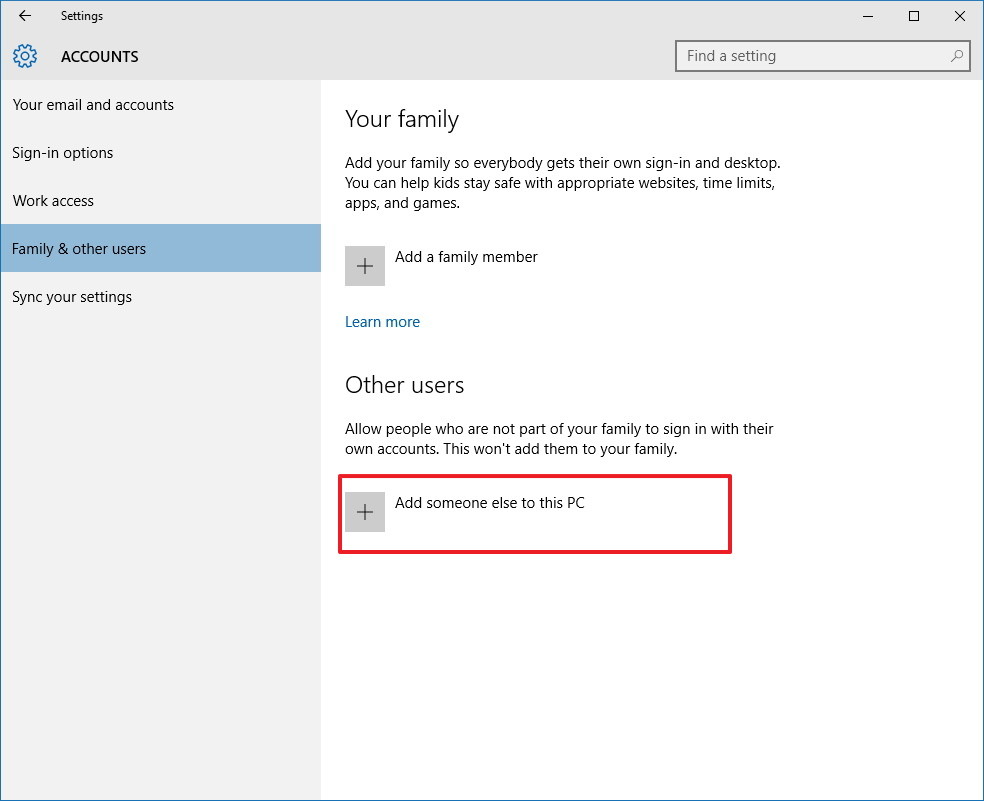
- Navigate to the left-side pane, where you’ll see an option called “family & other users”. Click the link.
- On the right-hand side, look for the option “add someone else to this PC.”
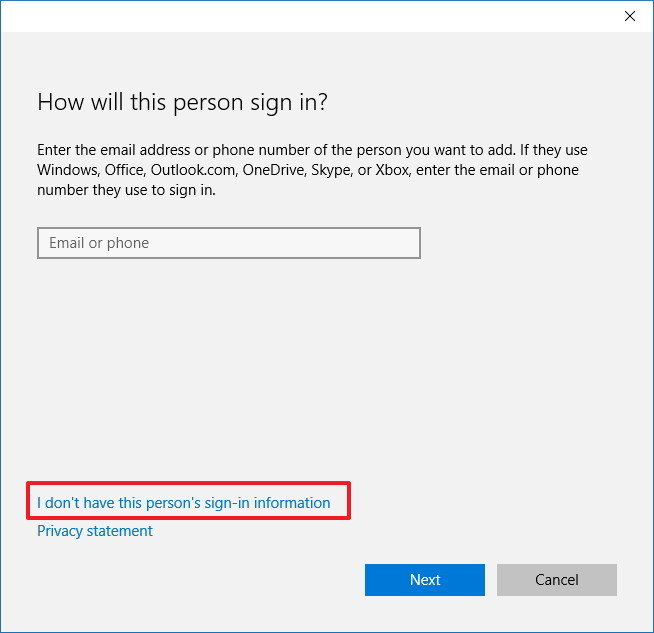
- In the next screen, you’ll be prompted to enter that person’s email ID or phone number. Look for a link called “I don’t have this person’s sign in information” at the bottom left. Click the link.
- In the next screen, you’ll be asked to enter the personal details of the new user. If you know the other person’s Microsoft account details, you can enter. Otherwise, look for a link called “add a user without a Microsoft account” on the bottom left again.
- In the next screen, enter the details of the user. Choose a strong password for your own security as this server can be accessed from the Internet.
These steps allow you to create a new user. Next, you’ll have to add this user account to the FTP folder.
Add a new user to the FTP folder
You have to explicitly add a new user account to the FTP folder, in order for that user to access it. The steps for the same are:
- Navigate to the FTP folder, right-click on it and select “properties.”
- Click the “security” tab and navigate to “edit” button.
- Look for “Add” button in the next screen and click on it.
- This will open the “select users or groups” dialog box. In this screen, enter the name of the user you want to add in the text area. Click on “check names” button to make sure that you have entered the right name. Click OK.
- This will take you back to the “add button” screen. But this time, you’ll find the new user in group or user names list located just above the add button.
- Select the newly added user account and set the permissions for this user. Once done, click “apply” and OK.
Configure the user to access the FTP folder
Once you’ve added the user, you have to configure to ensure that the user can access the folder. To do that:
- Go to control panel and open administrative tools.
- Double-click Internet information services (IIS) manager.
- Expand the left-hand pane and navigate to sites. Click on sites and you’ll see your FTP server. Select this server.
- On the right-hand pane, you’ll see many options. Look for authorization rules. Right-click on it and select “add allow rules” from the context menu.
- In the next screen, choose “selected users” option and enter the Windows 10 account you created earlier. Set the permission you’d like this user to have. Click OK
Now the user you created is all set to access your FTP folder.
In short, having an FTP server gives you a lot of flexibility and convenience, and it is easy to set it up too, as Windows has a built-in tool for this purpose. You can even add other users to your FTP folder easily, so all of you can send and receive files through FTP.
Have you tried setting up FTP server? Did you encounter any problem? Please share it with our readers in the comments section.


Hi,
In india this only works with some isps.
Do you know why and how to make it work.
I want to access one computer with ftp server from another computer in another location using the ip address of the ftp computer.
The ESP for both is Tata.
Why we can’t use other port no. To configure.
try a vpn
Probably because you don’t have a static IP provided by the ISP.
FTP server is only allowing me to download 2 files at a time, but I can upload 10 at a time to the server. The client I am using is Filezilla. The server is the one in Windows 10 Pro, shown here to setup. Same issue with other FTP clients as well.
This is quite literally not how windows 10 works… Using the windows+X key does not display any option titled “Programs and Features”. This is pseudo-information at best.
This story is two years old. Microsoft changed several menus and shortcuts in the 2019 Creators update. The Windows+X function was correctly described when the story was published.
My system and the system to which I will share files both are in domain I have created ftp server , but I can’t access the server from other pc , error showing is can’t reach this page..
Make sure you actually use an ftp client either via command line or using something like WinSCP.
Both should show you connection progress.
Yes, it does. Only it says “Apps and features”. You have to be a real jackass to not be able to read these instructions and account for the updates that Microsoft has done to Windows. It’s not hard.
After windows + X, Click on “Apps and Features” and then on the right hand side you will see the “Programs and Features” link under the Related Settings title.
I connected my PC with my phone mobil hotspot and when I search my gate way IP on the default browser on my PC it say reload and again and again is it most I should purchase a router device
how do i find the ip adress of the FTP server that I setup
how to disable FTP login anynomous in windows 10
I done everything but when i enter login credential it fails. I enter my email id of my microsoft account in username field and password of my Microsoft account in password field
there is no IIS manager ..pls help me
Open Control Panel and click Programs and Features > Turn Windows features on or off
in that you have to click on iis (internet information service) to be selected and press ok
My login credentials fail with my microsoft username and password.
How can I put to global network ?
Thanks a lots. This articles helps a lot to configured the FTP server and access through FileZilla or other hosts. i had requirement to design an etl workflow where i have to configure the FTP server where the file will kept in the FTP path on daily basis and etl workflow will download that files and store the files in a server directory and then perform data operation. I have tested the whole scenarios end to end by configuring the server. Thanks a lot for the article.