Introduction
The concept of vSphere standard switches is fairly straightforward. With vSS you have one or more virtual switches on each host, each with their own uplinks to the network. Each switch has one or more port groups (like vKernel and Virtual Machine) with VMs being connected to the virtual machine port group. What about vSphere Distributed switches? Do you need them?
Why vSphere Distributed Switches?
I must admit that when I first heard about vSphere Distributed switches, while I thought that the idea was innovative and cool, however I figured I really didn’t need to use something like that as I thought that it was likely “overkill” for my lab (and most companies). Because of that, I initially didn’t devote much time working with vDS (or dvswitch, as it’s sometimes called). However, the more I have used vDS, the more I have come to realize how powerful and necessary it is (and by the end of this article, I hope that you have too).
vDS is only available to those who have vSphere Enterprise plus and it’s not enabled by default – you need to make the choice and fulfill the creation of the vSphere distributed switch, add uplinks from hosts, and add virtual machines to port groups.

Figure 1: Graphic Thanks to VMware.com
When it comes to listing out the reasons to use vDS, here’s what I came up with:
-
Centralized location to setup the virtual network for the entire infrastructure
-
Aggregation of networking at a cluster level
-
Enabling of centralized provisioning, administration, and monitoring
The vSphere Distributed Switch maintains network runtime state for VMs as they move across multiple hosts, enabling inline monitoring and centralized firewall services. It provides a framework for monitoring and maintaining the security of virtual machines as they move from physical server to physical server and enables the use of third party virtual switches such as the Cisco Nexus 1000V to extend familiar physical network features and controls to virtual networks.
What’s New with vSphere Distributed Switch Version 5?
With the launch of vSphere 5 a number of new feature were added to the vSphere distributed switch. New features include:
-
Netflow – ability for NetFlow collectors to collect data from the vDS to determine what network device is talking and what protocols they are using
-
SPAN and LLDP – allows for port mirroring and traffic analysis of network traffic using protocol analyzers
-
Network I/O control – NIOC allows you to align your network traffic with the needs of your business – prioritization of critical traffic types over others
Other features include:
-
Enhanced provisioning and traffic management capabilities through private VLAN support and bi-directional virtual machine rate-limiting
-
Enhanced security and monitoring for virtual machines migrated via VMware vMotion through maintenance and migration of port runtime state
-
Load-based teaming for dynamic adjustment of the teaming algorithm so that the load is always balanced across a team of physical adapters on the distributed switch
None of these features would be possible without the vSphere distributed switch.
Installing a vSphere Distributed Switch
vSphere distributed switch isn’t a whole new product that you install. If you have vSphere enterprise plus, vDS will just be a feature that you take advantage of. When you worked with traditional vSwitches, all configuration was done on each of the hosts. The benefit to vDS is that it is a centralized administration and configuration. Thus, all vDS administration is done in the vSphere Client’s networking inventory.
When you first enter the networking inventory, you’ll see something like this:
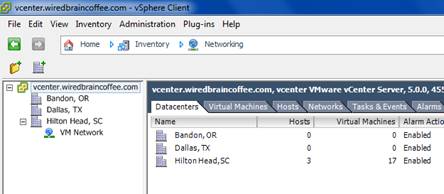
Figure 2
Notice how, by default, you have a single standard vSwitch called “VM Network” in your virtual datacenter. This is being used by your virtual machines to connect to the LAN and by your hosts for vmkernel traffic like vMotion, iSCSI, NFS and even the vSphere Client / vCenter traffic.
To create our first vDS, we are going to right-click on the virtual datacenter and click New vSphere Distributed Switch (or ctrl-k).

Figure 3
This will bring up the Create a vSphere Distributed Switch wizard that will guide us through the process.
We first need to select what version of vSphere distributed switch that we want to create. Unless you have older ESX 4 or 4.1 hosts then you want to create the latest switch version – 5.0.0 – because you’ll get all the latest features that are available.
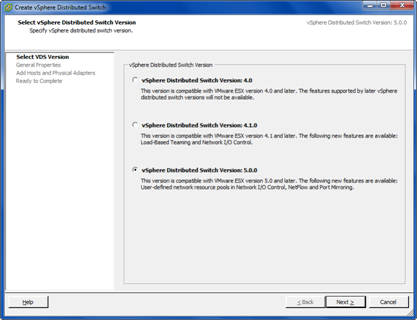
Figure 4
Click Next and then we need to give the vDS a name and select the number of uplink ports. The default name for a new vDS is dvswitch. While the default name certainly works for your first dvswitch, best practices tell us that we should give the dvswitch a much more useful name like “Production-1”, to tell use the purpose or importance of the traffic running on this new dvswitch.
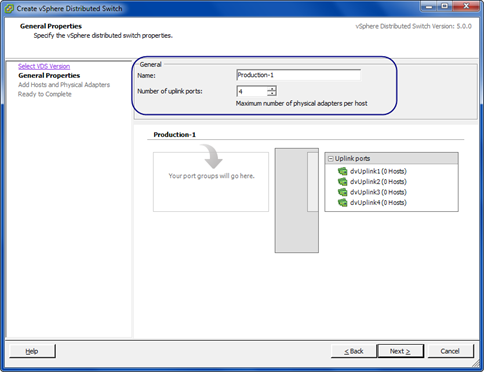
Figure 5
Click Next. Now you need to specify, first, if you want to add ESXi hosts and their adaptors to the switch now or later. By choosing “later”, you are creating, basically, an empty dvswitch that has no outside network connectivity. That means that if you put virtual machines on it, they would only be able to communicate with themselves (not the outside world), until you added uplinks. Also note from the graphic that you may have the same problem that I do in that you may have an ESXi host that you want to be a part of the dvswitch but that host has no uplinks to add. Solving this problem may be as simple as going to the standard vSwitch on that host and removing some redundant uplink adaptors. However, let’s say that you have an older host that just has a single Ethernet adaptor. In that case, you really need to add some additional NICs (they aren’t very expensive and if you are willing to buy licenses for vSphere Enterprise plus then having redundant NICs on your host should also be part of your complete virtual infrastructure design).
To start with, I selected to add a single adaptor from one of my two hosts that had adaptors available. You can always add more adaptors later.
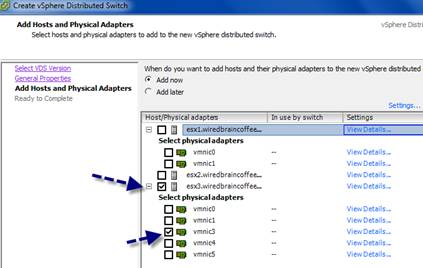
Figure 6
Quick tip: you can click on View Details for each of the adaptors that are available to add as these adaptors may be disconnected or be the wrong network speed. In my case, none of the adaptors from host ESX1 were connected to the network (even though they were available to be added).
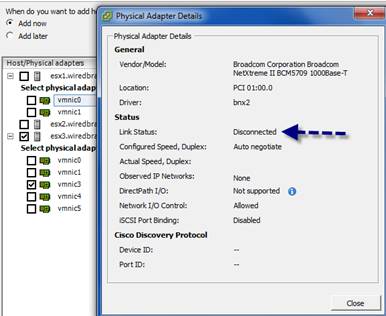
Figure 7
Click Next and you’ll be prompted to finalize your addition of the dvswitch and create the first default port group (we’ll talk more about dvportgroups in our next post). Take the default here and click Finish.
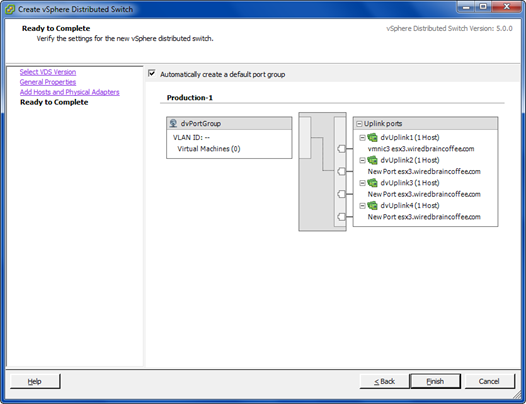
Figure 8
At this point, you should see the new dvswitch being created and now in the inventory, you’ll find your new dvswitch, your uplink port group and your dv port group.
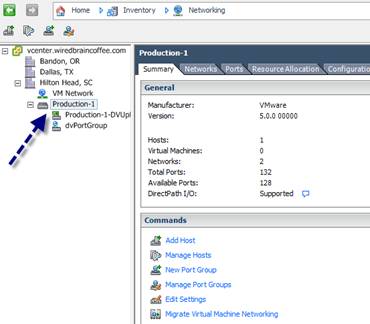
Figure 9
Congratulations, the creation of the dvswitch is done! However, no virtual machines are on the switch yet so we really can’t use it. Read my next article on this topic – Using vSphere Distributed Virtual Switches.
Wrap Up
vSphere distributed virtual switches aren’t right for every company out there as they require such a high version of vSphere. However, if you have the license level, dvswitches are beneficial even if you just have 2 hosts as they offer you a centralized point of administration for your virtual infrastructure networking plus other benefits like network I/O control, NetFlow, and the option to use the Cisco Nexus 1000V. Even if you don’t use dvswitches in production, I recommend trying them out for yourself with the 60 day vSphere evaluation license program just to gain experience – both for future knowledge and for the VCP5 exam.


