Do you use a hybrid cloud structure? Is it getting difficult to manage user identities on your on-premises and cloud applications? Well, that’s why Microsoft introduced a tool called Azure AD Connect.
What is Azure AD connect?
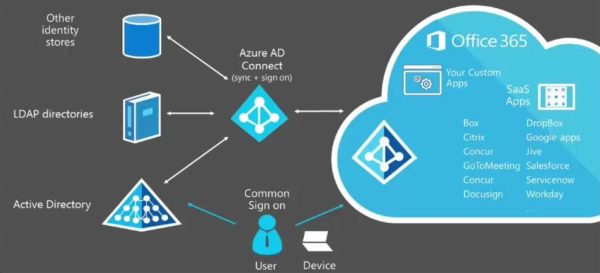
In a nutshell, Azure AD connect is a tool that synchronizes user identities, so the same set of login credentials can be used to access resources on both your on-premises and cloud environments.
Earlier, multiple tools such as Windows Azure Active Directory Sync and Azure AD Sync did this task for you. But those tools are now deprecated and the support for them ended on April 13. Instead of two tools, the functionalities are combined together in Azure AD connect, and this is the only directory synchronization tool currently supported by Microsoft.
Now that we have a basic understanding of Azure AD connect, the next obvious question is why we should use it at all.
Why use Azure AD connect?
The single biggest reason to use this tool is its simplicity. You can integrate your on-premises and cloud resources, and give your employees a single login ID to access them.
For example, let’s say your organization uses Office 365 for documents and SaaS applications that are connected to Azure AD. Imagine how complicated it would be if your IT admin team has to manage a separate set of identities for Office 365 and SaaS applications.
With Azure AD connect, you can have a single identity for both these environments, so managing them is easy. Essentially, it’s a single tool to manage all your synchronization and sign-in experience, which means deployment is likely to be super easy as well.
Lastly, Azure AD connect provides the newest and best capabilities for you, as it replaces deprecated tools like DirSync and Azure AD Sync.
What are the prerequisites for installing Azure AD connect?
Before you install AD connect, here are a few things you need.
- You should be on a server that can handle synchronization. This tool can be installed only on Windows Server standard or higher versions, and not on Windows Server Essentials and Small Business Server.
- You need an Azure subscription. Remember this subscription is required for using the Azure portal and not for using Azure AD connect. So, if you have PowerShell or Office 365, then you don’t need a subscription to use this service.
- Make sure you have a verified domain before you add it to Azure AD.
- It’s a good idea to run a tool from Microsoft called IdFix to check for formatting problems and duplicates.
- The domain controller should be writable as Azure AD Connect can’t follow any write redirect commands.
- You should have a full GUI installed. Just a server core is not enough.
- Some features are supported on some server versions only. For example, password synchronization is available on Windows Server 2008 or later while group-managed service account feature is available only on Windows Server 2012 or later. Keep this in mind during deployment.
- You should not have PowerShell Transcription Group Policy enabled.
- You must have .NET Framework 4.5.1 or later versions and Microsoft PowerShell 3.0 or its later versions.
- You need a SQL Server database to store identity data.
- Every Azure AD connect server requires a DNS resolution, regardless of whether it is for the Internet or the intranet. This server should have the capability to resolve names both to your on-premises Active Directory as well as your Azure endpoints.
- Your service account should be located in the domain if your proxy server requires authentication.
Though these prerequisites may seem fairly long, most of it is just common sense and pretty much what we do on an everyday basis.
With these requirements in place, let’s now see how to install this tool.
How to install Azure AD connect?
The first step is to down load it from Microsoft’s downloads page. Next, navigate to the Windows folder on your computer where this download is stored and double click on the Windows installer. This should open the installation wizard. Agree to the terms and conditions.

When your domain is verified, the wizard will prompt for “Use express settings” option. Click on this option to start the installation. On the other hand, if you have a non-verified domain, the wizard will show the “customize” option, so go with it.
Next, you’ll be prompted for Azure AD global credentials and in the following page, you’ll have to connect with your enterprise administration credentials.
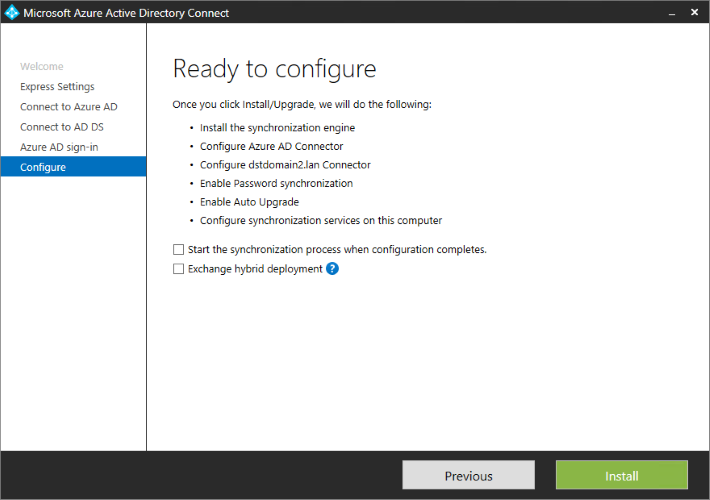
Finally, in the configuration screen, you can check or uncheck the options you want. You can do things like start the synchronization process automatically, opt for exchange hybrid deployment, and more. Most of it is fairly self-explanatory. To complete, click on the Install button and this will install Azure AD connect for you.
A quick word here. For some reason, if you didn’t add or verify your domain, you’ll be taken to the Azure AD sign-in configuration page in the wizard and you’ll be prompted to add this domain.
To do that, sign into your Azure portal with a global admin account. On the left-hand side, select “domain names” and choose “add.” On the domain name text box, add the name of your domain along with the top-level extension.

Next, verify this domain with the DNS entry information.
This should make your connect tool ready to use.
How do I use Azure AD connect?
The first step to using it to start the synchronization process. If you unchecked the automatic synchronization checkbox during the installation process, you need to start it manually using PowerShell.
Starting the synchronization
If you don’t remember what you chose, check the configuration settings with this PowerShell cmdlet.
Get-ADSyncScheduler
The cmdlet for starting the initial synchronization is:
Start-ADSyncCycle -PolicyType Initial
When you want to start the delta synchronization, use this cmdlet:
Start-ADSyncCycle -PolicyType Delta
Next, you can work on other settings too.
Customizing the scheduler
You can customize the synchronization time interval with this PowerShell cmdlet:
Set-ADSyncScheduler -CustomizedSyncCycleInterval 01:00:00
With this command, you’re telling the system to sync every one hour. You can choose any interval, but it has to be greater than 30 minutes.
Managing directory synchronization
Use the synchronization service manager console to manage your directory synchronization processes. To open this console, navigate to Start menu ->Azure AD connect ->Synchronization service manager.
This console will have four tabs — operations, connectors, metaverse designer, and metaverse search. You can monitor the synchronization process in the operations tab.
In a previous article, we have covered how you can force a synchronization instantaneously if necessary.
Summary
Overall, Azure AD connect is a great tool to manage your user identities. It is easy to install, simple to use, and is ideal when you want to sync changes between your on-premises applications and cloud.
Have you tried it yet? Please share your experience in the comments section.
Photo credit: Shutterstock


