If you would like to read the other parts in this article series please go to:
- Getting Started with Xendesktop 4 (Part 1)
- Getting Started with Xendesktop 4 (Part 2)
- Getting Started with Xendesktop 4 (Part 3)
- Getting Started with Xendesktop 4 (Part 4)
- Getting Started with Xendesktop 4 (Part 5)
In the previous article we configured the basic settings that made it possible for users to start a session to the virtual desktop.
Advanced Farm and DDC properties
It is no surprise that Citrix has lots of experiences offering desktop and applications to the end users using their ICA protocol within their Server Based Computing solution XenApp. So, if you are familiar with XenApp then most of the settings described here will be well known to you.
I will start with the options available within the Delivery Console which configures settings on the Desktop Delivery Controller. Open the Delivery Service Console and select the XenDesktop Farm icon and select the right mouse button menu item Modify farm properties / Modify all properties.

Figure 1: Opening Farm properties
Although the first setting is not a performance related option I would like to talk about it briefly. I struggled with this option during one of my Proof of Concepts. In that particular Proof of Concept only the Citrix Access Gateway connections was checked. When you are connecting as an end-user to a virtual desktop (using Web Interface only, so no CAG) the desktop pops-up quickly and then the desktop disappears. At the back-end the virtual desktop completely “hangs’ and can only be brought back online by restarting the machine. To find out what was causing this behavior we spent long hours troubleshooting the setup, so if you have something similar check out this setting.

Figure 2: Connection Access Controls
Next, enable or disable Session Reliability through the checkbox. When Session Reliability is enabled and the connection between the client and the virtual desktop is lost the client will automatically try to connect again. This feature is using port 2598 by default so when firewalls are used between the client and the virtual desktop this port should be enabled. I advise to use this option if possible, because Citrix is building almost all new technologies on top of this option.

Figure 3: Session Reliability
When SessionReliability is not possible then the default behavior of a lost connection is the immediate termination of the user session. Using the setting Keep Alive as shown below will show the configured time to the user while there is no connection between the client and the virtual desktop. The session is not responsive, but still visibe. Without this option the user should be reconnecting to the desktop again.
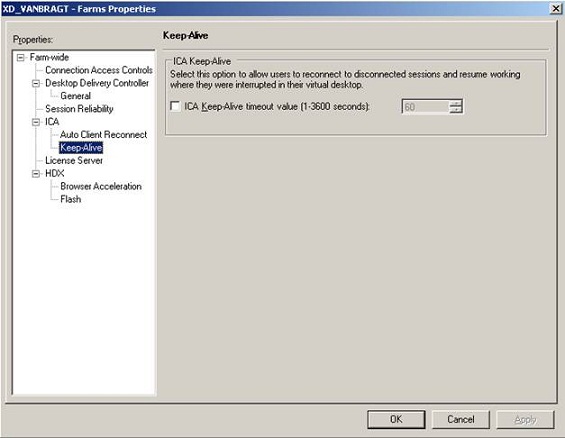
Figure 4: Keep Alive configuration (when Session Realibility is not used)
Under the HDX option, the real performance setting of the Farm settings can be configured. The first one is called Browser Accelaration. With this option the performance of viewing websites within the virtual desktop can be optimized. You can also configure the compression level of the images shown in the browser, which will logically decrease the time needed to show the images on websites. The exact settings should be determined based on the needs of the organization. The last option is a real nice one, where Citrix determines the available bandwidth and automatically adjust the compression level according to the available bandwidth.

Figure 5: Browser Accelaration
The last within the farm properties and HDX configuration options is Flash optimization. Within this configuration you can enable running Flash content on the virtual desktop or on the client. By default the Flash Content is rendered on the client, but the client logically needs to have the flash player installed locally and have a connection to the Internet. If this is not the case, server side rendering will happen. If needed the behavior can be changed using GPO .adm templates. This blog post describes the technique behind the rendering, while this article describes the step to alter the default behavior.

Figure 6: Flash Optimization
XenDesktop Citrix Policies
The second location to configure XenDesktop performance settings is from the Citrix Presentation Server Console. The name of the console implies that the current XenDesktop implementation is based on the XenApp product that previously was known as Citrix Presentation Server. Within the console you will find the Policies option.

Figure 7: Citrix Presentation Server Console
Within the Policies you can create one or more policies depending on your needs and different configurations needed. There are also several options are available. The first step to optimize the performance for the end user is specifying the connection type the users will be using when connecting to the virtual desktop. The policy will then be configured automatically with the best practices settings for the connection type.

Figure 8: Citrix Presentation Server Console
Depending on the connection type you have choosen, some other settings will be configured automatically. When no connection type was selected all settings are default and you can configure every item. Under Bandwidth there are several settings available to help you reduce the needed bandwith and thus the overall performance of the session. Great improvements can be made with session limits, where you can configure how much bandwidth can be used by each specific client mapping. Also speedscreen can improve the performance a lot, but here a compromise should be found between speed and quality.

Figure 9: Bandwith Settings
Within the Session Limits options the amound of bandwidth can be set for the client mapping, while in Client Devices the several client mapping can be enabled or disabled. It´s a best practice to limit the amount of client mapping to a minimal and only enable those which are required by the organization. In comparision with XenApp you will find the USB option (allowing or disallowing USB devices), which is not available in XenApp.
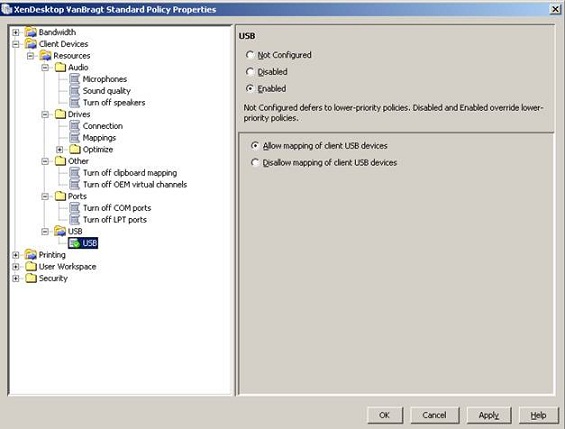
Figure 10: Client Devices
Printing is the last option within the policies part where you can tune performance. These settings apply only when you allow client printer mapping off course. I advise to revise the settings Auto Creation (which printers will be mapped within the session, where fewer printer mappings will speed up the logon process and possible less impact on performance) and Print Job Routing (using printer within the ICA protocol or standard printing traffic).

Figure 11: Printing
It’s going too far for this article to describe all settings separately and how policies can be combined. I would like to refer to a previous article series I have written about Citrix Policies for XenApp which explains the policies in-depth.
Connecting to the Virtual Desktop
The above described settings are not necessary to set-up the connection, but are important configuration steps. But finally it’s time to set-up a connection. Therefore we will start an Internet Explorer and navigate to the server hosting the Web Interface.
When the client device does not have the Citrix client available (Citrix Receiver/Plugin) this will be detected by the Web Interface and the user will be offered to install this client. When this part is finished the Web Interface will show a logon screen.

Figure 12: Web Interface
After logging in, the Web Interface will show the available Desktop Groups which are assigned to the end user. By clicking the icon the session to the virtual desktop will be created.

Figure 13: Showing the available Desktops
When the session is established the user is logged on the workstation and can perform his/her daily tasks.

Figure 14: The virtual desktop for the end-user
When we will go back to the Delivery Service Console, we will now notice that the VM is now in use and is assigned to the user VanBragt TestUSer1. Because we have configured the assigned on first use option this user will be assigned always to the virtual desktop. Logically this is dependent of the assignment configuration made during creation of the Desktop Group.

Figure 15: Delivery Service Console showing that the VM is in use and assigned to a specific user
Conclusion
In this article series we have seen how to install and configure an infrastructure to run the XenDesktop Express edition which is available for free. After this series you can set-up such an infrastructure and get used to the XenDesktop product. This helps users get familiar with the VDI concepts. In addition, performance and usuability can be tested and analyzed. Remember that the free edtion is limited to 10 virtual desktops and lacks several advanced features that makes XenDesktop enterprise ready such as, using thin provisioning with Citrix Provisioning Services and more management/advanced features for XenServer.
If you would like to read the other parts in this article series please go to: