This is the first in a series of articles on the merits of Google Cloud Platform from the vantage point of a Microsoft Azure expert.
I’ve been using Microsoft Azure and Microsoft cloud solutions for ages, but as species, we need to socialize to evolve. That principle can be applied to the cloud universe as well. Although Microsoft Azure is where I spend most of my day working with my customers, I love to peek and understand how the competition is doing, and some of my customers use more than one cloud vendor. You may be wondering, how about AWS? Several of my customers have a negative view of AWS because, depending on your industry, you are dumping money into the competition (Amazon). Here is where Google Cloud Platform has an edge for being a good alternative in a multicloud world.
Google and Microsoft are companies that have relevant contributions to the open-source community and share some of their internal processes to help enterprises all over the globe. I haven’t seen contributions from the other cloud vendors at the level provided by Google and Microsoft, but that is the humble opinion and view of this author.
I wrote about some areas of AWS in the past, and they have a good cloud offering. However, my proposal for this series is to share my progress in my GCP journey and log those steps in the format of articles here at TechGenix. If you are a cloud enthusiast, have some curiosity about GCP, want to see another perspective from an Azure guy looking at GCP, you are in the right place.
Signing up in Google Cloud Platform
The first step is to go to the Google Cloud Platform homepage, and like any other product on the Internet, click on Get started for free (spoiler alert, although it is free, it will require your credit card information) to start the process.

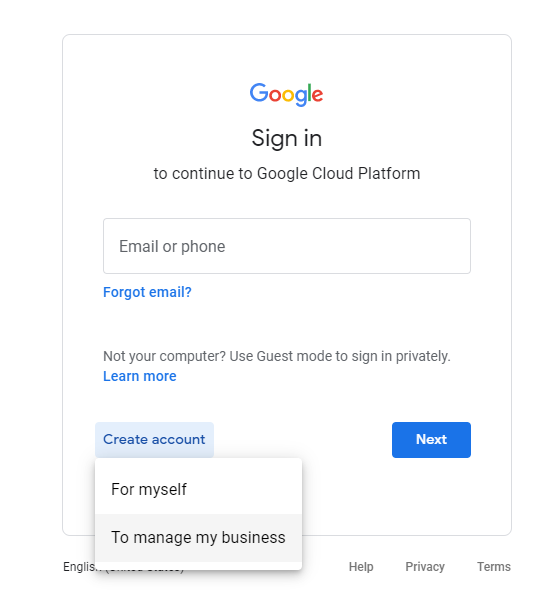
We will create an entirely new GCP environment and make things easier. Instead of logging in with any existing Google Account, click on Create Account and select To manage my business, as depicted in the image below.
On the Create your Google Account page, type in the information related to your account — make sure that you are typing the full email address containing your domain.
Note: If it shows @gmail.com on the email address field, click on Use my current email address instead.

On the verify your email address. A code of six digits will be sent to the email provided in the previous step, type in the code, and click on Verify.
After being verified, we need to provide the date of birth and gender. Keep in mind that the phone number is not required on this page.
On the Privacy and Terms page, make sure that you read everything (I loved the section “You’re in Control” toward the end of the agreement), accept the terms to continue, and click on Create Account.
Google always says that all companies are data companies. So, the next page will inform you that your initial account has been created, and it asks to configure a profile for your business, but we definitely don’t need that at this time. Click on Not Now.
Now that we have completed the account creation process, a new process to enable the free services for 90 days or $300 (whichever comes first) will be started. On the first page, we need to confirm Account Information, which provides the country and, if you accept the GCP terms and conditions, click on Continue.

On Step 2 of 3 pages, we need to provide our phone number, and an SMS message will be sent to confirm your phone number. Make sure that you confirm your number on the next page and click on Verify when prompted.
The final Step 3 of 3 pages is all about your financial information. Fill out all the information and when ready, click on Start my free trial.
We are done with wizards (well, wait for the next article when we touch identity) for now.
Compared with Microsoft Azure, the signup process on the Microsoft side seems easier. Microsoft Authenticator plays a big role if you need to authenticate instead of sending SMS messages.
Accessing your brand new GCP environment
GCP has four different methods to interact with, the Cloud Platform Console (web browser), Cloud Shell and Cloud SDK (command-line interface), Cloud Console mobile app (Android and iOS), and the Rest-Based API.
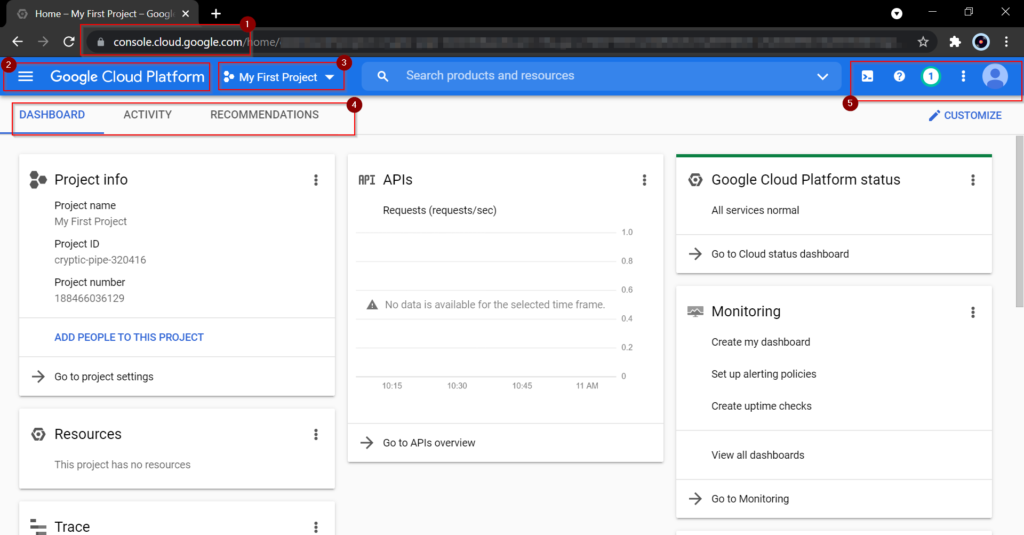
We can start with a tour in the Google Cloud Console (Item 1). You can always go to cloud.google.com and authenticate, or go straight to the console page (if that is your first time, you will get a getting started page). Note: The first time, you will receive a wizard to describe your organization size, why you are playing with GCP, and what you do. You can safely dismiss it.
The GCP Console has a navigation menu (Item 2) that will list all services divided by category (computer, serverless, databases, and so forth). You can find the same services by looking at the Search field in the top bar. Personally, I’m not too fond of the flyout menu in Azure, and it seems that is the only option available in GCP.
In GCP, you have projects, and you can select Projects, which can be part of the organization and organized by folders (we will get there in our next article) from Item 3.
The completely customizable Dashboard brings the page that is displayed below. The activity (similar to going to Monitor/Activity Logs in Azure) and Recommendations (similar to Azure Advisor) are all visible from the main page (Item 4).
GCP also offers Cloud Shell, which has tons of tools to manage the platform, including the gcloud utility, a command-line part of the Google Cloud SDK, and interacts with GCP APIs. In the same area, we have the Help area, which is used to open support tickets in the platform, the Notification Area, Settings and Preferences, and last but not least, the logged user and the ability to switch accounts.
The Google Cloud Shell has 5GB of persisted data, and you don’t need to associate a storage account as we have in Microsoft Azure. Another benefit of this feature is the ability to use Cloud Shell tabs in the same browser tab, and there is no need to switch between PowerShell and Bash, so you have a bash. In this area, I like Google’s offer, and they do simplify the cloud administrator experience.
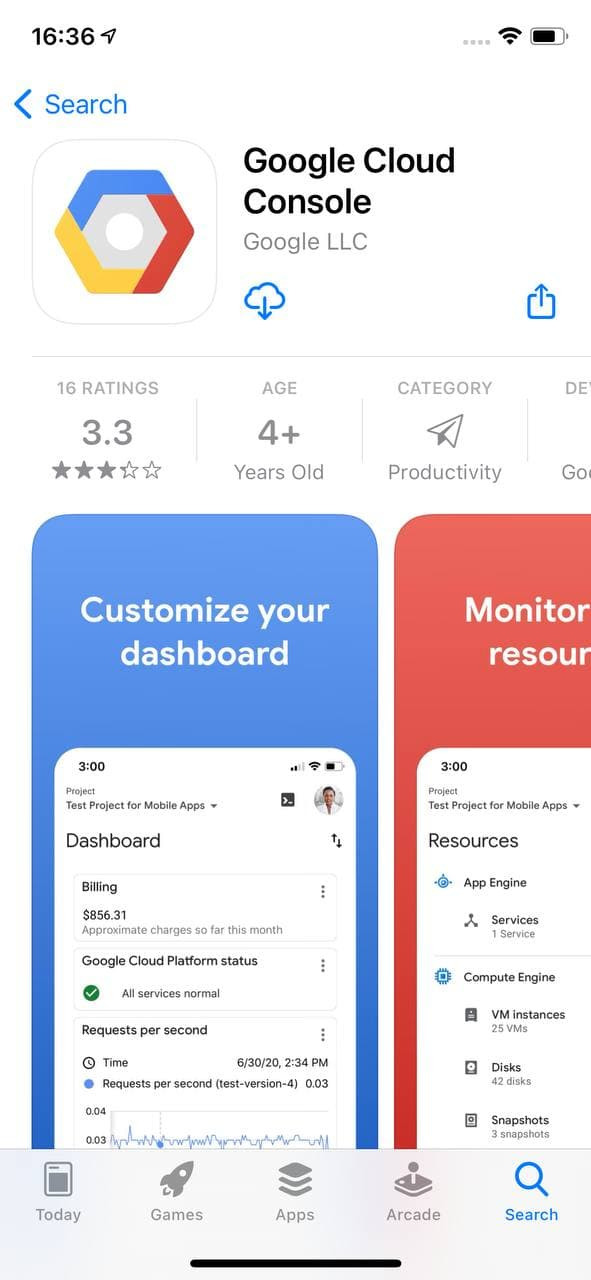
You can give it a shot at managing your GCP using a mobile phone. It is a more simplistic view of the resources running, but you can do some actions on your existing resources (no creation, though). It supports Cloud Shell with a special keyboard provided by the app (at least on iOS), but the interface, compared with Azure, is not there yet.
So much more to do — so stay tuned
In this first article in our series, we covered creating a GCP tenant and getting to know how to connect and see your cloud environment.
Featured image: Shutterstock


