If you would like to read the other articles in this series please go to:
- GroupWise to Exchange 2007 – Interoperability and Migration (Part 1)
- GroupWise to Exchange 2007 – Interoperability and Migration (Part 3)
- GroupWise to Exchange 2007 – Interoperability and Migration (Part 4)
- GroupWise to Exchange 2007 – Interoperability and Migration (Part 5)
- GroupWise to Exchange 2007 – Interoperability and Migration (Part 6)
- GroupWise to Exchange 2007 – Interoperability and Migration (Part 7)
- GroupWise to Exchange 2007 – Interoperability and Migration (Part 8)
- GroupWise to Exchange 2007 – Interoperability and Migration (Part 9)
My co-author Declan Conroy and I will walk you through the installation of the Connector for Novell GroupWise and the Calendar Connector on the Exchange Server, and the GroupWise API on the GroupWise server. We will also give some background on our lab network so you can easily recreate the environment.
About co-author Declan Conroy
 Declan Conroy is an IT consultant specializing primarily in Microsoft technologies including Exchange and Active Directory. Having previously worked for companies like Hewlett Packard and Compaq both as internal IT support, middle management and as a Professional Services consultant, Declan founded Cheddon Consulting Limited in April 2005. Since then Cheddon Consulting have migrated over 150,000 mailboxes to Exchange Server.
You can contact Declan here, or through his blog.
Let’s Outline our Migration Scenario
In order to give a realistic migration scenario, our company is in the process of migrating from a Novell network to a Microsoft network. An Active Directory does exist, but AD design and configuration is outside the scope of these articles. There are no user objects in Active Directory.
All users have accounts in eDirectory and the clients being used are all Windows XP SP2 with the Novell client.
The GroupWise system is currently running version 7, although the principles of migration, if not the client versions, would remain the same for earlier versions.
We are doing everything in a virtual server farm using VMware Server which is on version 1.0.4 as of this writing.
Our server infrastructure will grow as we progress through this series of articles. As it currently stands we have;
- A GroupWise 7 server running on Netware 6 called NWGW1
- An Active Directory Domain Controller called ADADMIN
- An NDS admin workstation running Console One and NWADMIN called NDSADMIN
-
An Exchange 2003 server called EXCHANGE2003
In later articles we will add Exchange 2007 servers, and Quest migration workstations into the infrastructure.
Our GroupWise server is running both the API gateway and our live Post Office. We have done this for several reasons, it serves our purpose and it allows us to demonstrate the key steps and technologies used in migrating away from GroupWise, but we appreciate that GroupWise best practice is to run the API gateway on a separate Post Office in a separate secondary Domain.
We have started with the four machines above for simplicity. Remember, you cannot add an Exchange 2003 server to an existing Exchange 2007 organization, and you should have spotted this in the planning stage. In order to migrate to Exchange 2007 and co-exist with GroupWise during the process, you need to get Exchange 2003 in first. You may already have Exchange 2007 in place, but so long as you also have your Exchange 2003 in place, that is fine.
Our Exchange 2003 server is running Exchange 2003 SP2 on Windows Server 2003 R2 also SP2. We have a clean install, with no connectors, no Mailbox enabled AD objects and no additional AD user objects other than Administrator.
We have a small OU structure in NDS that consists of five departments. We have 12 user objects, three groups, one GroupWise resource and two GroupWise external entities. We will worry about these GroupWise objects and how they are migrated to Exchange in a later article.
For now we are going to get these two systems talking to each other.
Installing the Exchange Connectors
Although there are situations where more than one connector may be required, for example where you need to synchronize with more than one GroupWise system, or where you wish to distribute the workload which you can do by pointing multiple Connector instances at the same API gateway or at separate gateways possibly in separate GroupWise domains, you can only run one instance of the Novell Connector for GroupWise per Exchange 2003 server. In a small to medium sized migration to Exchange 2007 this is likely all you need. One Exchange Server talks to one GroupWise server and the replication mechanisms of each system do the rest.
Start with the Exchange 2003 CD in the drive.
Skip the ExDeploy, and run the setup.exe directly from the \SETUP\i386 subdirectory.
On the Welcome to the Microsoft Exchange Installation Wizard page, press Next>.
For the Microsoft Exchange component and the Microsoft Exchange Messaging and Collaboration Services component change the action from ü to Change as shown in Figure 1.
For the Microsoft Exchange Connector for Novell GroupWise and the Microsoft Exchange Calendar Connector components select Install, again shown in Figure 1.
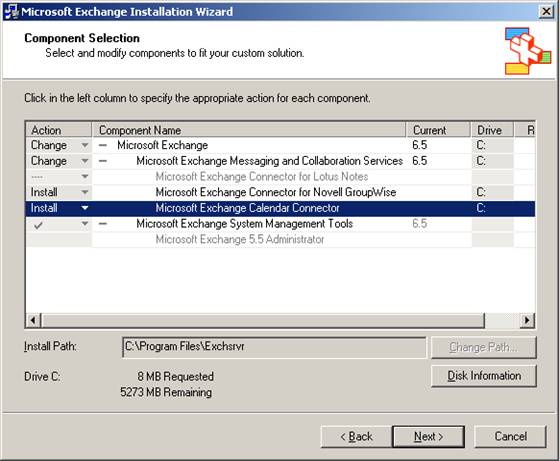
Figure 1: Modifying the Exchange install to install connectors
Press Next>.
These files do not take much space, about 8Mb. We are essentially creating a file and folder structure with the Exchsrvr\Conndata directory.
You will need to re-apply Exchange 2003 SP2 after the connectors have been installed as shown in Figure 2. There were some updates to the GroupWise connector in SP2.

Figure 2: Exchange setup warns you to re-install SP2
If the re-installation of SP2 gives you a warning about the IMF as shown in Figure 3, open Regedt32 and look for the following key:
HKLM\Software\Microsoft\Exchange\ContentFilterVersion

Figure 3: The IMF warning which prevents update
Change the value to 1 as shown in Figure 4, exit the SP installation and try again.

Figure 4: Setting the IMF Version value to 1
So let us look at what we have. In ESM we now have two connectors, one for Novell GroupWise and one for the calendar which you can see in Figure 5.
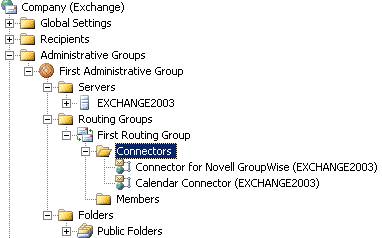
Figure 5: The newly installed connectors
Before these will actually talk to anything, we need to install the Novell client onto the Exchange server. We need to do this for the following reason; the way the connector actually works is that it simply places text files into a specific directory structure on the Netware server that is running GroupWise. Gateway Services for NetWare GSNW is not available for Windows Server 2003. To access the directory structure, we need the Novell client.
At the time of writing the most up to date version of the client for Windows Server 2003 is 4.91 SP4. You can download it from http://download.novell.com. It is a 21.5MB download.
Once you have created a login (free) and downloaded the install file, unzip it and run SETUPNW.EXE.
Select Typical Installation and click Install> as shown in Figure 6. Then opt to Reboot.

Figure 6: Installing the Novell Client
We are not actually going to install the GroupWise client on the Exchange server at this point. If we decide to use the native Exchange Server Migration Wizard we will need to. The migration is client side driven, and each GroupWise mailbox is opened using the GroupWise client.
The Quest utilities that we will cover in a later article are also client side driven, but we typically run these on a dedicated migration workstation, with everything we need such as the AD AdminPak, GroupWise and Outlook clients installed.
So, the Exchange Server now has all the prerequisites in place, they just need to be set up. We will come back to this in a moment.
Installing the GroupWise API
The GroupWise API is a generic API that allows GroupWise to talk to any third party e-mail system. It is not specific to Exchange. Novell do make a specific connector for Exchange, but you can only run this on a Windows platform, and if GroupWise is not running on Windows then we are left with the good old fashioned API.
Patch 2 for the 4.1 API was written in 1999, and Patch 5 was last updated in December 2001. The Microsoft Connector for Novell GroupWise was last updated on October 2005 when Exchange 2003 SP2 came out so as you can see we are not dealing with the latest technology here!
Download the Novell API from http://download.novell.com. Also, get a copy of the most recent patch, simply search for gw41api2.exe and fgwapi5.exe.
Extract the files from the gw41api2.exe to a floppy disk, and insert it in the floppy drive on the GroupWise server.
On the keyboard, press CTRL+ESC, and from the list of Current Screens shown in Figure 7, select the System Console.

Figure 7: The Netware Current Screens selection page
Type NWCONFIG and press return. We are looking for the option to Install a product not listed shown in Figure 9, which is under the Product Options you can see in Figure 8.

Figure 8: The Netware Configuration Options screen

Figure 9: The Netware Other Installation Actions screen
Press <Enter> to continue when prompted that the Product will be installed from A:\.
Now this next screen, the API Gateway Installation shown in Figure 10, is pretty important and for most Windows/Microsoft consultants, it takes a bit of careful deciphering.

Figure 10: The API Gateway Installation screen
The GroupWise Domain Path follows the Novell Volume format which is not intuitive to us Windows folk. The Domain Path is essentially a path to the WPDOMAIN.DB file. The domain path uses the following format:
Volume:Path_to_groupwise_domain
There may be more than one WPDOMAIN.DB, as it is possible for multiple domains to exist on a single GroupWise server, but chances are with a separate GroupWise server that has been set up in a secondary domain to run the API Gateway there will only be one.
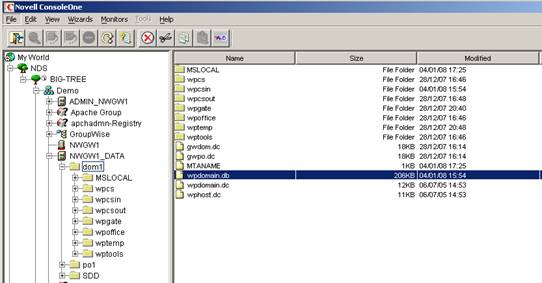
Figure 11: ConsoleOne showning the WPDOMAIN.DB file
You can find the WPDOMAIN.DB file from within ConsoleOne as shown in Figure 11. This typically gives you a good indication of what the volume and path should be. You can also use the Tools, GroupWise System Operations, Select Domain… option from within ConsoleOne to verify the domain path.
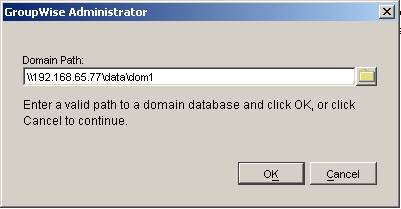
Figure 12: Showing the GroupWise Domain Path
In my case, because I am using an admin workstation to run ConsoleOne the domain path is displayed in terms of a Universal Naming Convention starting with \\ which you can see in Figure 12.
Since I am installing the API on the Post Office itself, all I need are the volume and path, so in my case it is data\dom1. The format required by the API installation includes an “:”, so it is data:\dom1. Once you have the GroupWise domain path, the Gateway NLMs path may update itself, after which you should press Install…
Once the install has completed, press ESC twice, then Enter to confirm you wish to exit NWCONFIG.
Next we need to do a file replacement in order to upgrade the API to Patch 5.
When you unzip fgwapi5.exe there is a notepad document called fgwapi5.txt that walks you through this, but essentially we are replacing the NGWAPI.FIL and the NGWAPI.NLM files in the wpgate\api directory under the GroupWise domain path, so in my case this is dom1\wpgate\api.
You can browse to the directory using Windows explorer, and simply swap the files.
While we are in the api directory, open the NGWAPI.PRM file shown in Figure 13, and locate the line that reads: Gateway does inbound group expansion. Remove the ; from ;/group on the following line to enable group expansion. While the NGWAPI.PRM file is open, look for the line that reads ; Path to the gateway’s root directory. This line should contain a reference to the GroupWise domain path from earlier. In my case it reads /Home-data:\dom1\wpgate\api
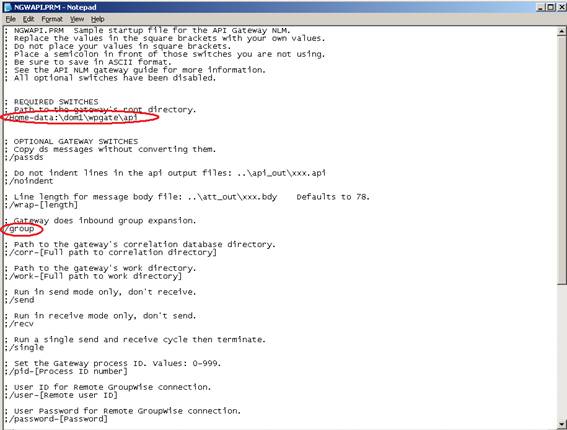
Figure 13: The NGWAPI.PRM file showing the areas requiring change
Save the file and close it.
Summary
At this stage you have finished the install process of the connectivity pieces used to get Exchange and GroupWise talking. In the next article we will show you how to configure them to get things actually working!
About co-author Declan Conroy
Declan Conroy is an IT consultant specialising primarily in Microsoft technologies including Exchange and Active Directory. Having previously worked for companies like Hewlett Packard and Compaq both as internal IT support, middle management and as a Professional Services consultant, Declan founded Cheddon Consulting Limited in April 2005. Since then Cheddon Consulting have migrated over 150,000 mailboxes to Exchange Server.
If you would like to read the other articles in this series please go to:
- GroupWise to Exchange 2007 – Interoperability and Migration (Part 1)
- GroupWise to Exchange 2007 – Interoperability and Migration (Part 3)
- GroupWise to Exchange 2007 – Interoperability and Migration (Part 4)
- GroupWise to Exchange 2007 – Interoperability and Migration (Part 5)
- GroupWise to Exchange 2007 – Interoperability and Migration (Part 6)
- GroupWise to Exchange 2007 – Interoperability and Migration (Part 7)
- GroupWise to Exchange 2007 – Interoperability and Migration (Part 8)
- GroupWise to Exchange 2007 – Interoperability and Migration (Part 9)


