If you missed the previous parts in this article series please read:
- GroupWise to Exchange 2007 – Interoperability and Migration (Part 1)
- GroupWise to Exchange 2007 – Interoperability and Migration (Part 2)
- GroupWise to Exchange 2007 – Interoperability and Migration (Part 3)
- GroupWise to Exchange 2007 – Interoperability and Migration (Part 4)
- GroupWise to Exchange 2007 – Interoperability and Migration (Part 5)
- GroupWise to Exchange 2007 – Interoperability and Migration (Part 6)
- GroupWise to Exchange 2007 – Interoperability and Migration (Part 7)
- GroupWise to Exchange 2007 – Interoperability and Migration (Part 8)
About co-author Declan Conroy
 Declan Conroy is an IT consultant specializing primarily in Microsoft technologies including Exchange and Active Directory. Having previously worked for companies like Hewlett Packard and Compaq both as internal IT support, middle management and as a Professional Services consultant, Declan founded Cheddon Consulting Limited in April 2005. Since then Cheddon Consulting have migrated over 150,000 mailboxes to Exchange Server.
You can contact Declan here, or through his blog.
Introduction
In this, which truly is the last part of this series, my co-author Declan Conroy and I complete the migration process using the Quest tools. In part 8 we introduced the tools and then performed the Directory Export and AD Merge phases. Now we move on, with the Provision Distribution group phase.
Provision distribution groups
So far so good, we’ve merged all of the objects that actually have a GroupWise mailbox.
Distribution lists are provisioned using the Administrator Driven Batch Migrator.
The first time you run the Administrator Driven Batch Migrator, after the license screen you are presented with four options. Un-tick the option GroupWise administrative functions and select the bottom option to Provision distribution groups as shown in Figure 1.

Figure 1: Setup options when running the Administrator Driven Batch Migrator
On the next screen shown in Figure 2, the utility will ask you for a location within AD to create the Global Distribution groups and the credentials of an Active Directory account it can use to do the job.

Figure 2: Setting credential and locations for group provisioning
Press Next>, set logging options, review the summary shown in Figure 3, and we are done.
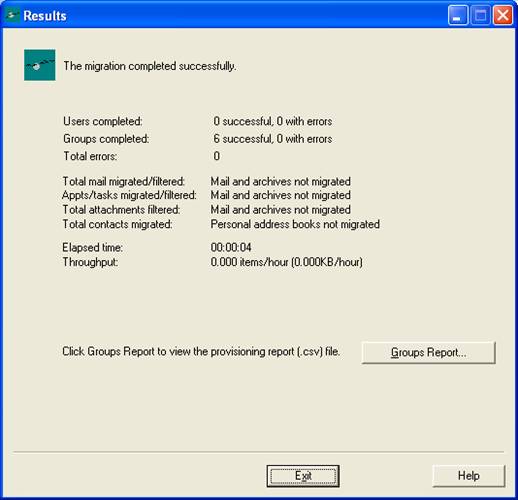
Figure 3: The Batch Migrator Summary
The information used to create the distribution groups and their membership comes from the fourth file created by the Directory Exporter, the GroupToProvision.txt file.
The Administrator Driven Batch Migrator
We have already used this tool in the preceding step to provision distribution groups.
We will now use it to perform the following three steps in our migration.
- Exchange administrative functions
- GroupWise administrative functions
- Migrate users
These three options cannot be performed at the same time, or during a single run thru the utility.
Exchange administrative functions
I typically do Exchange admin functions first as the only admin function I am really interested in is the creation of mailboxes.
My thinking here is that if you do the GroupWise admin functions first which typically includes hiding the GroupWise mailbox by setting its visibility to none, that you have a small window where the user does not have a visible mailbox on either system. If you enable the Exchange mailbox first then you have the safety net of the Exchange mailbox before you hide the GroupWise one.
The Exchange Admin functions are pretty straightforward.
Select the type of Target Exchange System as shown in Figure 4

Figure 4: Selecting the Target Exchange System
Next, select Mailbox-enable existing Active Directory accounts as shown in Figure 5.

Figure 5: Selecting the relevant Exchange admin options
Next, enter the credentials and the Domain controller Host name: used to manipulate Active Directory as shown in Figure 6.

Figure 6: Entering credentials
In our case the users were loaded into Active Directory: using the MS Exchange GroupWise Connector

Figure 7: Selecting the server to migrate to and the relevant database
Specify Server: and Mailbox store: as shown in Figure 7.

Figure 8: The Summary of the migration
Review the summary, press Exit > as shown in Figure 8 and we’re finished with the Exchange admin functions.
GroupWise administrative functions
The GroupWise admin functions are a little bit more involved, and we have a few more choices to make here.
Anything that the Quest utility does with regard to GroupWise is done using the native GroupWise API on the migration workstation. This includes the initial directory export and any of the GroupWise administrative functions.
In order to allow the Quest tools relevant access to mailboxes, we have three options:
- Grant Proxy Access to all of the mailboxes being migrated.
- Reset passwords for all mailboxes being migrated from GroupWise 6.0 or lower
- Make use of the Trusted API with GroupWise 6.5 or above.
We covered some utilities that will help with granting Proxy Access in Article 6. Quest also supplies the AddProxy Utility which can be called via a login script, which is explained in Appendix A of the user guide.
While we are on the subject of proxy access, every GroupWise resource (mailbox) has an owner and this owner has proxy access to the resource. In order to be able to set forwarding on a resource, you first need to proxy into the resource as the mailbox owner and then grant proxy access to the migration account.
Let’s run thru the GroupWise administrative functions.
For this run I have removed Matt from the UsersToMigrate.csv file because this is the account I am using to do the migration. If I leave my migration account in the .csv file it is processed just like any other mailbox and once I set the user visibility to none for the migration account then proxy access won’t work for any other account. Each mailbox from here in will generate an error.
After we select GroupWise administrative functions and a list of users to migrate, we are presented with four options shown in Figure 9.

Figure 9: Selecting GroupWise administrative operations
The first two are mutually exclusive, we can either set or remove forwarding but we cannot do both.
We then have the option to Set user password and Set user visibility.
If you have GroupWise 6.5 or above, do not waste any time with the user password as the options to use user passwords on later screen are simply grayed out.
If you are on 6.0 or below then it may be worth playing with as an alternative to trusted API or proxy access.
My preference is to tick the box for Set forwarding but not to actually set any forwarding.
I set an auto reply informing people that the user has been moved, but in my experience the forward itself causes issues.
Once a GroupWise mailbox has had its visibility set to none, any mail destined for the SMTP format address that is found in the Exchange GAL, used on the Internet or displayed in the GroupWise Address Book will be delivered to Exchange.
There is a common scenario where a small amount of mail still arrives in the GroupWise mailbox after a user has been migrated. In my experience this is caused by GroupWise frequent contacts, when other internal GroupWise users send mail and the frequent contact is selected over the Address Book.
If you set a forward in GroupWise to forward mail to Exchange, the mail arrives in the Exchange mailbox with the legacy GroupWise mailbox as the sender, and when the Exchange mailbox user tries to reply the automatic reply address is their own legacy GroupWise mailbox which is not very helpful.
My preference is to set an auto reply informing the original message sender to delete the frequent contact and try again as shown in Figure 10. This is largely a culture thing, some people will go for this and others will not.

Figure 10: Setting an Auto Reply message
The following screen shown in Figure 11, selects the forwarding method. I am sticking with API Gateway. We are not actually doing any forwarding however, so in my case it is largely irrelevant.

Figure 11: Selecting the forwarding method
If you have GroupWise 6.0 then the password options screen shown in Figure 12, may be of some use.

Figure 12: Setting a new user password for all users (GroupWise 6 or earlier)
Choose None for mailbox visibility as shown in Figure 13.

Figure 13: Setting the visibility mode for users
Next, specify the Account you will be using for Proxy Access as shown in Figure 14.

Figure 14: Specifying the Account used for proxy access
Then check the results as shown in Figure 15.
I have had ten successes and three failures below, but again it is all about the numbers. We removed the migration account from the user list, one failure is a GroupWise external entity which has no actual mailbox, and in two other cases I have not actually granted proxy access to the migration account.

Figure 15: The results summary
Migrate users
For each batch of GroupWise mailboxes, this is the third and final run through the Administrator Driven Batch Utility.
First, we need to check that we have assigned the correct permissions on the target Exchange mail-store. In Exchange 2003 we do this by right clicking on the mailbox store and getting Properties.
On the Security tab click Advanced, then Add…
Add the Active Directory migration account, in my case the Administrator account, and press OK.
Scroll down the list and select Receive As, as shown in Figure 16 and then press OK three times.

Figure 16: Adding migration account permissions
In Exchange 2007 the process is done using the Exchange Management shell with the command:
Add-ADPermission -Identity “Mailbox Store” -User “Administrator” -ExtendedRights Receive-As
Once this permission has been granted, we can start the Administrator Driven Batch Migrator again. This time, select Migrate users and choose a Target Exchange System as shown in Figure 17.

Figure 17: Selecting to Migrate Users
In my case I do not have a central repository of archives so I have chosen not to batch migrate them as shown in Figure 18. I usually use the Self-Service Desktop Migrator for archives which I have covered briefly later.

Figure 18: Dealing with Archives
I have pretty much accepted all of the default options from here. In Figure 19 you can set options for filtering the mail migrated.

Figure 19: Options for filtering migrated items
The login method shown in Figure 20 will default to the last login method used. Use user password(s) is grayed out for GroupWise 6.5 and 7. You can specify Direct Connection by entering the Post Office path.
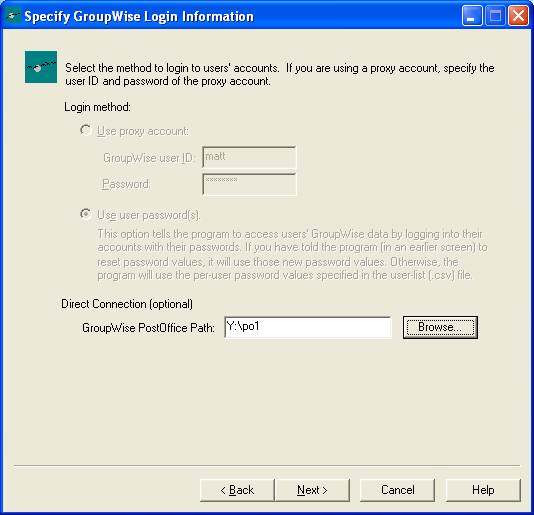
Figure 20: Specifying GroupWise Login Information
On the next page shown in Figure 21, I have accepted Server-based mailbox for Destinations for Migrated Data and for Shared Information, shown in Figure 22 I have stuck with the defaults.

Figure 21: Selecting the Destination for migrated data

Figure 22: Specifying Shared Information settings
Next, enter the Outlook Profile user credentials which will be used to access the Exchange server as shown in Figure 23. This screen will test the user profile and the “Receive As” permission we set earlier.

Figure 23: Setting the credentials used to access Exchange
On the Run Information page specify a log file name as shown in Figure 24.

Figure 24: Setting the logging level and file name
Finally, sit back and watch the data migrate! Once the migration completes you will see a summary as shown in Figure 25.

Figure 25: The final summary page!
Post Migration Tasks
After the users have been migrated, they are no longer visible in the GroupWise global address list as their visibility has been set to none. In order to enable the new Microsoft Exchange mailboxes to receive mail from legacy GroupWise users, the new Exchange mailboxes must now be synchronized back to GroupWise as external contacts.
The MS Exchange Connector for Novell GroupWise is explicit, and on the Export Containers tab, shown in Figure 26, we have told it to export Exchange users from a specific OU back to GroupWise.

Figure 26: Settings to export newly created Exchange users back into GroupWise
We need to move (drag and drop) our newly created Exchange mailboxes into this OU in order for the Exchange mailboxes to be synchronized back to GroupWise.
At this point you are finally done!
Self Service Desktop Migrator
Having completed the steps above, you have finished the migration steps, however there is a possibility of saving some time! How? Well, the Self-Service Desktop Migrator, and the Administrator Driven Batch Migrator actually do the same job, but the administrator utility allows you to migrate multiple mailboxes in batches, where the self-service utility is designed to allow individual users to perform the migration on their own desktop and migrate server side mail, personal address books and local archives.
The Self Service Desktop Migrator has far fewer prerequisites but it does require both GroupWise and Outlook installed in the correct order if the user wishes to convert GroupWise archives to Outlook PST files.
It is typically run from a network share so it can be run from a login script or from a UNC link in an e-mail. The shared directory on the migration workstation needs to be shared on the network for this to work.
I will not spend too much time on the self-service utility, except to say that there is an .ini file called gwdtapp.ini typically found in the C:\Program Files\Quest Software\GroupWise Migrator for Exchange\Shared directory that lets you customize the user experience.
The contents of the ini file are pretty self explanatory, there is a section called [Screens] that allows you to select which of the utility screens are displayed and which are hidden or run in quiet mode.
You can use the show or skip values to customize the desktop experience for your end users, and you can effectively run your entire migration client side, and you can allow or remove options such as Trash or Archives, by editing the gwdtapp.ini file.
It is well worth looking at as it can push some of your migrations steps out to your users!
Summary
So we have made it! All the way from Part 1 introducing the concepts of migration through setting up connectivity in part 2, configuring the connectors in parts 3, testing connectivity in part 4 and then getting co-existence of free-busy information to work in part 5. At this point we finally started the actual migration! Parts 6 and 7 cover the use of the native tools and then parts 8 and 9 complete the picture with a look at the Quest tools.
Of course there are many things we have not been able to cover comprehensively (or at all) but from the feedback we have received it seems we have provided something of use!
The only thing to say now is a massive thank-you to Declan Conroy who has years of migration experience and wrote the bulk of these articles. In the future we may do one more article covering some of the questions and feedback we have received however, for now, that is it!
If you missed the previous parts in this article series please read:
- GroupWise to Exchange 2007 – Interoperability and Migration (Part 1)
- GroupWise to Exchange 2007 – Interoperability and Migration (Part 2)
- GroupWise to Exchange 2007 – Interoperability and Migration (Part 3)
- GroupWise to Exchange 2007 – Interoperability and Migration (Part 4)
- GroupWise to Exchange 2007 – Interoperability and Migration (Part 5)
- GroupWise to Exchange 2007 – Interoperability and Migration (Part 6)
- GroupWise to Exchange 2007 – Interoperability and Migration (Part 7)
- GroupWise to Exchange 2007 – Interoperability and Migration (Part 8)


