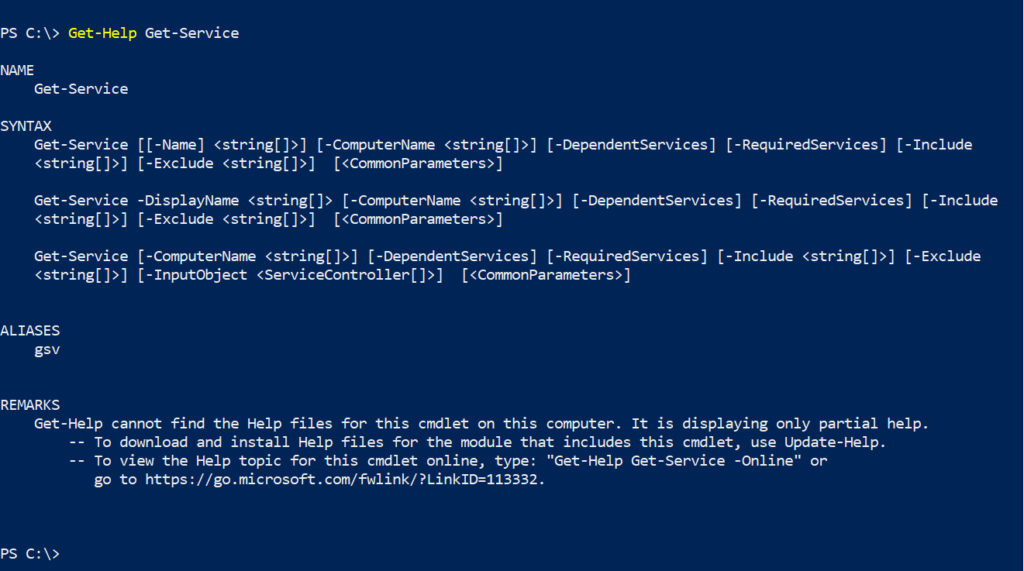
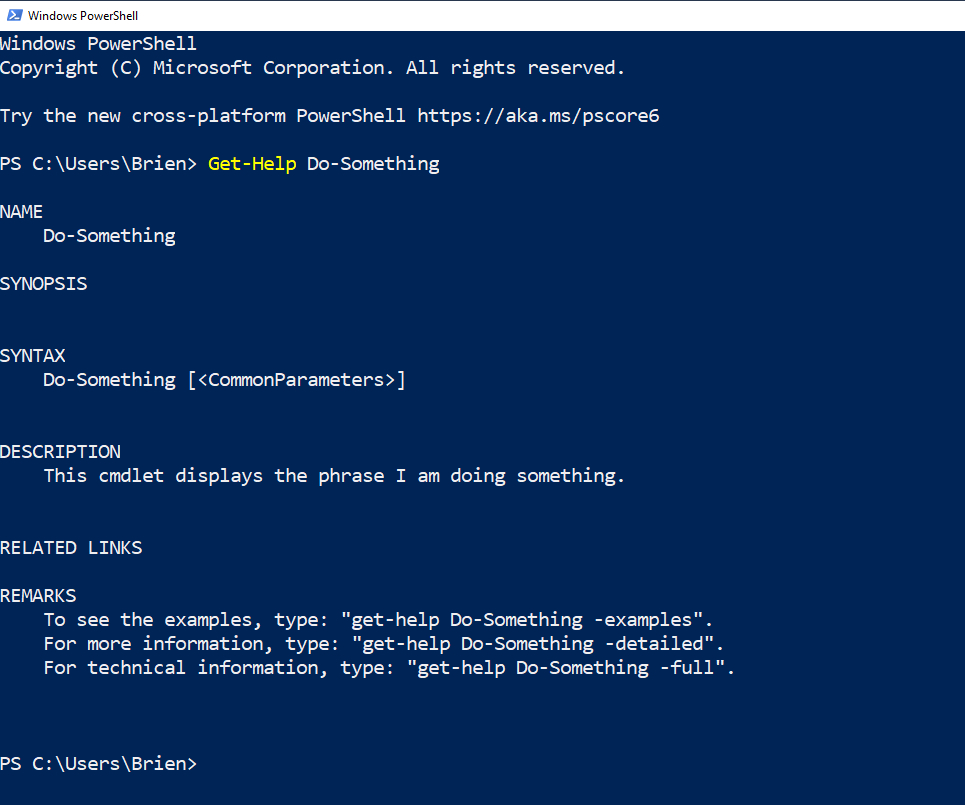
Yesterday, I wrote an article here at TechGenix in which I explained how you could create your own custom PowerShell cmdlets. The process involves creating a module file and then adding functions to the module. When properly constructed, each function becomes a PowerShell cmdlet. One of the things that really differentiates custom cmdlets from those cmdlets that are native to PowerShell is the absence of any sort of help. To show you what I mean, check out what happens when I use the Get-Help cmdlet to get help with a native PowerShell cmdlet:
Now take a look at what happens when I ask for help with my own custom cmdlet.
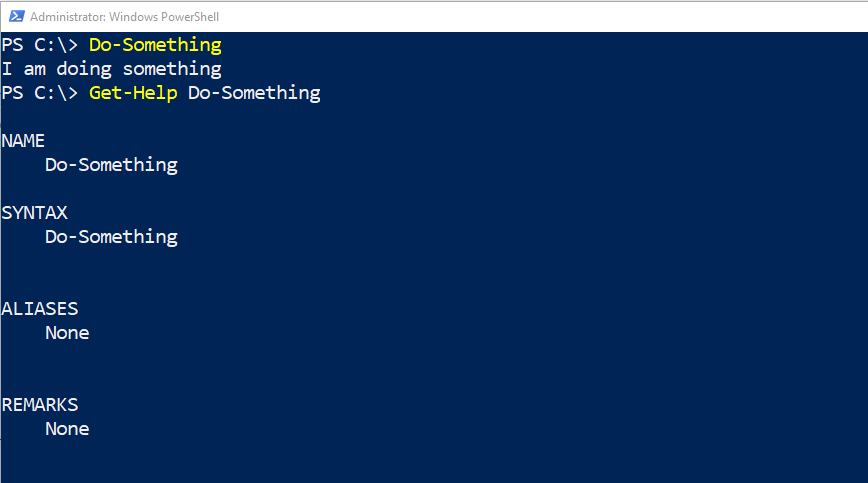
The absence of any kind of help probably isn’t a big deal if you have created a custom cmdlet purely for self-use. After all, if you created the cmdlet yourself, you presumably know how it works and don’t need help. If other people may eventually be using your custom cmdlet, it’s a good idea to give them some help. You can provide this help in any way that you like. It’s relatively common to include the command’s syntax in the command help, but you can include other things as well. For instance, you might include a tech support contact or perhaps an example of how the cmdlet is to be used.
PowerShell actually gives you a little bit of guidance as to the types of help that you might provide. If you look back at the previous screenshot, you will notice that the online help is divided into a few different categories, including Name, Syntax, Aliases, and Remarks. You can create help messages for any of these categories. In fact, there are even some other categories for which you can offer help. Appending the -Full parameter to a Get-Help command (Get-Help Get-Service -Full) provides verbose help. In addition to the types of things that you saw in the previous screen capture, you will also get the full, unabridged command syntax, which includes things like common parameters, inputs, outputs, and more.
Comment-based help
So let’s go ahead and take a look at how to incorporate help into a custom command. There are actually a few different ways to get the job done, but I like using a technique called comment-based help because I find it to be easier than some of the other methods.
As the name implies, comment-based help is added to a function in the form of a comment. This does not mean that you have to read a cmdlet’s source code in order to get help. Instead, PowerShell displays the help messages in the same manner that you saw in the first screen capture.
This, of course, raises a big question. Developers add comments to PowerShell scripts for any number of purposes. I myself have used comments to document a script’s date or version number or to remind myself of how a particularly tricky block of code works. The Get-Help cmdlet does not cause these types of comments to be displayed, so what is it that makes comment-based help work?
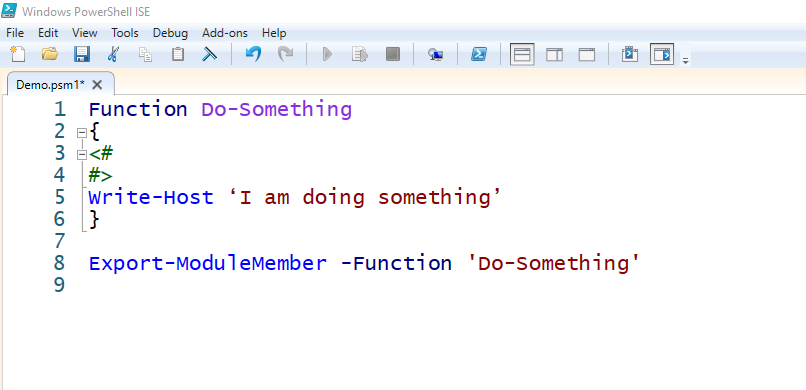
The trick to using comment-based help is that your help messages have to adhere to a very specific format in order to be recognized. The first thing that you will have to do is to enclose anything help related between a less than sign and a greater than sign. You will also need to place a pound sign just to the right of the less than sign and just to the left of the greater than sign. Here is what an empty help based comment section looks like on lines 3 and 4 in the script below.
Earlier I pointed out that the online help was grouped into sections (Name, Syntax, Alias, etc.). The key to populating these and other sections is to create section headers and section content within the comment-based help section shown in the screenshot above. Again, this needs to adhere to a very specific format.
Supported section names
The format requires you to use a period followed immediately by the name of the help section that you want to create. The section name must be in all capital letters. Additionally, you cannot create custom section names. The supported section names include:
- SYNOPSIS
- DESCRIPTION
- PARAMETER
- INPUTS
- OUTPUTS
- EXAMPLE
- LINK
When you create a help section, you will need to place a period immediately before the section name. The section name must be followed by a single blank line. If you skip the blank line, the help won’t work, nor will it work if you use multiple blank lines.
To show you how this works, let’s create a Description section and have it to display a brief description of what the cmdlet does. Here is what a description looks like:
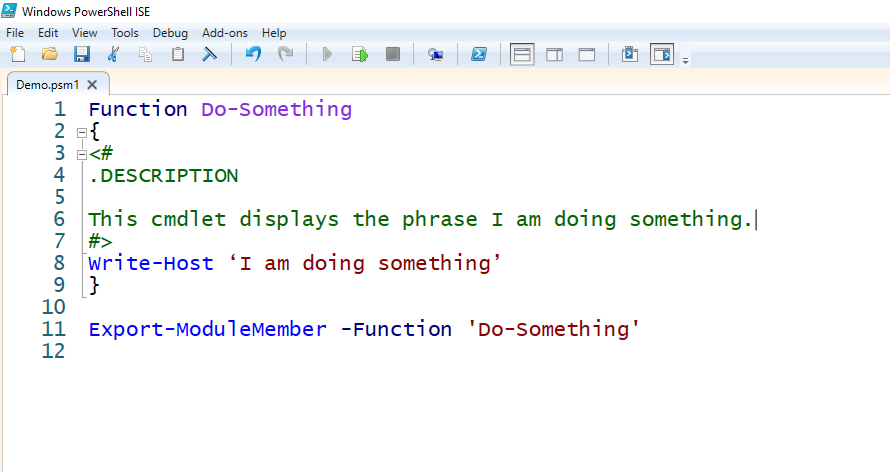
As you can see in the screenshot above, I created a section header called .DESCRIPTION. I followed that header with a blank line and then the text that I want the online help to display. In this case, my help text only consumes a single line, but multi-line text is allowed.
If you look at the screenshot below, you can see that my description has been added to the Get-Help description for the cmdlet.
A helping hand for your custom PowerShell cmdlets
As you can imagine, it can be very useful to add help to the custom PowerShell cmdlets that you create. This is especially true for cmdlets that require parameters to be supplied.
One really important thing that you need to know about the technique that I just showed you is that when you add help to a custom cmdlet, your change will not be reflected until you save the module file and then close and reopen PowerShell.
Featured image: Pixabay


I do have to admit that’s one thing VSCode does well. At the start of your module, type
comment-help
and press enter. The template for the comment help will be automatically created and you just have to fill in the details.
Your link to “yesterdays” article is broken. Is this the one
Building custom PowerShell cmdlets the easy way with modules
https://techgenix.com/custom-powershell-cmdlets/
.
Yes, that’s the one.