Introduction
In my previous article, I walked you through the process of Getting Starting with the vSphere 5 vCenter Server Appliance. I covered the benefits of using vCenter in a virtual appliance (now offered in vSphere 5), how to download it, and how to deploy it as a new VM in your virtual infrastructure. With your vCSA up and running, I will now show you how to configure it, step by step.
Connecting to the vCenter Server Appliance for Administration
You have a few options to connect to the vCSA appliance for administration. They are:
- vSphere Client VM Console – just as I showed in the previous article, you can access the vCSA VM console through the vSphere Client, like any other VM. There, you will find the option to configure the IP and timezone configuration through text-based menus or even to access a CLI interface (the vCSA VM shell)
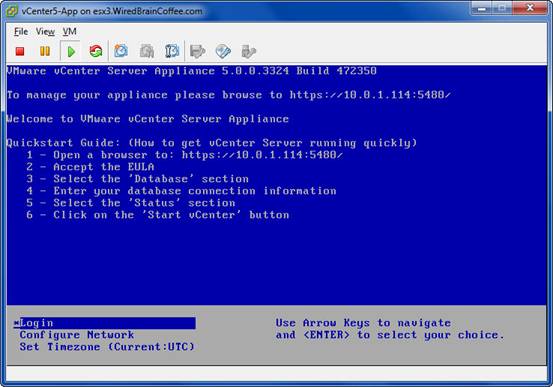
Figure 1
- SSH to vCSA – enabled by default, you can access the same console you would find on the VM console over SSH, as you see in Figure 2. This is great for troubleshooting but generally isn’t too helpful for day to day administration of vCenter.
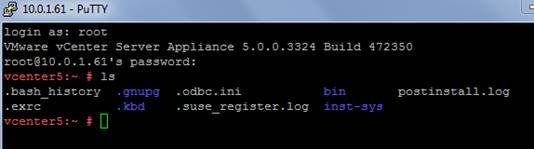
Figure 2
- Web Browser – you can access the vCSA console through a web-based client and, in fact, this is how you will perform the initial configuration of vCenter, how you will check on service status, and perform vCenter upgrades in the future (you will see lots of screenshots of this interface below as we perform our configuration so I won’t insert one here).
- vSphere ClientvCenter Server Admin – as you saw, you can administer the vCSA VM through the vSphere Client but you can also administer vCenter, just as you traditionally would with the vCenter for Windows, through the vSphere Client under vCenter Server Settings
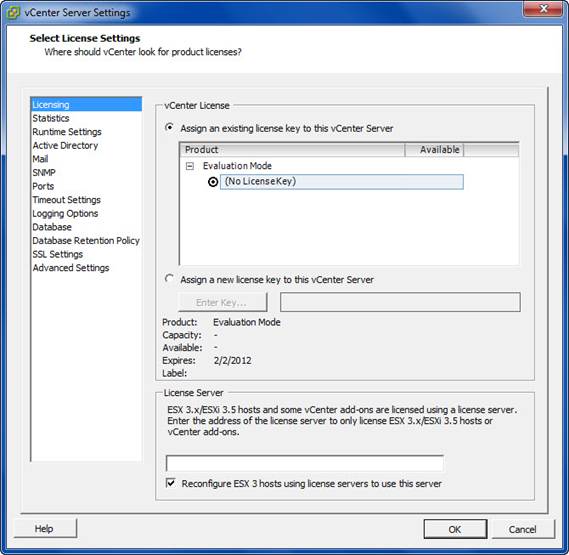
Figure 3
Performing Initial vCenter Server Appliance (vCSA) Configuration
In our case, we’ll be performing the rest of the configuration of vCenter using the web interface.
Start my pointing your web browser to the IP address of DNS name of the new vCSA VM with https at the start and “:5480” for the port number. It should look like this:
https://vcenter5:5480
Note that, if you haven’t already you should make a DNS host alias for the IP address of the new vCSA VM.
This URL will bring up the page that you see in Figure 4, below.

Figure 4
You’ll login to the vCSA VM, for the first time, with the default vCSA username and password:
Username = root
Password = vmware
(all lower case)
Of course, we will be changing these later.
The first thing that you need to do is accept the end user license agreement (EULA) for vCSA. This will be the first thing that you see when you login to vCSA. Of course, all this takes is to read the legal mumbo-jumbo (or nort) and click Accept EULA, as you see in Figure 5, below.

Figure 5
The first real configuration task that we want to perform is to configure the database to be used by the vCSA server. Options for the database include a local embedded database or you can select and configure vCSA to talk to remote databases like Oracle (but today, SQL Server is not an option). Still, the locally embedded DB2 database works great for environments with less than 5 ESXi hosts or 50 virtual machines (equivalent to Windows vCenter Server + MSSQL Express).
In our case, to get up and running as quickly as possible (and because I don’t have Oracle) we’ll use the embedded by clicking on the Database screen under the vCenter Server tab.
Here, we’ll make sure that the embedded database is selected for the database type, then click Save Settings.

Figure 6
At this point, we have loaded up our embedded database schema and you should see Operation was successful as well as the schema version should say “VirtualCenter Database 5.0”, as you see in Figure 7.
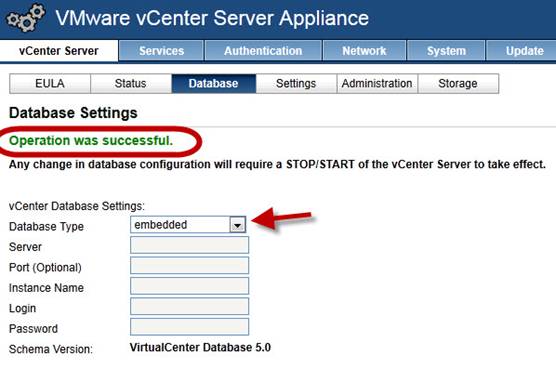
Figure 7
Next, go to the Status screen under the vCenter Server tab. To start the vCenter services (which aren’t running by default) click on Start vCenter, as you see in Figure 8.
Be forewarned that the starting of the vCenter services, for the first time, can take about 5 minutes and that this is normal.
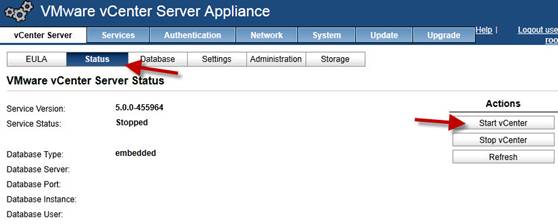
Figure 8
Once the vCenter services are started, again, you’ll see “Operation was successful” and that the service status says “Running”, as you see in Figure 9.
At this point, you could actually use the vCSA for vSphere management (meaning, you could connect to it with the vSphere client, add ESXi servers, etc.) however, I highly recommend we perform a handful of other best practices tasks if you are going to use this in production.
Also note that this same vCenter Server status screen is where you can come at any time to check the status of the vCenter services and restart them if there is a problem in the future.
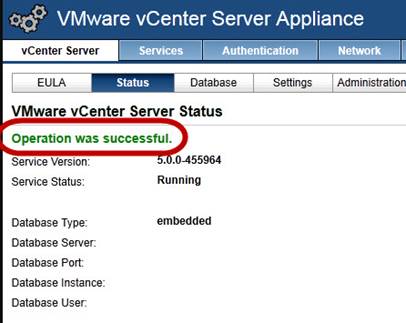
Figure 9
The first of the more optional tasks is to change the vCSA VM from having a dynamic IP address, received via DHCP, to a static IP address that you would want on a production server. To do this, go to the Network tab and click on the Address screen.
Here is where you will change the IPv4 address from dynamic to static and fill out all the traditional IP address configuration information – IP, subnet mask, and default gateway.
One sort of bug that I have seen here is that there is no blank to configure DNS servers. The only way around this is to either configure the DNS servers using the text-based console under network configuration OR to go on down on this screen to where it says IPv6 and change it from DHCP to SLAAC. Once the SLAAC IPv6 type is enabled, you can configure the IPv4 DNS server IP address. Of course, that is why it is a bug humble opinion, as you have to tweak IPv6 just to enter IPv4 DNS servers.

Figure 10
So, change the IPv6 address type from DHCP to SLAAC, enter the hostname for the vCSA server and your custom DNS server IP address (or addresses).
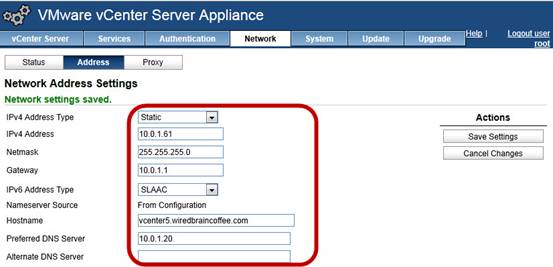
Figure 11
Finally, once all this is configured, click Save Settings to apply the changes.
Note that you were connecting via the dynamic IP using your web browser and now you changed the IP. That means that, in your web browser URL, you’ll have to change the IP there (and change it in DNS if you had already configured a DNS entry).
The last of the optional (but best practices) config that you need to know about is that the vCSA can serve as a syslog server for ESXi hosts, it offers coredump capability for those hosts, it serves as a server for the new vSphere web-client, and it can be used for autodeploy as well. All of these things are configured under the Services tab, as you see in Figure 12 (all of them are actually enabled by default except for autodeploy but they are tweaked and stopped/started from this tab).

Figure 12
In summary, the new vSphere 5 vCSA virtual appliance version of vCenter is the future of vSphere centralized management. I would be that the Windows version of vCenter will go away at some point in the future and the vCSA will be the only option. Thus, now is the time to get started learning about vCSA and try using it, at first, in your vSphere lab environment.


