One of the big problems that virtualization admins sometimes encounter is the so-called noisy neighbor syndrome. The idea behind this is that a virtual machine may consume a disproportionate share of system resources to the point that it begins to degrade the performance of other virtual machines running on the host. This tends to be especially true of storage IOPS. Microsoft Hyper-V includes a feature called Quality of Service Management (formerly known as Storage Quality of Service or Storage QoS) that you can use to limit the amount of storage IOPS that a virtual machine is allowed to consume.
Quality of Service Management is enabled on a per virtual hard disk basis. This means that you could conceivably limit the performance of one of a virtual machine’s virtual hard disks but not another. It also means that you have the option of imposing limits on one VM but not another.
To show you how Quality of Service Management works, I set up a Hyper-V virtual machine and installed a clean copy of Windows 10. Once I had Windows up and running on the virtual machine, I downloaded and installed a utility called My HDD Speed. As its name implies, My HDD Speed is a utility for benchmarking hard disk performance. You can download My HDD Speed for free here.
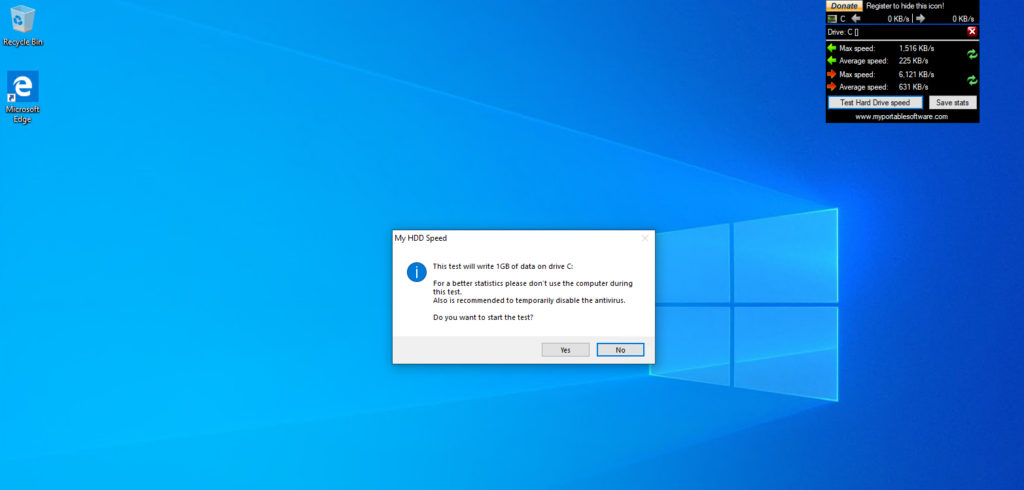
When you launch My HDD Speed, it will open a window that allows you to monitor hard disk read and write performance in near real-time. The window shows you both the disk’s maximum speed and its average speed. For this article, however, I opted to run a hard disk speed test. As you can see in the image below, running a speed test causes the utility to write 1 GB of data to the system’s hard disk.
In some ways, the My HDD Speed utility isn’t the ideal tool for demonstrating how Quality of Service Management works because the tool measures disk performance in MBPS or KBPS. In contrast, Hyper-V’s Quality of Service Management feature is designed to limit disk performance based on IOPS, not throughput. Even so, there is a way to map data throughput to IOPS. According to Microsoft, 8KB of data counts as a single IOPS operation.
Any given hard disk will have a maximum number of IOPS that it can handle. This number varies based on the make, model, and type of disk, as well as some other factors. According to LUNAVI, an HDD will typically deliver anywhere from 55 to 180 IOPS, while an SSD might be able to deliver anywhere from 3000 to 40,000 IOPS.
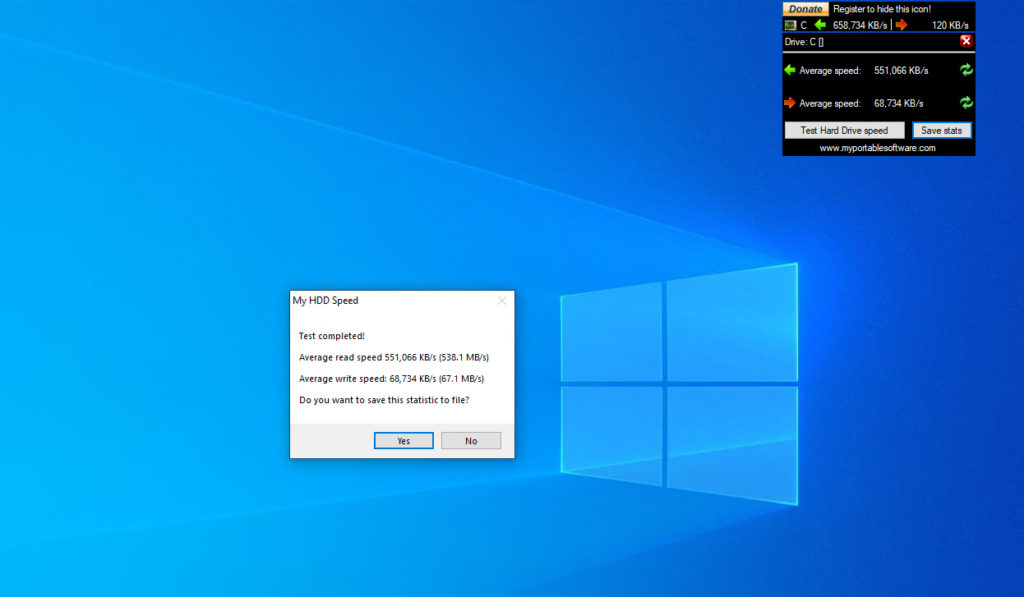
For the sake of demonstration, I decided to benchmark my Windows 10 virtual machine’s performance with and without Quality of Service Management enabled. Before enabling Quality of Service Management, the My HDD Speed tool reported a read speed of 538.1MB/s and a write speed of 67.1MB/s. You can see these measurements in the image below.
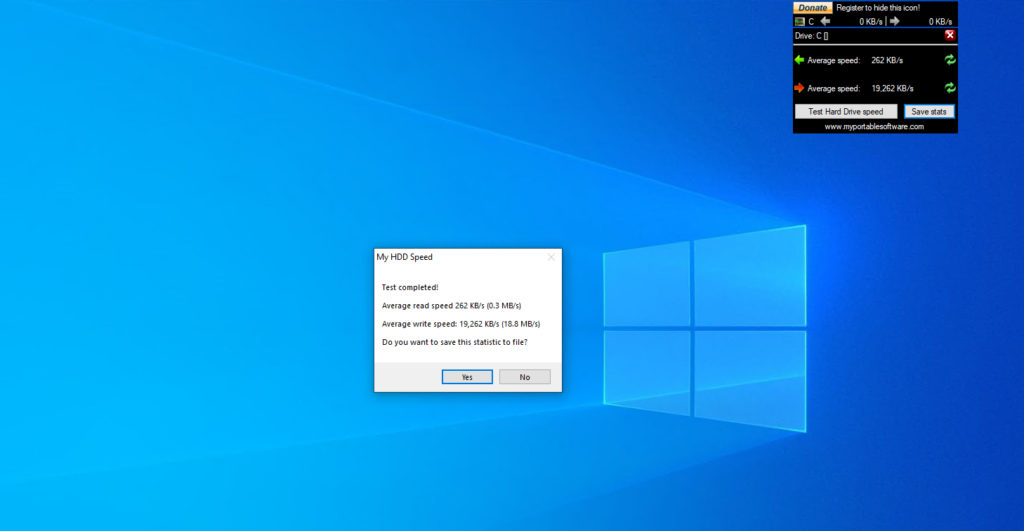
After taking this initial benchmark, I set Quality of Service Management to limit the virtual machine’s hard disk to 500 IOPS, far less than what the virtual machine has available to it when its storage performance is not restricted. This time when I ran the test, Quality of Service Management reported the virtual machine’s read speed at 0.3MB/s and its write speed at 18.8MB/s. You can see these results in the image below.
So now that I have shown what happens when you enable Quality of Service Management, let’s look at how to use this feature. You can enable Quality of Service Management directly through the Hyper-V Manager. To do so, right-click on your virtual machine and select the Settings command from the shortcut menu. This will cause Windows to display the virtual machine’s settings, as shown in the next image.
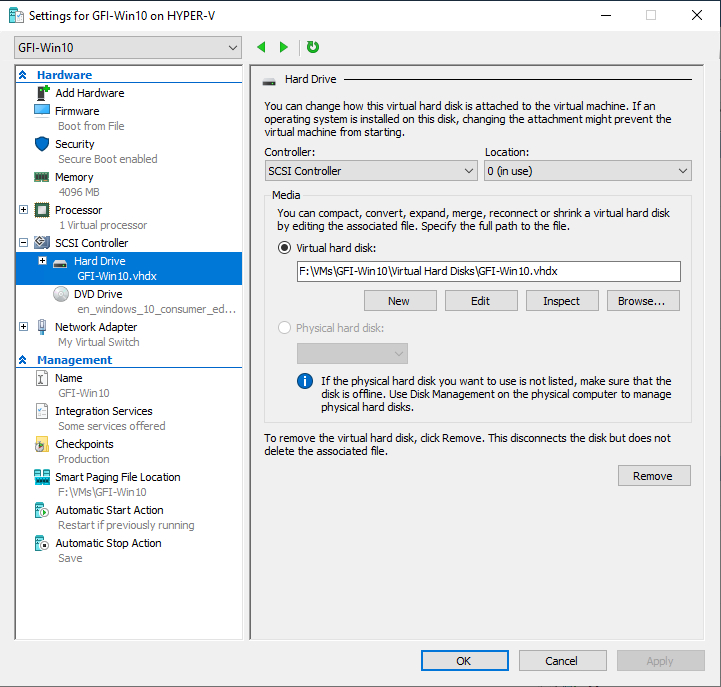
As you look at the image above, you will notice that I have selected the virtual machine’s virtual hard disk. If you look at the console tree on the left side of the screen, you will see a plus icon within the Hard Drive tab. If you click on this plus icon, it will expand the Hard Drive tab, revealing a sub-tab labeled Quality of Service. This is where you will need to go to configure Quality of Service Management. You can see the Quality of Service Management settings in the next image.
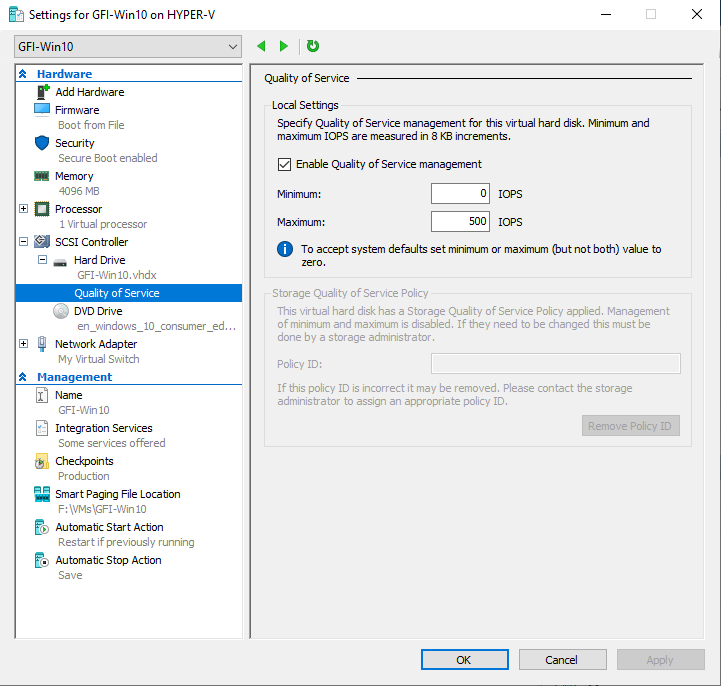
Earlier I mentioned that I had limited the virtual machine’s virtual hard disk to supporting only 500 IOPS. As you can see in the image above, I did this by selecting the Enable Quality of Service Management checkbox and entering 500 as the maximum number of IOPS.
I’m sure that you noticed in the previous image that the Quality of Service Management feature also allows you to specify a minimum value. Whereas the maximum value effectively acts as a cap on storage bandwidth consumption, a minimum value acts as a storage bandwidth reservation. This is useful if you have an I/O sensitive workload and need to make sure that it receives at least a certain number of storage IOPS. It is worth noting, however, that such reservations are made on a best-effort basis. In other words, Hyper-V will do whatever it can to honor storage IOPS reservations, but it cannot 100% guarantee that reservations will always be met. If you attempt to reserve more storage bandwidth than your system can deliver, then Hyper-V would be unable to give you the amount of storage bandwidth that you reserved. If Hyper-V fails to provide the minimum amount of bandwidth requested for a virtual hard disk, it will generate an event-based notification.
As you can see, Quality of Service Management can be an effective tool for making the best possible use of your available storage bandwidth. You can use maximum values to throttle storage bandwidth for some virtual hard disks while using minimum values to reserve storage bandwidth for other disks.
Featured image: Shutterstock


