If you find yourself routinely having to create large numbers of virtual machines, then one way of expediting the process is to create a script that builds VMs based on the contents of a CSV file. The actual procedure for creating VMs from a CSV file varies widely depending on the level of customization that is required from one VM to the next. If, for example, you want all of your VMs to be provisioned with the same amount of memory as one another, the memory allocation can be hardcoded within your configuration script. There is no need to specify memory allocation settings within your CSV file in that case. If, on the other hand, some of the VMs will have unique memory requirements, then those memory requirements are absolutely the sort of thing that you would want to include in the CSV file.
Once you have determined which VM configuration elements need to be included in the CSV file, and which can be hardcoded, then you can create the CSV file. In the interest of keeping things simple, I have created a very basic CSV file that contains two pieces of information — a virtual machine name, and the amount of memory that should be allocated to the VM. You can see what this looks like in the screenshot below.
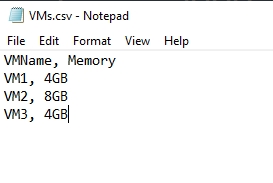
As you look at the screenshot above, you will notice that the CSV file contains column headers (VMName and Memory in this case). You can use any names that you want to for the column headers. Just be sure to remember the header names that you have chosen, because your script will need to reference those names.
Also, it probably goes without saying, but in a real-life situation, the CSV file would likely contain more elements than what I have included in my sample file. I chose to create a minimally complex file to make my demo script easier to understand.
So, with that said, let’s get started on the script. Before I jump right into building a script that will create VMs, I first want to take a moment and show you how to get PowerShell to read the CSV file that you have created. Below is an example of code that can read the contents of the CSV file that I created:
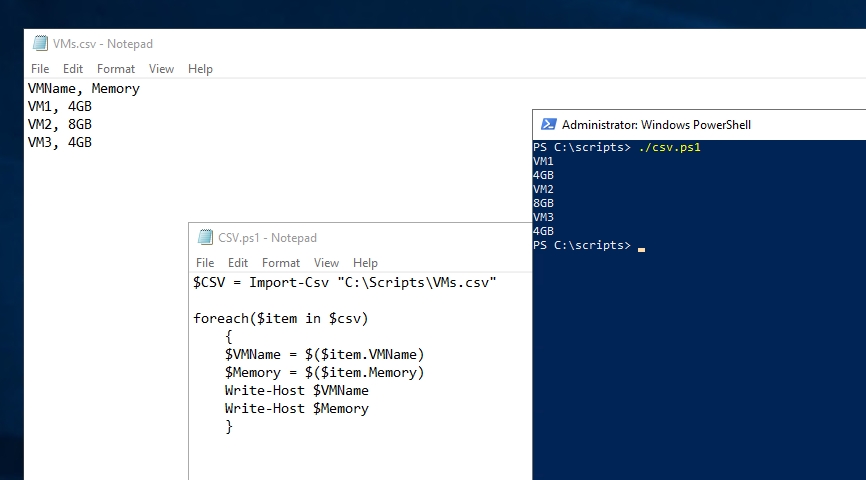
$CSV = Import-Csv "C:\Scripts\VMs.csv"
ForEach($item in $csv)
{
$VMName = $($item.VMName)
$Memory = $($item.Memory)
Write-Host $VMName
Write-Host $Memory
}
The first line uses the Import-CSV cmdlet to read the contents of the CSV file. From there, I am setting up a ForEach loop that reads the various items from the file one at a time. It is worth noting that in this case, an item refers to an entire line of the CSV file, not an individual piece of data within a line.
The ForEach loop defines two variables $VMName and $Memory. Notice that the mappings for these variables reference the column names within my CSV file. For example, the header row in my CSV file defines a column named Memory. Therefore, the $Memory variable (the variable name doesn’t actually matter) maps to $($item.Memory), which refers to the contents of the current item’s Memory column.
The last two lines within the ForEach loop display the contents of the $VMName and $Memory variables. These lines aren’t required. I only included them so that you could see what the script is doing. The figure below shows the script, the CSV file, and the script output.
So now that you know how to read the contents of a CSV file, let’s create some virtual machines. There is quite a bit of complexity that can come into play when using PowerShell to create VMs. Being that there is a limit as to how long this article can be, I am going to stick to the basics.
The PowerShell cmdlet that is used to create a new virtual machine is New-VM. Here is the command syntax as it relates to this article:
New-VM -Name <virtual machine name> -MemoryStartupBytes <memory size> -BootDDevice <virtual disk type> -Path <virtual machine path> -NewVHDPath <virtual hard disk location> -NewVHDSize <virtual hard disk size> -Generation <virtual machine generation number> -Switch <virtual switch name>
If, for example, you wanted to create a virtual machine named VM, the PowerShell command for doing so might look something like this:
New-VM -Name VM -MemoryStartupBytes 4GB -BootDevice VHD -Path ‘F:\VMs’ -NewVHDPath ‘F:\VMs\VM.VHDX’ -NewVHDSize 20GB -Generation 2 -Switch ‘My Virtual Switch’
You can see how the command works in the screenshot below.

As you look at the command that I used to create a VM, you will notice that among the accepted parameters are the VM’s name and its memory allocation. Both of these parameters are included in the CSV file. Therefore, we can create VMs from the CSV file simply by including the New-VM cmdlet inside of the ForEach loop and replacing some of the hardcoded parameters with the values that have been derived from the CSV file.
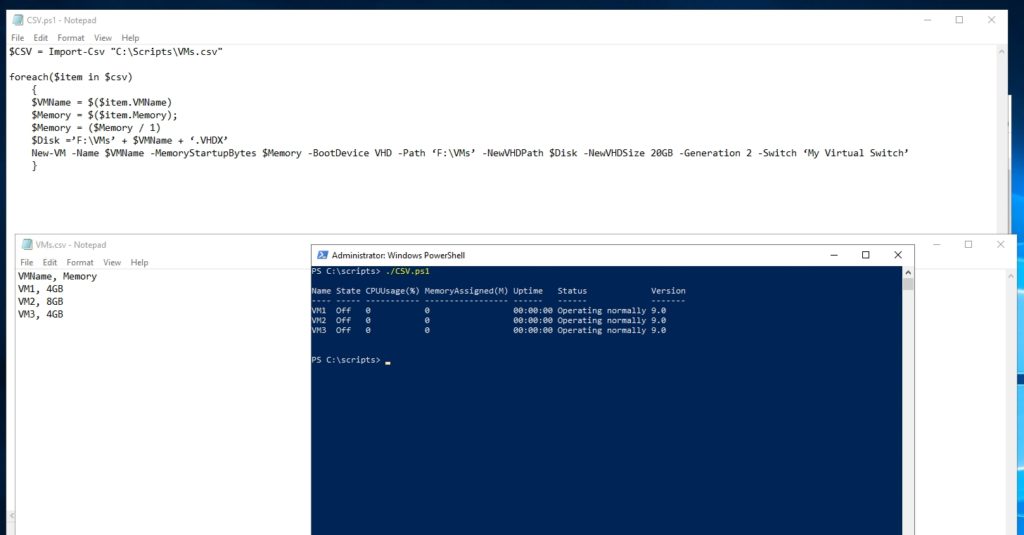
There is, however, one caveat to this. When PowerShell reads a memory value such as 4GB from a CSV file, it treats that value as a string. We need the value to be in Int64 format. The easy solution to this problem is to simply divide $Memory by 1.
One last thing that needs to be addressed is that since each virtual machine requires its own virtual hard disk, I also created a variable named $Disk that will store a virtual hard disk name that has been based on the virtual machine name. Here is what my script looks like:
$CSV = Import-Csv "C:\Scripts\VMs.csv"
ForEach($item in $csv)
{
$VMName = $($item.VMName)
$Memory = $($item.Memory)
$Memory = ($Memory / 1)
$Disk =‘F:\VMs’ + $VMName + ‘.VHDX’
New-VM -Name $VMName -MemoryStartupBytes $Memory -BootDevice VHD -Path ‘F:\VMs’ -NewVHDPath $Disk -NewVHDSize 20GB -Generation 2 -Switch ‘My Virtual Switch’
}
You can see the script, the CSV file, and the output in the screenshot below.
Creating VMs from a CSV file: From simple to complex
Although I kept things relatively simple in my example, the technique that I used can be easily expanded to create virtual machines that are more complex. The key is to figure out which attributes should be included in the CSV file, and how to work those attributes into the New-VM cmdlet or into the Set-VM cmdlet.


