When managing Azure IaaS (infrastructure-as-a-service), storage is a critical component and the administrator must be acquainted with some of the general tasks involved in the management of this component. We are going over some of the tasks related to disk management in an IaaS VM. If you have never done it, you may have some basic questions that I hope to address as we describe several processes about this topic in this article.
Adding a disk to a VM
The first task is the addition of a data disk to an existing VM. The process is simple. Using Azure Portal, click on the desired VM (using the virtual machines item on the left, or searching by the VM by name).
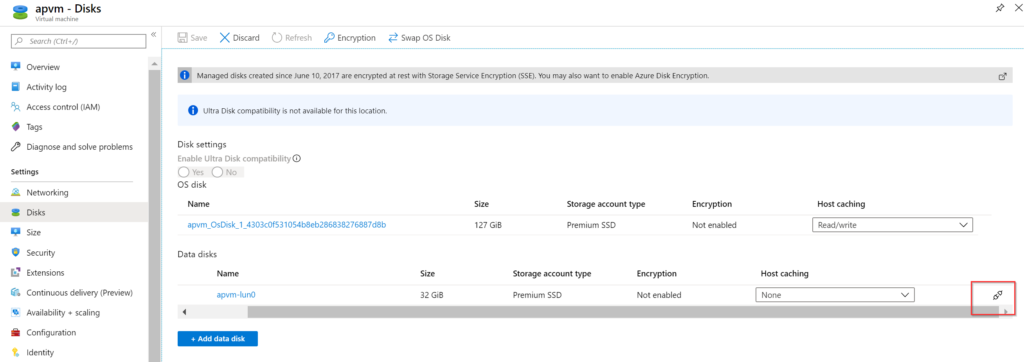
In the VM blade, click on Disks (Item 1). On the right side, a list of all disks associated with the VM will be displayed, click on Edit, and Add data disk button will be enabled at the bottom of the page. Click on it, and the next available logical unit number (LUN) will be created, and a new line to introduce a new disk will be added to the existing list (if any).
In the column Name, we can create a new disk starting a wizard using the Create Disk link. Another option is to use a detached disk. All disks within the resource group will be listed first on the list. Another option that we can choose here is the Host Caching where the possibilities are None, Read/Write, and Read-Only cache.

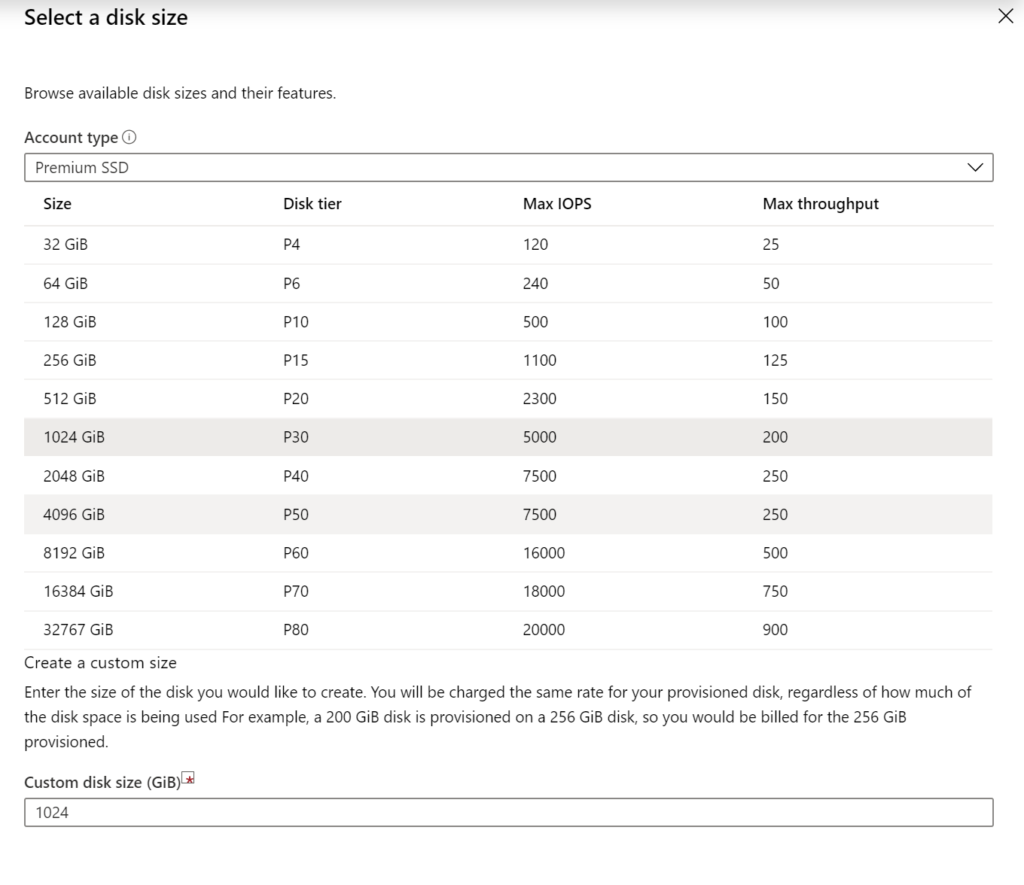
Click on Create Disk, and a new blade requesting a Disk Name, Resource Group, Source Type and Disk Size will be displayed. Fill out the required information and click on Change Size. In this new blade, we can select the account type for the new disk and which tier within the account type that we can choose.
This page will provide the committed max IOPS and max throughput for the disk, and that helps the disk storage system of your VM to make sure it supports your workload requirements.
At the operating system level, a new disk will show up in the Disk Management (Item 1). We can ask properties of the disk, and the Location field shows the LUN associated with the new disk (Item 2), and that LUN matches the LUN that we configure in the Azure Portal.

The process to add and remove disks does not require a restart of the virtual machine.
The process to remove is done at the same place. When we edit the existing disks, just hit the Disconnect icon located on the right side of the line of the disks that you want to remove. The disk will be removed automatically from the operating system.
Changing disk configuration
There are some caveats when changing the properties of individual disks (see image below). When trying to resize a disk or change the account type, we must make sure that the disk is not in use. There are two options to accomplish this task: deallocate the VM or detach the disk, perform the changes and reattach the disk.
The author prefers to make sure that the disk that I want to change is not in use at the operating system level, then detach the disk, perform the changes and reattach. The benefit of this option, when compared with the deallocating, it is to be able to perform a change in a disk without requiring downtime of your server/application.

There are several ways to get to the Disk blade. We can click on the disk being listed on the Disks tab of any given VM, or find the Disk Resource in the Resource Group. Either way, the Disk blade will be displayed. Click on Configuration, and it is on this new blade that we can change the Account Type, as depicted in the image below.

The second disk configuration that we should be aware of is the ability to resize a disk. Although we don’t have the option to see which disk tier we are using, when we start adding more space, you will realize that the number of Max IOPS and Throughput will change automatically. In reality, the Azure Portal does not show, but as we increase the size, we are moving higher in the Disk Tiers, which means better performance and cost.
Important note: You cannot reduce the size of a disk. Keep that in mind before committing to substantial increases of space, especially in premium disks (due to the cost impact).

After reconnecting the disk to the VM, the original volume will be available as usual, and the extra space will be available. The administrator can extend the existent volume to use the new space or create a new volume.
Exporting a disk
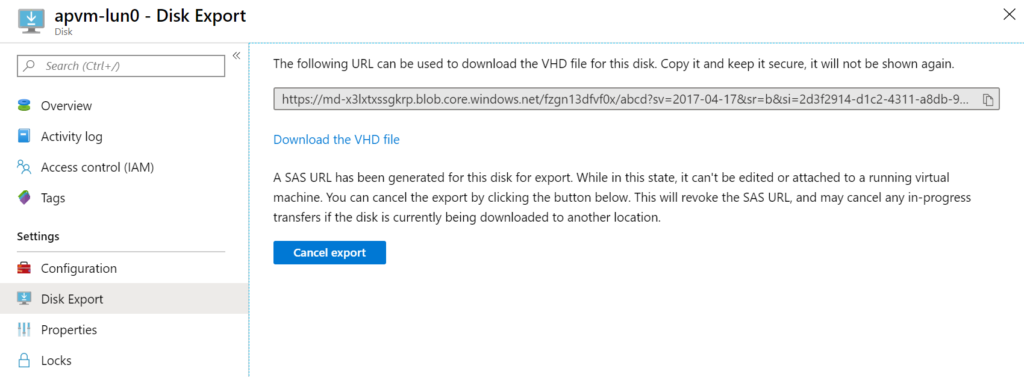
In some situations, we need to copy a disk attached to a VM, and it can be quickly done if the disk is not in use (the same situation to change the disk configuration: deallocate the VM or detach the disk). In the Disk resource configuration blade, click on Disk Export. Define the number in seconds that the URL will be available (1 hour by default) and click on Generate URL.

In the new blade, we will have the link that we can use for the period that we defined in the previous blade to download the VHD. If we are planning to bring it to your local machine, you can hit the Download the VHD file. At any time, we can cancel the “sharing” of the disk by clicking on Cancel Export.
Note: During the time that the disk is being exported, we cannot attach it to a VM or mount it in Azure in any shape or form.
Removing disk resources
I don’t recommend testing this one, but I want to make you aware in case you try. If you decide to delete an attached disk, it will fail, as depicted in the image below. Even if the VM is deallocated, you will not be able to remove it. The reason behind is the property that defines if the disk is attached or not.

Managing IaaS VMs: More to come!
If you are responsible for managing IaaS VMs in Microsoft Azure, you are going to perform some of the tasks that we went over in this article. We have covered only the essential processes around storage in a VM, and there is a lot more to be explored. One of my upcoming topics is storage performance, and some of the tasks that we covered here will be useful when we have that discussion. Stay tuned!
Featured image: Shutterstock


