If you missed the first part in this article series please read Migrating from POP/IMAP to Exchange Server 2007 using Microsoft Transport Suite (Part 1).
In the first article we saw how to install Microsoft Transporter and the required steps that must be done before starting the copy process from a POP/IMAP server to Exchange Server 2007. These steps are: install Microsoft Transporter, set the Exchange Impersonation permission on a CAS Server and create the CSV file that will be used by the Microsoft Transporter.
In this article I assume that those steps have been completed (permissions and CSV file) and we are now going to go through the steps required to move from an IMAP Server and play with some features that are found only when the IMAP protocol is used.
Migrating from an IMAP4 server
The wizard used by Microsoft Transporter Suite for Internal Mail to copy data from an IMAP4 server to Exchange Server 2007 is a little bit different from the process performed in the first article. Using an IMAP4 Server as source we are able to configure two new items: Folder Mapping and IMAP4 authentication.
Let’s start the process:
- Open Microsoft Transpoter.
- All the mailboxes imported from the .CSV file will be listed in All Mailboxes item. We can click on the Mailboxes Ready for Migration item which will show all mailboxes ready to be migrated from the CSV file(s). Select a couple of mailboxes and click on the Migrated Selected Mailboxes item located on Toolbox Actions
- Select Mailbox Type. Let’s migrate our users using the IMAP protocol, and tick the two check boxes: the first to not use SSL to copy data (If you have a server that supports SSL tick this one) and we are going to specify the CAS Server. Click on Next.
Note:
The account that is running the wizard must have Exchange Impersonation rights on the CAS server as we have seen in the first article.

Figure 01
- IMAP Folder Mapping. This is the first new feature when we use the IMAP protocol. For now we are going to leave the default setting which is use the default folder mapping and click on Next. In the next section we will validate how to change some settings to manage folders from the source server during the migration using an XML file called FolderMap.xml. (Figure 02)

Figure 02
- IMAP Authentication. This is the second new feature using IMAP. Microsoft Transporter is able to use a single account to authenticate against the IMAP server and copy data to Exchange Server. This account must have administrator credentials to log in to all accounts selected for migration on Microsoft Transporter. We are going to explain this new feature in the next section, for now let’s leave the default settings and click on Next. (Figure 03)
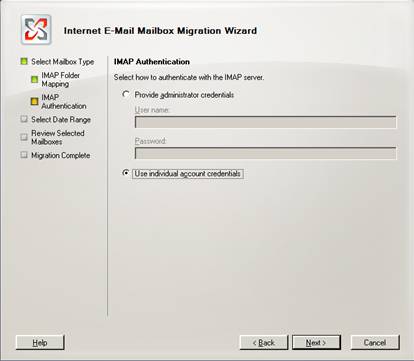
Figure 03
- Select Data Range. We can define either a range or All e-mail to copy messages from the source IMAP Server. (Figure 04)
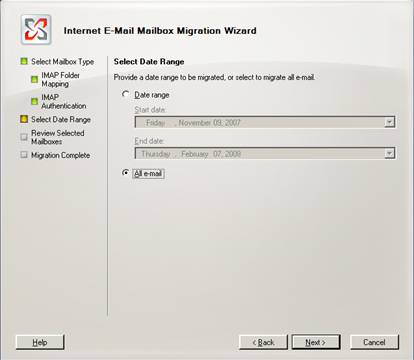
Figure 04
- Review Selected Mailboxes. An overview will be shown, just click on Migrate to start the copy from the source IMAP server.
After this process we will be able to see all the messages, calendar, notes, Tasks in the Exchange server 2007 mailboxes.
Using the Administration Credential feature
When the IMAP protocol is used and the source server has the ability to allow an account to access another user’s mailboxes, then we can use that specific account to log in to the source server to migrate the data, as shown in Figure 05.
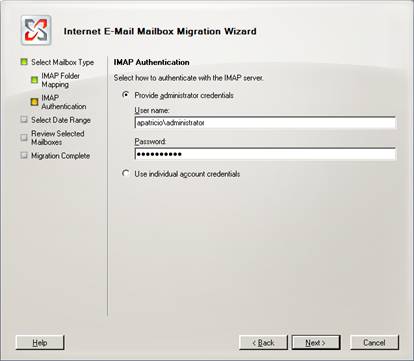
Figure 05
If we are going to use this resource we do not need to add the column SourcePassword into the CSV file because that password will not be used.
Using Mapping folders
Microsoft Transporter can use an XML file to match the IMAP source folders with the Exchange Server 2007 default folders. During the Microsoft Transporter installation a file called Foldermap.xml that can be found at c:\program files\Microsoft Transporter tools\Config is installed. We can use this file to create our own definitions. For example: if the source mailbox receives all new messages in a folder called New Items we are able to associate this folder to match with the default folder Inbox.
The default mapping table has these definitions:
|
Folder on IMAP Server |
Folder on Exchange Server 2007 |
|
Inbox, New Mail, [Root] |
Inbox |
|
Outbox |
Outbox |
|
Sent Items, Sent Mail, Sent |
Sent Items |
|
Drafts, Draft |
Drafts |
|
Deleted Items, Trash |
Deleted Items |
|
Junk E-mail, Spam |
Junk E-mail |
|
Contacts |
Migration Items\Contacts |
|
Journal |
Journal |
|
Tasks |
Migration Items\Tasks |
|
Notes |
Notes |
|
Calendar |
Calendar |
Table 01: This table can be found in the Microsoft Transport help file
If a different folder exists in the source server it will be created in the Exchange Server 2007 mailbox, if the folder already exists in the Exchange Server 2007 mailbox the content will be merged. Let’s use a couple of scenarios to demonstrate how to use the mapping folder feature.
To configure a custom folder mapping file click on Use a custom folder mapping in the wizard section named IMAP Folder Mapping, as shown in Figure 06.

Figure 06
Scenario 01: The user below (Figure 07) has a folder named Projects on the IMAP4 server. If we run the Microsoft Transporter Wizard that folder will be created automatically in the user’s mailbox.

Figure 07
Let’s create a copy of the file Foldermap.xml and save it as CustomFolderMap.xml and add the following parameters to that file (see Figure 08). That parameter will redirect all the information located in the Project folder of the source mailbox to the Exchange Server 2007 mailboxes in subfolder Projects folder under the Inbox folder.

Figure 08
Scenario 02: In this second scenario we do not want to move the contents of the source folder Projects. For this scenario we can add the following parameters into our XML file.
<Folder path = “Projects”>
<Property ExcludeFolder = “true”>
</Folder>
Using the example above the folder Project will not be created in the destination mailboxes.
Conclusion
In this final article we have seen how to use the Microsoft Transporter Suite for Internet Mail to copy data from POP/IMAP servers to Exchange Server 2007. We also saw how to configure extra options that can be used with IMAP protocols, such as: using an administrator account to move all users without knowing the user’s password and how to use a file to map folders from the source server to Exchange Server 2007.
If you missed the first part in this article series please read Migrating from POP/IMAP to Exchange Server 2007 using Microsoft Transport Suite (Part 1).


