Introduction
The word ‘Captcha’ stands for Completely Automated Public Turing test to tell Computers and Humans Apart (see References, below). Most World Wide Web users will have seen this kind of test in the form of a picture of a word (usually distorted), which the user must type into an input box to prove that they are a real person, and not just a spambot, or some other computerized agent trawling the Web for exploits. Here, shown in figure 1, is an example. Hopefully, you can recognize the word ‘summer’ in the image.
Figure 1: A typical Captcha image
The Exchange 2003 Outlook Web Access Forms-based Authentication (usually shortened to FBA) mechanism is fairly secure, of course (after all, any bot would still need valid credentials to get past it), but some people have recently been asking if it is possible to add the Captcha feature to it. In this article, I will give an example of how it can be done by modifying the FBA logon.asp file. There are several Captcha solutions available, but I have chosen to use a freely available script written by Jonathan Feaster, which is available at http://www.archreality.com/jcap/. This script has the advantage of not requiring a second page to receive the form input (something that is not possible with OWA 2003) – all processing is done client-side before the page is submitted to the server.
It should be noted that this example is shown using Exchange 2003 with Service Pack 2. Future SP releases may affect the contents of the logon.asp file, but the basic principles should remain the same.
Procedure
First, place the downloaded and extracted files in an appropriate place on the server. There are two .js files, and a folder (named cimg) that contains the images that are presented to the user. Place the files directly inside the C:\Program Files\Exchsrvr\exchweb folder (figure 2):
Figure 2: The downloaded files in the exchweb folder
The next step is to locate (using Explorer) the logon.asp file that your server sends to the browser when you logon to OWA using FBA. You will need to locate a folder in C:\Program Files\Exchsrvr\exchweb\bin\auth\ that contains the logon.asp file(s) used by your OWA users. Choose the folder that has a name that matches the appropriate abbreviated language name used by your OWA clients. For example, English-speaking users will receive the logon.asp file contained in C:\Program Files\Exchsrvr\exchweb\bin\auth\usa\. If you have users in several languages, you will need to modify each file.
Before doing anything else, make a copy of that logon.asp file. Right-click it, select Copy, then right-click the folder background and select Paste. This creates a copy of the logon.asp file called ‘Copy of logon.asp’. Do not proceed until you have made this copy; if you make incorrect edits to this file, your FBA logon may be rendered unusable. Next, open the logon.asp in Notepad. Press CTRL-F or F3 to do a text search, and search for the text </HEAD>. It should be found about three-quarters of the way down the file. Just before the </HEAD> tag, insert the following text (Note that JavaScript is case-sensitive):
<script type=”text/javascript” language=”javascript” src=”/exchweb/md5.js”></script>
<script type=”text/javascript” language=”javascript” src=”/exchweb/jcap.js”></script>
<script type=”text/javascript” language=”javascript”>
function doJcap()
{
if (jcap() == true)
{ document.forms[0].action = “/exchweb/bin/auth/owaauth.dll”; return true; }
else
{ return false; }
}
</script>
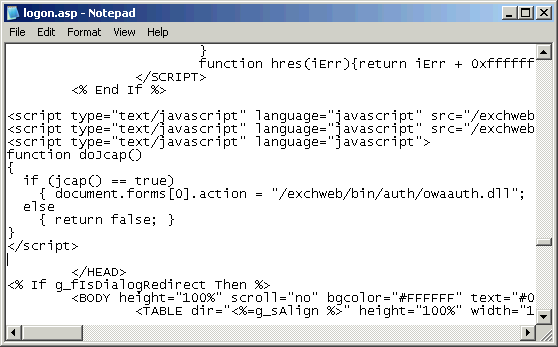
In my version of OWA (and remember that this may change with future service packs), it looks something like this (figure 3):
Figure 3: Amending the contents of logon.asp in Notepad
Next, press CTRL-F, and search for the text <FORM (note that there is no closing bracket). Insert the following text between the word FORM and the word action:
onsubmit=”return doJcap();”
Then remove the action definition for the <FORM> tag by deleting the text that says action=”/exchweb/bin/auth/owaauth.dll” (this will be reinstated upon successful entry of the imaged word). You will see another <FORM> tag a few lines further down. Make the same changes (onsubmit and action) on that line, too. This part of the page should now look like this (figure 4):
Figure 4: The amended FORM tags
Just after the second <FORM> tag, you will see a line like this:
<% End If %>
Immediately after that line, insert the following text:
<center>
<script language=”javascript” type=”text/javascript”>cimg()</script><br>
<noscript>[This resource requires a Javascript enabled browser.]</noscript>
<font color=”white” size=”2″><b>Enter the code as it is shown above:</b><br>
<input type=”text” name=”uword” id=”uword”>
</center>
so that it looks like the image shown in figure 5. This will simply place the image at the top of the page with an input box directly below it. If you are familiar with HTML, you may want to experiment a little here, to get a more interesting layout.
Figure 5: More changes to logon.asp
And that’s it, as far as the logon.asp file is concerned. You can now save the file, and close Notepad. There is just one small change that needs to be made to the jcap.js file that was saved in C:\Program Files\Exchsrvr\exchweb. Right-click the jcap.js file and select Edit. It should open in Notepad. On the line that begins with var imgdir, you need to change the path to point underneath the exchweb folder. Change it so that the beginning of the line looks like this:
var imgdir = “/exchweb/cimg/”;
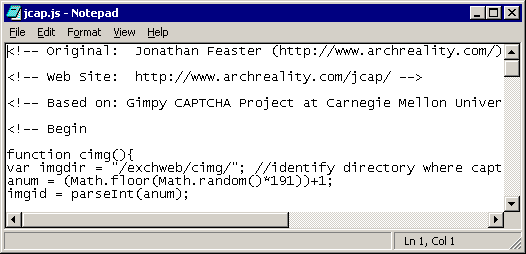
The complete line looks like this (figure 6):
Figure 6: Defining the path to the image files
Save the file and we’re finished. The next time you open the FBA logon page, it should look something like this (figure 7). Also shown is the alert message displayed if the typed text does not match the distorted text in the image.
Figure 7: The modified FBA logon page
Please remember that future versions of the logon.asp file may be different to the version shown. The basic principles are the same though. The references to the external scripts go inside the <HEAD></HEAD> part of the file; there will be two <FORM> tags that need changing (one for the Premium and one for the Basic version of the OWA client); and the image and input field can go anywhere between the opening <FORM> tags and the closing </FORM> tag.
References
Turing test discussed at Wikipedia.org:
http://www.wikipedia.org/wiki/Turing_test
The CAPTCHA Project:
http://www.captcha.net/


