Get your copy of the German language “Microsoft ISA Server 2004 – Das Handbuch”
Let’s begin
ISA Server 2006 is the next step in Microsoft’s Security Strategy. ISA Server 2006 is the successor of ISA Server 2004. ISA Server 2006 RTM is expected to be released at the end of June 2006 so this article is based on a Beta version of ISA Server 2006.
For you to better understand, I created a Topology diagram about the ISA Server 2006 and Cisco Pix config.
Figure 1: Network diagram

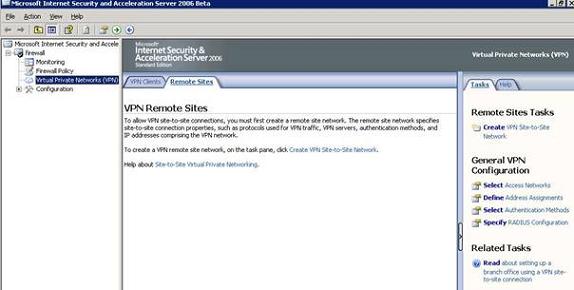
We are starting the Site to Site VPN configuration at ISA Server 2006 site. Start the ISA Server Management console and navigate to Virtual Private Networks (VPN) to create a new VPN Site to Site Network.
Figure 2: Virtual Private Network
Name the new Site to Site VPN network PIXNET.
Figure 3: Name the Site to Site VPN connection

Cisco Pix only supports IP Security (IPSEC Tunnel Mode), so we select this option. For every other Site to Site VPN you shouldn’t select IPSEC Tunnel Mode VPN.
Figure 4: Select IPSEC Tunnel Mode

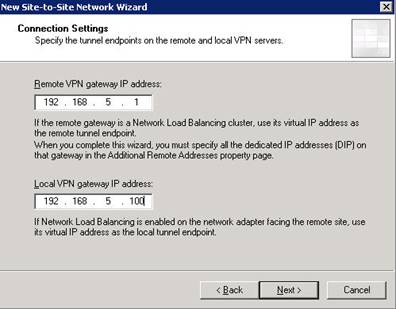
Specifiy the IP address of the Outside interface from Cisco Pix and the Local Interface IP address from ISA Server 2006.
Figure 5: Specify Remote and Local VPN Gateway IP Addresses
For a Site to Site VPN Gateway connection you must use a certificate from a CA or a Pre Shared Key. For this example we will use the very simple Pre Shared Key 12345678. If you don’t use certificates, which is recommended, you should specify a long and complex Pre Shared Key.
Figure 6: Insert the Pre Shared Key

Now specify the Remote Site network behind the Cisco Pix which you want to access from ISA Server site.
Figure 7: Specify the Remote Site IP Addresses

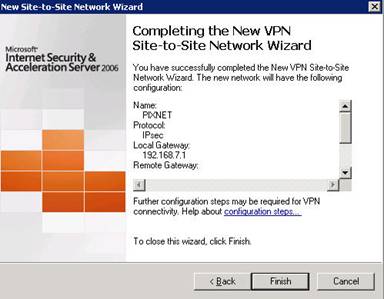
Read the summary of the Wizard and finish the VPN configuration on ISA site.
Figure 8: VPN Site to Site summary
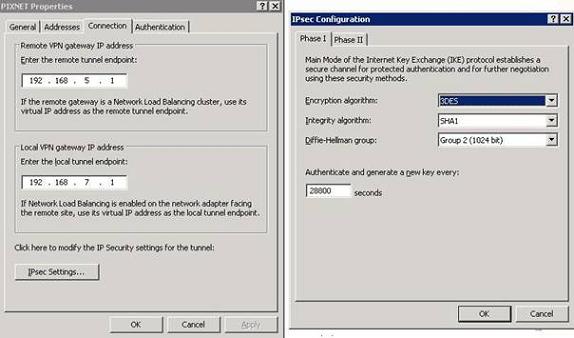
View the IPSEC Policy configured by the ISA Site to Site VPN wizard.
Figure 9: IPSEC policy summary
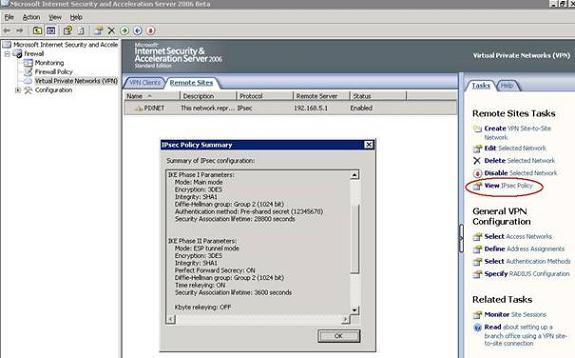
Take note of the IPSEC Policy settings because they must match the Settings that you will configure on Cisco PIX site.
Figure 10: IPSEC details
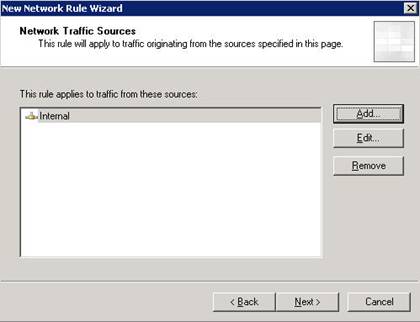
After creating the Site to Site VPN you must create a Network rule between Cisco Pix and ISA.
Figure 11: Network rule between ISA and PIX

The Source Network is Internal.
Figure 12: Specify the internal Network
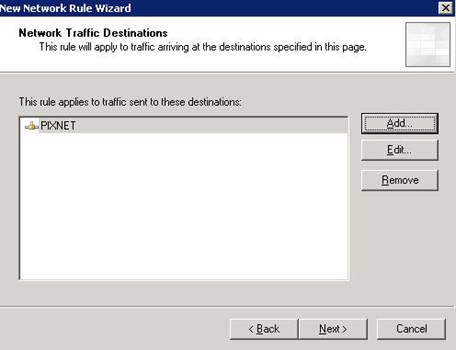
The Network destination is the Cisco Pix Network PIXNET.
Figure 13: Specify the Destination Network
The Network Relationship is Route.
Figure 14: The Network Relationship is Route

After creating the Network Rule you must create two Firewall rules to allow access between Cisco PIX Net and ISA Net. If the two networks are trusted, create a Firewall rule which allows full access or else create a Firewall rule with limited access.
Figure 15: Create two Firewall rules

Now it is time to configure the Cisco Pix site. Start the Cisco PDM.
Figure 16: Cisco Pix PDM

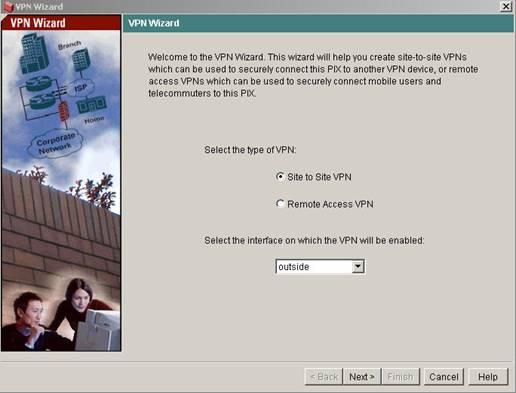
Start the Cisco Pix VPN Wizard and select Site to Site VPN. The Interface is the Outside Interface.
Figure 17: VPN Wizard
Specify the Peer IP Address. This is the IP Address of the external ISA Server 2006 interface.
Enter the Pre Shared Key that you had configured at ISA Server Site (12345678).
Figure 18: Specify remote IP address and Pre Shared Key

Enter the IKE Policy settings shown in the following picture to match the ISA VPN config.
Figure 19: Enter IKE Policy settings

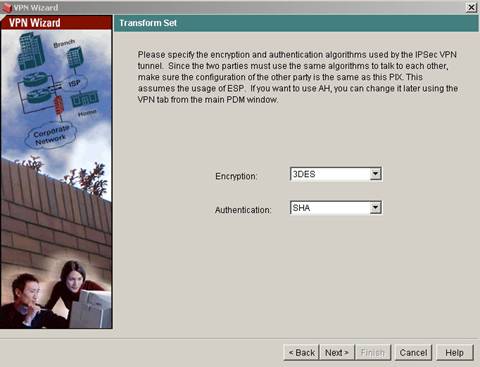
Next, specify the Transform Set settings shown in the following picture.
Figure 20: Transform Set settings
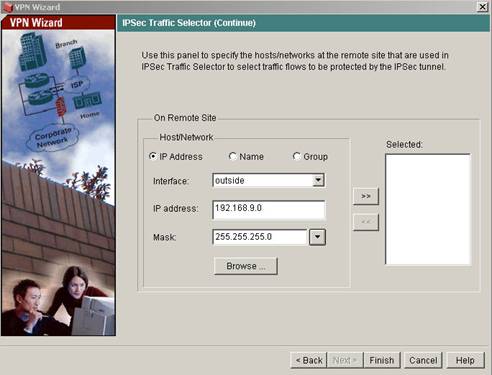
In the next VPN Wizard dialog page enter the IP Address Range from the Network behind the Pix (from the Inside Interface).
Figure 21: IPSEC Traffic selector

Enter the IP address range from the Internal network protected by ISA Server 2006.
Figure 22: Remote Network IP Address Range
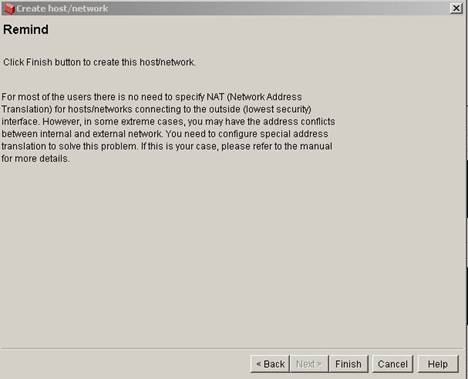
If it is the First time that PDM creates the Network, PDM asks to add the Remote Host or Network to the Cisco Pix configuration set. Click OK.
Figure 23: PDM creates Network Objects

Enter the configuration information for the remote Site network. Select the Outside Interface of the Pix.
Figure 24: Remote Site Network

Cisco Pix must know the route to the Remote Site Network so create a static route to the Destination Network.
Figure 25: Create a static rule

Click Finish to close the Network Create Wizard at Cisco Pix Site.
Figure 26: Finish the Network create Wizard
Click Finish.
Figure 27: Click Finish

Click Save to store the VPN configuration in Cisco Pix NVRAM.
Figure 28: Save configuration in NVRAM

After creating the VPN Site to Site configuration at Cisco Pix site, you must change some IPSEC settings. To do so, click Access Rules and then IPSEC – Tunnel Policy.
Figure 29: Change IPSEC Policy settings
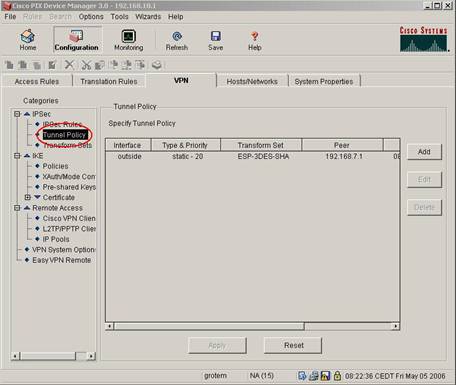
In the following picture you can see the Cisco Pix config settings for the Tunnel Policy before modifying.
Figure 30: IPSEC Tunnel Policy before modifying

You must change the Security Association Lifetime to 100000 Kilobytes, the Lifetime to 01 Hour and enable PFS (Perfect Forward Secrecy).
Figure 31: Change IPSEC Tunnel Policy

After changing IPSEC Policy settings click IKE – Policies and then Edit.
Figure 32: Change IKE settings

IKE Policy before changes.
Figure 33: IKE Policy before changing
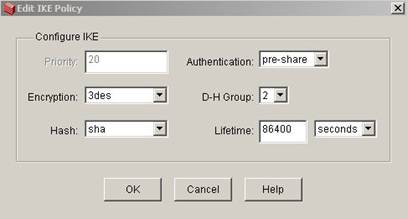
Change the IKE Lifetime from 86400 seconds to 28800 seconds.
Figure 34: IKE Policy after configuration change

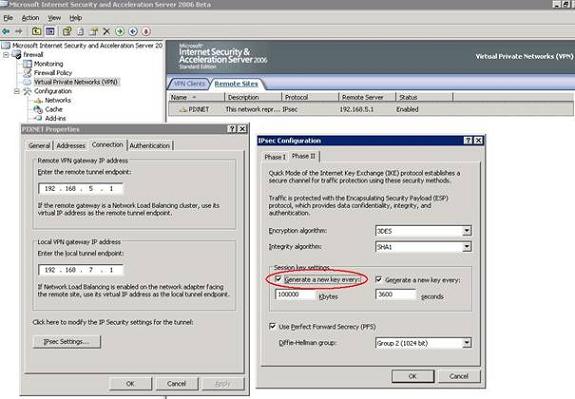
The last step is to configure the same IKE and ISPEC Policy settings made in the Cisco PIX config also on ISA Server site. Start the ISA Management Console and click into the Properties of the Site to Site VPN connection to the Cisco Pix and click Connection – IPSEC Settings – Phase II and change the Key generation to every 100000 Kbytes.
Figure 35: Change IPSEC Phase II settings on ISA Site
Now you should successfully Ping a Host on every Site of the Remote Site protected by Cisco Pix or ISA Server 2006.
Figure 36: Try to Ping a Host on the Remote Site Network

Conclusion
I hope this article was useful for you to see how to implement a Site to Site VPN with Cisco PIX 501 and ISA Server 2006.
Related Links
ISA Server 2006 Overview
http://www.microsoft.com/isaserver/2006/default.mspx
Download the ISA Server 2006 Trial
http://www.microsoft.com/isaserver/2006/beta.mspx
ISA Server 2006 Reviewers Guide
http://www.microsoft.com/isaserver/2006/prodinfo/guide.mspx


