In software development, developers and testers often need an isolated environment to test the working of a piece of code or application to identify any potential problems in it and ensure that it doesn’t break any of the existing functionality. Such an isolated environment is called a sandbox. Sometimes, cybersecurity specialists also use this sandbox to run potentially unsafe code, so it doesn’t affect the network or associated devices. The biggest advantage of a sandbox is its temporary nature. After running the code and the applications you want, you can close down the sandbox, and a new instance will be created when you open it the next time. Microsoft has come up with its version called the Windows Sandbox, and this is what we will be talking about in this article.
What is Windows Sandbox?

Windows Sandbox is a lightweight desktop environment where you can run applications in isolation. More importantly, the software and the code that runs in it are just “boxed” within this environment and don’t spill over onto other applications or environments.
Of course, if you need specific applications and tools for testing, they have to be installed in the sandbox, as the environment itself is empty and comes with no pre configurations. You can visualize it as a brand-new Windows environment where you have to customize and add applications to suit your needs. At the same time, all the applications and settings are lost when you close the sandbox.
The Windows Sandbox uses an integrated kernel scheduler, virtual GPU, hardware-based virtualization, and smart memory management for efficiency and security.
Before we get into how you can use Windows Sandbox, let’s briefly look at the installation process and the prerequisites needed for the same.
Prerequisites for Windows Sandbox
According to Microsoft, you need the following to install and use the Windows Sandbox:
- Windows 10 Pro. Note that Windows Sandbox doesn’t run on the Home edition. Ideally, you need the Enterprise or Education editions with a build of 18035 or later, if you don’t have the Pro version.
- AMD64, which is the 64-bit architecture.
- A minimum of 4GB RAM, though 8GB is recommended.
- 1GB of free disk space. Microsoft recommends SSD storage for Windows Sandbox.
- A minimum of two CPU cores, though four cores with hyperthreading are recommended.
- Virtualization capabilities.
Once you have all these in place, let’s start the installation.
Installing Windows Sandbox
Here is a step-by-step guide on installing the Windows Sandbox.
- Check if your machine meets the above-mentioned prerequisites.
- Enable virtualization on your machine. To do this:
- Make sure virtualization is enabled in BIOS.
- Use this PowerShell cmdlet, as recommended by Microsoft.
Set-VMProcessor -VMName \<VMName> -ExposeVirtualizationExtensions $true
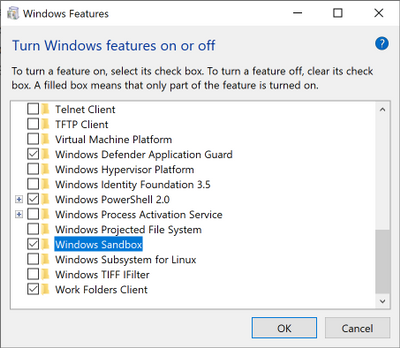
- Go to the Windows Optional Features tool. You can do this by searching for the “Turn Windows Features On and Off” option in the search bar.
- Select the “Windows Sandbox” tool, and restart the computer if prompted.
- After your computer restarts, look for the Windows Sandbox tool on your Start menu.
If you’re unable to do any of the above steps. It could mean that your computer doesn’t have the capabilities for it.
Configuring the Windows Sandbox
As mentioned earlier, the Windows Sandbox doesn’t save any changes made to it including the applications installed. Sometimes, this can be a problem because whenever you want to run the same application with more minor code changes, customizing the Sandbox can be time-consuming.
One way to overcome this problem is to use configuration files, so you can simply load this file, and all the tools and settings you want can become automatically available to you.
These config files are formatted as XML files and, by default, use the .wsb file extension to associate with the Sandbox.
Creating these files is easy too. Simply open a text file, give a name, and save it with the .wsb file extension.

Here’s a look at what you can include in the config file.
- Memory – The amount of memory, in MB.
- Network access.
- Shared folders with read or write permissions.
- Audio and video inputs for the Sandbox.
- Any increased security settings.
- Details of printers and other devices.
- A logon command, executed when the Sandbox starts.
- Mention if the virtualized GPU should be enabled or disabled. If disabled, the Sandbox will use the Windows Advanced Rasterization Program.
- Clipboard for copying and pasting contents.
Make sure to use XML tags and include all the above details within the <configuration></configuration> tags.
When you want to load this config file, double-click on it, and it will automatically open the Sandbox according to the settings on this file.
Here is an example of a config file from Microsoft Docs.
<Configuration>
<VGpu>Disable</VGpu>
<Networking>Disable</Networking>
<MappedFolders>
<MappedFolder>
<HostFolder>C:\Users\Public\Downloads</HostFolder>
<SandboxFolder>C:\Users\WDAGUtilityAccount\Downloads</SandboxFolder>
<ReadOnly>true</ReadOnly>
</MappedFolder>
</MappedFolders>
<LogonCommand>
<Command>explorer.exe C:\users\WDAGUtilityAccount\Downloads</Command>
</LogonCommand>
</Configuration>
So, how does the Windows Sandbox load these contents and create an environment you want? Well, let’s briefly look at some aspects of its architecture to get an overview of how it works.
Dynamic base image technology
Dynamic base image technology uses the copy of Windows already installed on the host instead of loading a new copy of the Windows operating system every time.
Typically, the Windows OS consists of both mutable and immutable files, and the mutable files are not shared with the Windows Sandbox. To overcome this limitation, the Sandbox stores pristine copies of these mutable files, so it can create a Windows copy by combining these files with the immutable ones shared by Windows OS.
This way, no downloads or additional copies of Windows are needed for starting the Sandbox.
Managing memory
A key aspect of any Sandbox is memory management, and typically, the underlying operating system allocates a fixed amount of memory. But when more or less memory is needed, it becomes hard to make the change and adjust the resources accordingly.
But a Windows Sandbox collaborates with the host to dynamically determine its memory and resource needs. The host can always claim back some free memory from the Sandbox when needed.
Integrated scheduling
The Windows Sandbox uses something called integrated scheduling, where the host scheduler decides when the Sandbox must get its CPU cycles. Also, the virtual processors of the Sandbox are handled as host threads, and all these mean that the most important tasks will always be prioritized.
Some final words on Windows Sandbox
The Windows Sandbox is a good option for testing applications and code snippets without impacting other applications, networks, or system states. It comes with many convenient features that make it a breeze to install and run applications on it.
What do you think? Will you use the Windows Sandbox for testing applications? Please share your thoughts with us.
Featured image: Shutterstock


my windows sandbox says the windows system running in it is not activated and cant be customized,cant be activated to install any apps or customize settings either,, so far.
Device name RAY1-11X64Pro
Processor AMD Ryzen 7 5700G with Radeon Graphics 4.30 GHz
Installed RAM 32.0 GB (31.8 GB usable)
System type 64-bit operating system, x64-based processor
Edition Windows 11 Pro
Version 21H2
Installed on 12/18/2021
OS build 22000.527
Experience Windows Feature Experience Pack 1000.22000.527.0