If you would like to read the other parts in this article series please go to:
- Installing Data Protection Manager (DPM) 2010 (Part 1)
- Installing Data Protection Manager (DPM) 2010 – Part 3: Protecting A Hyper-V Server
Introduction
This is the second article in a series on DPM 2010 and focuses on configuring storage and settings focused on backup and restoration of Hyper-V servers and virtual machines. This article assumes that you have completed the installation of DPM 2010 as detailed in the first article in the series, found here. Now you need to configure DPM 2010 with storage and modify settings specifically for backing up and restoring Hyper-V servers in your environment.
Storage Requirements
DPM requires storage that is seen as locally attached before it can be used for DPM backup storage. DPM can use direct-attached storage (DAS) or storage area network (SAN) devices that are attached through iSCSI or fibre channel connections. DPM cannot use storage that is detected as removable media like USB, IEEE 1394 (Firewire), or other media such as compact flash. This is because these types of media are not always attached to the system when needed and do not support VSS. Any volumes that are configured for DPM storage must be dedicated to DPM, but the entire disk does not need to be allocated to DPM use.
Storage Pools
A Storage pool is one or more disks configured as a set that DPM uses to store replicas and recovery points. Before you can perform your first backup with DPM, a storage pool must be created and one or more disks added to the pool. A replica is a complete copy of the protected data source residing on the DPM server. A replica is created for each protected data source defined in a protection group. Co-location allows multiple replicas from different protected data sources residing on the same volume. A protection group is a collection of protected data sources that share a common configuration and schedule for protection.
When you add a disk to the storage pool, it cannot have any partitions on it. DPM takes over complete management of the disk, including formatting the disk and erasing any data when the disk is added to the storage pool. It is not possible to use the system disk of the DPM server for storage pool storage.
Adding a Disk to the Storage Pool
As noted previously, any disks that will be used by DPM for storage of replicas and recovery points, must not be in use by the DPM server.
Use the following procedure to verify the disks are configured for adding to the DPM storage pool.
- Add a new physical disk, iSCSI LUN or SAN LUN to the DPM server
- Open the Disk Management MMC (diskmgmt.msc)

Figure 1
- Find the disk that you want to add to the Storage Pool in the list of disks at the bottom of the screen. The disk should be listed as offline
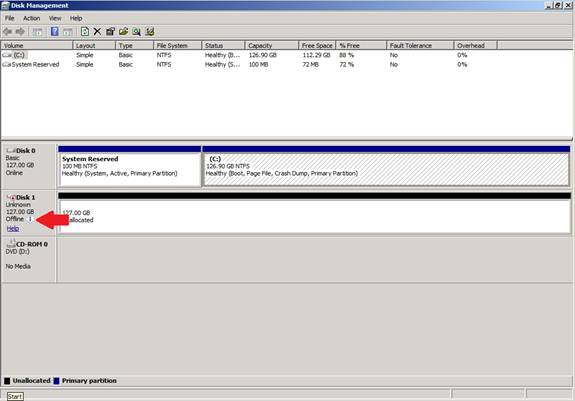
Figure 2
- Right click the disk button for the disk and select Online. This will bring the disk online to the server as a raw disk that is not initialized and has no define partitions.

Figure 3
At this point you have a disk that is ready to add to the storage pool.
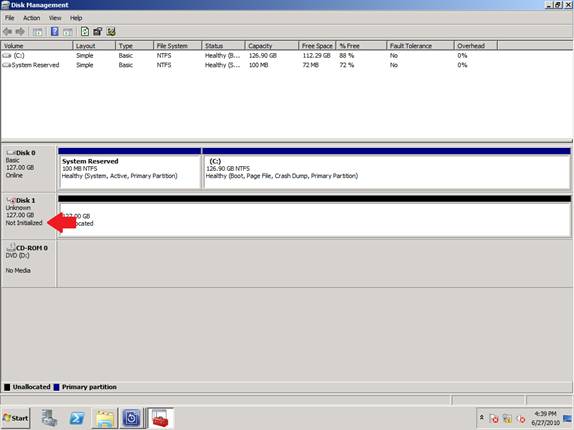
Figure 4
Use the following procedure to add the disk to the DPM 2010 storage pool:
- Open the DPM 2010 administrative console

Figure 5
- Click the Management button

Figure 6
- Click the Disks Tab

Figure 7
- Click the add option in the right menu to add disks to the storage pool.

Figure 8
- You will see the disk that you made online in the Available Disks list on the left. Click that disk to select it, then Click Add to add the disk to the selected disk list.

Figure 9
- Click OK to add the disk to the storage pool
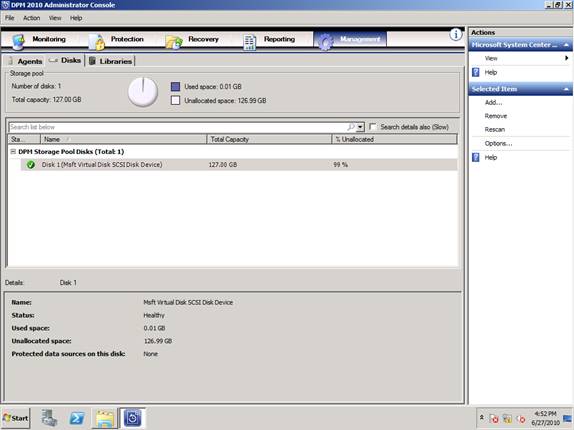
Figure 10
You can add multiple disks to the storage pool at the initial configuration, or add them later by following the same procedure above.
Custom Volumes
While the DPM storage pool is fine for most applications, sometimes you want better control over the storage used for a specific protection group or you want to define multiple tiers of storage due to performance requirements. The Storage pool does not have the ability to create multiple tiers of storage, but there is a way to create a custom volume that can be used for replica or recovery point storage.
A custom volume is a volume that has not been assigned to the storage pool, but is available on the DPM server. A disk or LUN can be broken into multiple volumes. Each of the volumes can be used as a custom volume.
To utilize custom volumes you must for a protection group data source, you must add two volumes to the DPM server. One volume will be used to store replicas and one volume will be used to store recovery points. Also not that you must have two custom volumes for each data source you want to protect within a protection group.
For example, if you selected to protect the C: volume of the DPM server and the system state, you would need two custom volumes to protect the C: and two additional custom volumes to protect the system state. Note that it is possible to protect one or more members within a protection group with custom volumes while leaving the remaining data sources protected using the storage pool.
To create a custom volume so it is available for assignment, follow these procedures:
- Add disks/LUNs to the DPM server that will be used for creating custom volumes
- Bring the disks/LUNs online
- Create simple volumes on each disk/LUN. Note that you can create a single volume per disk/LUN or you can create multiple volumes on each.
- When you go through the simple volume wizard, do not assign drive letters to the volumes, but do format them.
- Make sure to assign names to the volumes so you know what they are going to be used for.
Storage Calculator
Planning your storage requirements is a very important step in designing a DPM 2010 server deployment. Not only do you have to determine the correct tier of storage that each data source will require, but you also have to plan the size of the storage pool and any required custom volumes.
Microsoft has produced a storage calculator tool that can help reduce the labor and stress of storage planning. The storage calculator is downloadable from the Microsoft using the following link.
The storage calculator is an Excel spreadsheet that allows you to provide information about the DPM server, the Hyper-V hosts, and the virtual machines you are trying to protect. The results of the calculator are a storage model that can be used as a baseline for planning purposes.
Conclusion
In this article we covered configuring the storage for DPM 2010. This involved adding disks/LUNs to the DPM server to be used for the storage pool or custom volumes, creating the storage pool, and creating custom volumes. The next article in the DPM 2010 series will cover creating protection groups and backup and recovery of Hyper-V R2 servers.
If you would like to read the other parts in this article series please go to:


