If you would like to read the first part in this article series please go to Integrating OCS Instant Messaging into Outlook Web App (Part 1).
Managing the Integration on the OCS Side
Okay, time to have fun on the OCS side. The configuration on the OCS is at the Front End/ Pool level and we need to specify the CAS Server address. The following steps can be used to add the CAS server to the host authorization list on the OCS Front End/Pool.
Note:
In some cases you do not have to configure anything on the OCS side and it will just work fine.
- Log on OCS Server or in any machine that you have Office Communications Server 2007 R2 Administrative Tools
- Open Microsoft Office Communications Server 2007 R2 management console
- Expand Forest – <FQDN of your AD forest>
- Expand Standard/Enterprise pools (in our example we are using Standard Edition Servers)
- Right click on the pool name/Front-End name and click on Properties and then Front End
Properties, as show in Figure 01

Figure 01
- On the Add Authorized Host. You can decide to use FQDN or IP address to identify your CAS Server, make sure that the options Throttle As Server and Treat as Authenticated are checked
- Afterwards make sure that the client Front End Services are restarted
Testing and Using Some Resources of the Integration
After configuring Exchange and OCS, it is now time to open an Outlook Web App session and let’s check if the communication between our products is working fine. Bear in mind that these are the features available when the integration is working properly:
- User can send and receive Instant Messaging using OWA
- Users can add and remove contacts from the OCS buddy list
- You can create OCS contact list groups using OWA
- Users cannot use advanced features such as Sharing Desktop, Audio and Video, File Transfer and etc.
The result should be similar to the Figure 02 where on the right-upper corner the OCS status button will appear and you will notice on the left side underneath your Mailbox a new menu called Contact List.

Figure 02
If you click on the OCS status button you will be able to change your OCS status, as show in Figure 03. You can also sign off just from OCS clicking on Sig out of IM. If you sign out of IM you must sign in manually next time in order to be online again, your status will be kept during OWA session.

Figure 03
The entire process of receiving an Instant Messing in the OWA session and answering it using OWA and the initiator of the conversation receiving the message back in the OCS Communicator is described in the Figure 04.

Figure 04
Another cool feature that was brought by the integration is two new buttons: Chat and Add to IM Contact List when visualizing the Global Address List. If you are looking up the Global Address List you can easily add someone to your Contact List or start a chat right away, isn’t that cool? The new buttons are shown in the Figure 05. The same screen will show up if you click on Add contact… underneath the OCS menu on the left.
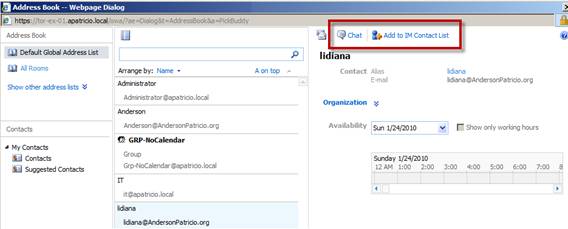
Figure 05
Another feature that I would like to show in this tutorial is the integration in the message threads. In the Figure 06, we can right click on the user from the TO: field and in the menu we have also Chat and Remove from IM Contact List (that user is already in the contact list) and the current status is shown besides of the username as well.

Figure 06
Managing the IM Features
Exchange Server 2010 introduced a really cool feature named Outlook Web App Mailbox Policies where we can create OWA policies and assign them to the users. Basically, we can turn on or off the Instant Messaging and assign it to the users through policies. The feature itself can be managed in the Segmentation tab (Figure 07) of the Outlook Web App Mailbox Policy or OWA properties.

Figure 07
Creating a Script to Automate the Process
We saw a bunch of steps that are required to integrate both products and based on those procedures I started working on a script to automate the process. The script is a work in progress and you always can check this site out for new updates on that script: http://msmvps.com/blogs/andersonpatricio/pages/script-imexintegration-ps1-v1.aspx
The script will help you on these following key points:
- You don’t have to add those spaces in the Serial Number
- The OCS pool/Front end will be listed
- OWA Virtual Directories will be configured automatically
- A backup of the current configuration is created, you can roll back the settings changed any time
- The script will use the current OWA certificate in the web.config file
Here is the script source:
Function ValidateCerSerialNumber($tmpSN) {
 $tmpSerialNumber = ""
 For ( $count =0; $count -le $vExCert.SerialNumber.length-2; $count=$count+2) {
 $tmpSerialNumber = $tmpSerialNumber + $vExCert.SerialNumber.substring($count,2) + " "
 }
 Return $tmpSerialNumber
}
Function SwapFile(){
 mv web.config web.config.backup.script
 copy-item .\IMBackup\web.config.new web.config
 Get-OWAVirtualDirectory | Set-OWAVirtualDirectory -InstantMessagingType OCS
}
Function BackupFile(){
 If (Test-Path "IMBackup") { write-host "[INFO] IMBackup folder already exists." -ForeGroundColor Yellow } Else { mkdir IMBackup }
 $BackupFileName = "IMBackup\web.config.backup." + (get-date -uformat "%Y - %m - %d - %A - Time - %s")
 Copy-item $DefaultPath"\web.config" $BackupFileName
 If (Test-Path ".\IMBackup\web.config.new") { remove-item ".\IMBackup\web.config.new"; write-host "[INFO] An old file (\IMBackup\web.config.new) created by this script was found on the backup folder. File was deleted to avoid conflict with the current operation." -ForeGroundColor yellow }

}
Function EnableOWA(){
 Get-OWAVirtualDirectory | Set-OWAVirtualDirectory -InstantMessagingType OCS
 start-process C:\windows\system32\IISReset.exe
}
#
# Global variables definition
$DefaultPath = Get-ItemProperty -path hklm:"system\CurrentControlSet\Control\Session Manager\Environment" -name ExchangeInstallPath
$DefaultScriptPath = $DefaultPath.ExchangeInstallPath + "Scripts\Get-UCPool.ps1"
$DefaultPath = $DefaultPath.ExchangeInstallPath + "ClientAccess\OWA"
cd $DefaultPath
BackupFile;
$vOriginalValues = Get-Content .\web.config | where-object { $_ -like "*add key=?IM*" }
$vEXCert = Get-ExchangeCertificate | Where-Object { $_.Services -like "*IIS*" } | select Issuer,Subject,SerialNumber
$vNewSerialNumber = ValidateCerSerialNumber($vEXCert.SerialNumber);
#Define new values for IM integration..
Write-host 'These are the OCS Front End/pool entries that were found by the get-UCPool.ps1 script:' -foregroundcolor yellow
write-host $defaultScriptpath
& $defaultScriptpath
write-host
write-host 'Please, type in the name of your Pool/Front End OCS server: ' -nonewline -foregroundcolor Red
$vOCS = Read-Host
Write-host " Based on your current certificate these are the values that will be used to integrate OCS(IM) and Exchange Server 2010 Outlook Web App" -ForeGroundColor yellow
$vIMPoolName = '                <add key="IMPoolName" value="' + $vOCS + '" />'
$vIMCertificateIssuer = '                <add key="IMCertificateIssuer" value="' + $vEXCert.Issuer +'" />'
$vIMCertificateSerialNumber = '                <add key="IMCertificateSerialNumber" value="' + $vNewSerialNumber.trim() + '" />'
write-host $vIMPoolName
write-host $vIMCertificateIssuer
write-host $vIMCertificateSerialNumber
#
# Creating a new web.config file based on the new values...
#
Get-Content .\web.config | ForEach-Object {
 $vChanges = $false
 if ( $_ -eq $voriginalvalues[0]) { Add-content IMBackup\web.config.new -value $vIMPoolName
        $vChanges = $true
      }
 if ( $_ -eq $voriginalvalues[1]) { Add-content IMBackup\web.config.new -value $vIMCertificateIssuer
        $vChanges = $true
      }
 if ( $_ -eq $voriginalvalues[2]) { Add-content IMBackup\web.config.new -value $vIMCertificateSerialNumber
        $vChanges = $true
      }
 If ( $vChanges -eq $false ) { Add-Content IMBackup\web.config.new -value $_ }
 #write-host $vchanges
}
SwapFile;
EnableOWA;
The script in action can be seen on the Figure 08, the only requirement is to type in the OCS Front End/ Pool name.

Figure 08
Common Errors During the Integration
You may face some of the issues listed below during your integration process. I tried to list the most common here. If I find any new issue I will be blogging about them on my blog here at MSExchange.org.
- Server Error 500 – Internal Server error when you try to open /owa page
You configured something wrong on your web.config, it may be a missing “character or something like that. Make sure to restore your old web.config and restart IIS again and then analyze what you’ve missed or added extra. - Instant Messaging isn’t available right now The Contact List will appear when the service becomes available –Check the OCS server name on the web.config file. If you are using a self-signed certificate that is a known issue.
- Error ID: 504 on the Office Communicator R2 when sending a message – It seems that you have issues on your certificates in place. Revise your certificate in place.
If you are getting a different error, you don’t need to worry because we always can use some troubleshooting tools from both products: OCS and Exchange.
On Exchange side we can use one of the new features of Exchange Server 2010 and use the Diagnostics Logging (Figure 09) or if you like Exchange Server Management Shell, then you can use Set-EventLogLevel.’MSExchange OWA\InstantMessage” –Level <debug-level>.

Figure 09
On OCS side, we can download the Office Communications Server 2007 R2 Resource Kit from the following address and then use debugging and Snooper Tool to identify where the communication is falling.
Conclusion
In this final article we saw how the end users can use the new features brought by the integration of these two great products and a simple script to help you to automate the process.
If you would like to read the first part in this article series please go to Integrating OCS Instant Messaging into Outlook Web App (Part 1).


