If you would like to read the other parts in this article series please go to:
- Introduction to Configuration Manager 2012 (Part 2)
- Introduction to Configuration Manager 2012 (Part 3)
- Introduction to Configuration Manager 2012 (Part 4)
- Introduction to Configuration Manager 2012 (Part 5)
- Introduction to Configuration Manager 2012 (Part 6)
- Introduction to Configuration Manager 2012 (Part 7)
- Introduction to Configuration Manager 2012 (Part 8)
Introduction
About a year ago, I published an article here that was an introduction to an early beta version of what was then known as System Center Configuration Manager 2012# Much information has changed in the past year, including the product’s name# In this article, I will provide a revision to that original piece and in follow up parts, will expand on what can be done with Configuration Manager#
The name change
Most noticeably, the product name has changed and it’s no longer available as a standalone product# It’s now sold as a part of the System Center 2012 suite and is officially known as System Center 2012 Configuration Manager, which places the emphasis on System Center as a whole# That said, I’ll still abbreviate it as SCCM 2012#
SCCM 2012 brings with it a number of changes that make it very different from previous versions of the product# I’m getting pretty involved in the product for a project and will share my thoughts with you as I go through the paces#
This article and the subsequent pieces are all based on the released version of the product#
SCCM 2012 system requirements
The SCCM 2012 client is supported on the following:
- Windows XP Professional SP3
- Windows XP Professional 64-bit SP2
- Vista Business, Enterprise, Ultimate, SP1, SP2, 32-bit & 64-bit
- Windows 7 Enterprise and Ultimate
- Windows Server 2003 SP2
- Windows Server 2003 R2
- Windows Server 2008 Standard, Enterprise & Data Center #Itanium systems are not supported#
- Windows Server 2008 R2, SP1, SP2
- Windows Storage Server 2008 R2
- Windows Embedded/Thin systems based on Windows XP SP3 and Windows 7
SCCM 2012 does have a few limitations you should understand if you decide to deploy it in your environment:
- Data Center editions of Windows are supported but are not certified for SCCM 2012# If there is a Data Center-specific problem that arises in SCCM 2012, Microsoft may not provide a fix#
- SCCM’s new Application Catalog is not supported in Embedded versions of Windows#
- Endpoint Protection is not supported with versions of Windows Embedded that are based on Windows XP#
Hardware requirements
Other requirements
Before you install SCCM 2012, make sure that you also install the #NET Framework 4#0# This will probably require a restart of your system# #NET Framework 4#0 is not included in Windows Server yet, so you’ll need to download it from Microsoft#
In addition to the #NET Framework 4#0, you’ll need to install the following role services and features from Server Manager:
- Remote Differential Compression
- Background Intelligent Transfer Service
- IIS WMI Compatibility Component
You will most likely have to restart your computer after installing these components. In Figure 1, you’ll see an example of what it takes to install these prerequisite components.

Figure 1: Installing the SCCM 2012 prerequisite components
SQL Server requirements
Like its predecessors, SCCM 2012 requires the use of a SQL Server-based data repository into which all SCCM data will be written. The following versions of SQL Server are supported for use with SCCM 2012:
- SQL Server 2008 SP2 with Cumulative Update 9
- SQL Server 2008 SP3 with Cumulative Update 4
- SQL Server 2008 R2 with SP1 Cumulative Update 6
In addition, there are some other considerations to keep in mind with regard to SQL Server.
- SCCM 2012 requires a dedicated SQL Server instance that doesn’t also house other application data. This doesn’t mean that you need a separate, dedicated SQL Server just for Configuration Manager; you can simply add an instance to an existing SQL Server that you have running in your organization.
- If you choose to use a named instance of SQL Server rather than a default SQL Server instance, you must use the SQL Server Configuration Manager to configure the selected named instance to listen on port 1433.
- Whichever instance you choose to use for Configuration Manager must use case-insensitive collation .SQL_Latin1_General_CP1_CI_AS.
- Enable named pipes as a communications option on the SQL Server and the restart the SQL Server service.
- Add the computer account to the Local Administrators account in the intended SQL Server.
Installation process
To get started with the main installation process, browse to the location to which you downloaded SCCM 2012 and double-click the splash.hta file. Click the Install option to get started.

Figure 2: The SCCM 2012 installation splash page
You’re next presented with a screen that provides loose prerequisite information. There’s not much to see here so just click the Next button to move on.

Figure 3: Prerequisite information regarding SCCM 2012
For your initial installation, you’re presented with a couple of options with regard to installation. First, you can choose to install a Primary Site Server. Or, you can choose to install a Central Administration site. If you choose to do a primary site server installation, you can also fast-track the process by selecting the checkbox next to Use typical installation options for a stand-alone primary site. In order to make sure you see all of the options, I’m not going to take this easy route. Figure 4 gives you a look at the setup options.

Figure 4: Choose your setup option
In Figure 5, you’ll see the next step in the installation process. This is a fun-filled page that asks you to provide your product key. Once you’ve done so, click Next to proceed.

Figure 5: Product key and license page
You have to agree to the license terms as they appear in Figures 6 & 7. Figure 6 is the license agreement for SCCM 2012 while Figure 7 is a series of license agreements covering a number of the prerequisite components necessary for SCCM to operate. You must agree to all of the license terms in order to proceed.

Figure 6: License agreement

Figure 7: Component agreements
As a part of the installation, the installer looks for updated prerequisites. In order to store these files, you must create a directory for this purpose. As you can see in Figure 8, I created a folder named c:\sccmdl and have specified this folder as the download destination. I’ve already downloaded the necessary files.

Figure 8: Download updated prerequisite components
Both the SCCM server and the SCCM client software support multiple languages. On the next two screens of the installer, shown in Figures 9 and 10, you’re asked to select the languages that you’d like to have supported in your environment.

Figure 9: Select your server language options

Figure 10: Select your client language options
If you’ve used Configuration Manager in the past, the information requested on the Site and Installation Settings page .Figure 11. will be familiar. Here, you’re asked to provide your Configuration Manager site code, site name and the location to which you want to install the product. I’ve used a site code of SDL and have opted to install the Administrator Console.

Figure 11: Configure your site and installation settings
You may be adding your new SCCM 2012 site to an existing Configuration Manager hierarchy. For this installation, I am installing a brand new SCCM 2012 site and have no plans to expand it, so I’m going to install it as a standalone primary site.
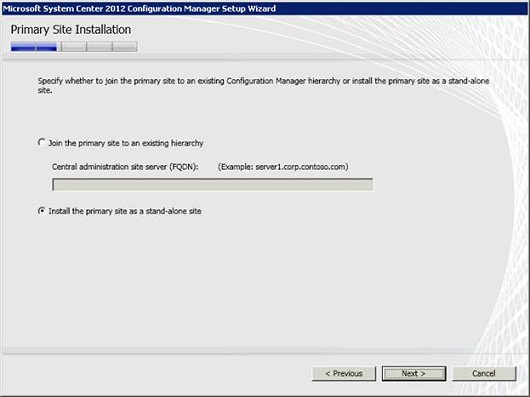
Figure 12: What kind of site are you installing?
When you make this selection, you receive a warning indicating that you can’t join this site to a hierarchy later on. If this is ok, click Yes to continue.
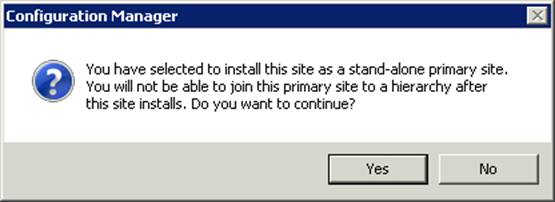
Figure 13: A friendly reminder
The database server is an integral component in your SCCM infrastructure. I’ve already installed SQL Server 2008 R2 SP1 with CU6 on the a separate server from SCCM 2012. On the screen shown in Figure 14, you’ll notice that I’ve provided the name of my SQL server .SCCMSQL., the name of the database .CM_SDL. and a folder that will be used for SQL replication snapshot.
If I’d decided to use a SQL instance, I would have specified the database as instancename\CM_SDL instead. In my case, I’ve decided to use the default instance.

Figure 14: Point the installer at your database server
In most of its products, Microsoft offers to allow customers to join the Customer Experience Improvement Program. You aren’t provided with an opportunity to opt into this program. On this page, simply click Next to move on with the process after you make your selection.

Figure 15: Do you want to join the program?
The next page of the installation wizard asks you to specify the server to which the SMS Provider will be installed. The SMS Provider is the component responsible for console to SCCM database communication. In Figure 16, you’ll see that I’m installing the component to the server named SCCM2012.

Figure 16: Which server will hold the SMS Provider?
In previous versions of SCCM, administrators had to make a choice between running their site in either Mixed or Native mode, with Native mode adding additional security. Native mode also required the use of a Public Key Infrastructure .PKI.. In SCCM 2012, Mixed and Native mode have been removed in favor of something a bit more flexible. Specifically, you now decide whether to use HTTP or HTTPS for client computer communication. For my purposes, I’m going to allow clients to use HTTP but make use of HTTPS if it’s available and configured. In a later part in this series, we’ll cover what’s needed to make HTTPS work.

Figure 17: Specify the mode by which SCCM clients will communicate
Configuration Manager is made up of a number of components that can be distributed across multiple servers. In the case of the SCCM 2012 installation, you’ll note that you can install two roles during the installation process – the management point role and the distribution point role.
The management point role acts as the intermediary between SCCM clients and the SCCM site server. The distribution point role is used to store packages that are then distributed out to clients.
On the screen shown in Figure 18, you’ll see that I’ve decided to install both roles on the server named SCCM2012 and configured both services to communicate using HTTP.

Figure 18: Do you want to install these two site system roles?
On the Settings Summary page .Figure 19., the installer follows up with a summary of all of the selections you’ve made throughout the process. Review your selections and click the Next button to continue.

Figure 19: Here’s your installation summary page
Once you’ve reviewed your settings, the installer reviews your system to ensure that it meets all of the requirements. If your system has warnings or errors, you will be notified so that action can be taken, if necessary.
When you’re done, you’re told that the process was successful .hopefully!.. At this stage, you also have the option to launch the console right after the installation is complete.

Figure 20: The installation is complete
Summary
At this point, your new SCCM 2012 installation is complete and you’re able to start investigating the new features and the console, which is exactly what we’ll be doing in the next part of this article series.
If you would like to read the other parts in this article series please go to:
- Introduction to Configuration Manager 2012 (Part 2)
- Introduction to Configuration Manager 2012 (Part 3)
- Introduction to Configuration Manager 2012 (Part 4)
- Introduction to Configuration Manager 2012 (Part 5)
- Introduction to Configuration Manager 2012 (Part 6)
- Introduction to Configuration Manager 2012 (Part 7)
- Introduction to Configuration Manager 2012 (Part 8)


