Introduction
Corporate email signatures have always been a letdown in services like Microsoft Exchange and Google… Sure, Exchange admins can use transport rules to append HTML text at the bottom of outbound emails, but they are still somewhat basic, a nightmare to configure and manage, and you are likely to have to rely on knowing HTML and CSS. And yes, users can create their own signatures, but how do organizations ensure uniformity?
To the surprise of many, Microsoft hasn’t developed any serious solution for email signatures, leaving the doors wide open for organizations like Letsignit, a French company determined to become a world leader in email marketing signatures. It even has the support of Microsoft (Microsoft France was involved in the development) as well as large investment funds, and is currently expanding internationally.
Letsignit helps ensure that all employee email signatures are fully aligned with the company’s identity automatically and easily. Furthermore, it can transform emails into a communication opportunity by providing organizations with a way of distributing marketing banners in a controlled and targeted way.
Although relatively new to the game, one could easily presume Letsignit had decades of experience with email signatures, given the maturity of its solution! So, let’s dig in.
Requirements & Installation
Letsignit has been designed for Office 365 Exchange Online and Google’s G Suite. Given that Exchange (and recently Exchange Online, to be more specific) is by far the most popular email platform for organizations, that’s what I will use for this product review.
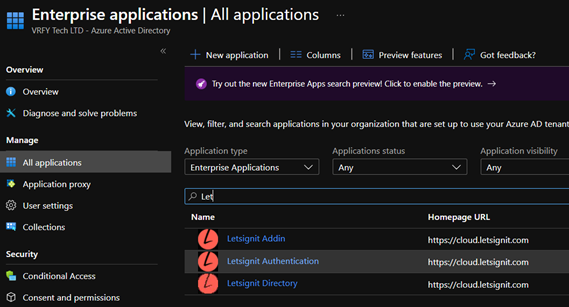
Letsignit relies on two or three Azure Enterprise Applications to work, depending on how we configure it.
The initial configuration is done through easy and intuitive Letsignit wizards that admins can access once an organization signs up for the service.

First, we run the Office 365/G Suite integrations wizard, which prompts us to authorize the Letsignit Authentication enterprise app, giving Letsignit access to our users’ profiles:

Once that is done, the next step is to deploy the Letsignit Outlook add-in to our Office 365 tenant. This add-in is what automatically applies signatures to users’ emails and lets users manage some of their details (if allowed by admins) and signatures when they have more than one.
One of the many advantages of these add-ins is that administrators do not need to mess around with packaging an MSI file, deploying it to users’ workstations, making sure it’s kept up to date, etc… Once deployed to the tenant and assigned to users, it gets automatically added to those users’ Outlook clients (Windows or Mac), and it is ready to use!

From the Microsoft App Store, we can easily add the add-in to our tenant:

For simplicity reasons, in my case, I will deploy it to all users (entire organization):


Once this is done, the add-in should be available to users within a few hours. But before it can be used, we still have a few more steps to follow.
Creating email signatures and making them available to users is done through the Letsignit admin portal. To do that and customize signatures with user details, Letsignit needs to have visibility of our users and their attributes. This can be done through a CSV import containing all the required details, or we can synchronize our Azure Active Directory to a database managed by Letsignit, which is much easier from a manageability perspective. This sync is kept up to date frequently (every 3h), and it’s one-way only.

The synchronization is done through another enterprise application called Letsignit Directory, which gives Letsignit read access to our directory data:

The synchronization engine allows admins to choose which users they want to synchronize based on their domain or specific groups:

Once everything is configured, we can see when the last synchronization happened, and manually trigger a sync if required:

In Letsignit, we can manage three different types of user attributes:
- Default attributes are the default attributes in our directory, which are automatically synchronized with Letsignit;
- Custom attributes are custom attributes from our directory (if any are configured);
- Letsignit attributes are attributes that we can create in Letsignit and are independent of our directory.
Below I left all the default settings, with one exception. I blocked the job_title field so that users cannot change it themselves. This is a valuable feature for organizations that only want users to be able to update a subset of their details, or even none at all.

We are now set to start configuring and using our first email signature!
Signature Configuration and Usage
Configuring and assigning signatures to users is done through the Letsignit admin portal. From the main dashboard, we can see at a glance how many signatures and campaigns we have assigned to users, how many clicks links in signatures have generated (we will cover this and campaigns in more detail later), how many licenses we are using, and more:

All signatures are designed in this portal that only admins have access to, meaning users cannot design their own signatures. After all, that would defeat the whole purpose.
The designer is user friendly, making it easy and intuitive to use, yet very powerful. We can start designing our first signature from one of the templates provided, start from scratch, or even by importing HTML code. We can also have a different signature for a reply or forwarded email.

Once we choose a template and start building our signature, user fields will either appear with their name (like {Title} for example) if we are in work mode, or with the current admin details when in preview mode.
Changing and formatting a field could not be easier through the menu provided when we highlight a block:
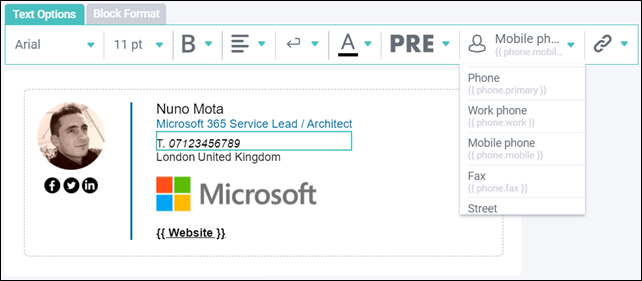
Pretty much everything can be customized. In the following screenshots, I am changing the telephone prefix (T.), and adjusting the padding between the city and country so they are more spaced out:


We can also drag and drop user details and many other elements from the left-hand-side bar:

Finally, I am going to add some social media icons to the signature, as well as a Microsoft Teams widget so recipients can easily reach our users:
![]()
And here we have my first signature, all done in just a few minutes!


The final step is to assign this signature to users. For that, we can either individually select the user(s) we want to assign the signature, or use one or more groups:

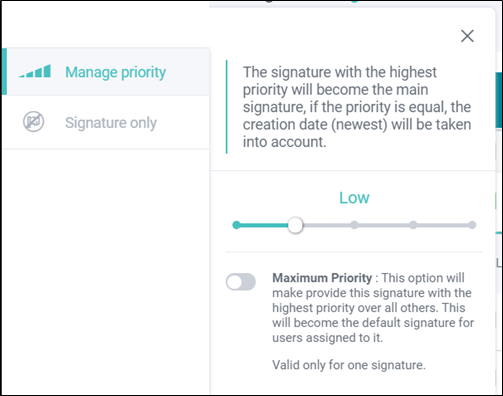
We can also configure our signature’s priority, which will determine which signature is added to emails by default for users with more than one signature assigned:
Once we save our changes, that is all. Our first signature has now been assigned and is ready to be used!

Users don’t even need to do anything. As long as they have the add-in deployed and a signature assigned, pretty much from the moment an admin makes that signature active, it will be available to users. In my test, I opened a new email almost immediately after assigning the signature and making it active, and it popped up right away (without restarting Outlook)!

The signature was even available immediately in Outlook for the Web (aka webmail/OWA) without further configuration!

From a user perspective, from the Outlook add-in, I can select which signature to assign to my email (if I was assigned more than one) and update my details. Here we can see that I am not allowed to change my job title since we blocked that field previously:

Another great feature of Letsignit is Campaigns. This allows organizations to increase the impact of their marketing campaigns by relaying them in email signatures. Instead of updating a signature to include a marketing banner, we can create a campaign with the banner and append it to a specific signature (or all of our signatures). We can even choose which users will be targeted by which campaign, and during which period!

Letsignit provides the ability to collect click information from recipients that have received emails with our signatures and/or campaigns. This way, organizations can analyze if a particular campaign is generating the expected click rate, which campaign is more effective, etc. For GDPR reasons, no details about the recipients are collected, only the sender, the signature or campaign that contained the click, and the link itself:

For other clients, such as mobile devices, Letsignit offers an SMTP configuration similar to other email signature providers, which enabled the placement of Letsignit signatures into all outgoing emails sent from any device. For Exchange Online, inbound and outbound connectors are created between the Office 365 tenant and the Letsignit Microsoft Azure service data center. The outbound emails we choose are then routed through Letsignit to get a signature applied before being sent out.
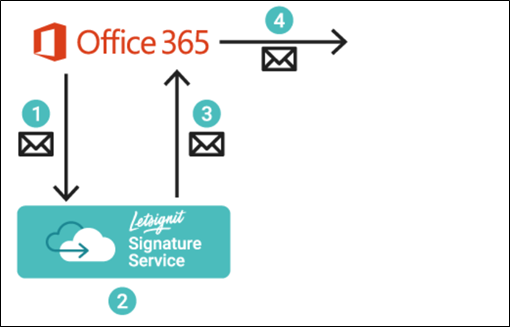
- Send Connector: a dedicated Send Connector re-routes emails coming from our Office 365 tenant (we can target specific users, domains, etc.) to pass through Letsignit’s Microsoft Azure service data center;
- Signature Placement: once Letsignit receives the email, the signature is applied to the email;
- Receive Connector: a dedicated Receive Connector allows the emails coming from Letsignit to return to the Office 365 tenant securely;
- Email Sent: once the email arrives back to the sender’s Office 365 tenant, it is sent out to be delivered to the intended recipient.
Conclusion
Letsignit is an excellent solution for organizations looking for a simple but powerful way of managing and deploying professional email signatures to their users. It has all the features one would expect, and more! Honestly, too many to cover in this review, unfortunately. Configuring Letsignit is straightforward and quick, creating signatures is surprisingly easy thanks to the fantastic designer, and managing signatures and campaigns could hardly be any easier! All in all, an excellent product for any organization.

TechGenix.com Rating 5/5