If you are preparing for your Linux certification or planning to be more productive when managing files and improve your bash experience, then the use of the vi text editor in Linux may be essential for you. Vi is light, and it has been around for ages. It is available virtually everywhere (including Azure CloudShell), which may be useful when performing quick changes to configuration files. Another benefit of learning it: If you do manage to go back in time to the 1980’s you will act normal and groovy editing files 😊. I like the vi text editor for Linux. The software comes from a time that I wasn’t even born, and there is a newer version called vim that has some additional features, especially in the area of scripting, and it does a great job by highlighting the code.
The vi may not be very intuitive by today’s standards, but give it some time to sink in, and you are going to love it!
The vi text editor
To open a vi type vi <filename>, by default, you will start in read-only mode. To access a menu of sorts and be able to exit the editor or add additional commands, you need to hit <Escape button>, and colon (:) and enter your command.
Since we covered the process to open the editor, how about when you’re done? To leave the editor, the most common options are:
- <escape> + :wq that will save the changes and exit the editor.
- <escape> + :q! that will leave without saving existing changes.
Besides using “:” to apply commands, the vi text editor allows just typing commands as we navigate on the text. Those commands can be a single or a combination of characters and they help to edit, navigate, and so much more.
You can navigate through your file with the keyboard arrows, but you can also use j to go down, k to go up, h to go the left, and l to move to the right.
A piece of trivia here: Why use those letters to move around the file instead of our traditional navigation arrows, right? When the software was created, the keyboard available is depicted in the image below. Notice that Tab and the arrows were not physically available at the keyboard (credits to Wikipedia, which provided the history lesson and the image below).

When editing files in vi, we need to be able to navigate easily within a single line and the overall page. To navigate the current line, we need to memorize a few letters, and they will come quickly as you start using the editor.
To go to the beginning of the line, use either 0 or ^. To go to the end of the line, use $.
Another critical point is being able to jump words in a single line. Taking into consideration where the cursor is located, we can use w to go to the next word (your right side or forward). Use b to go to the previous word (your left).
The following picture shows the keys to navigate in a single line (the red circles) and the ones to navigate within the page (the ones in blue).
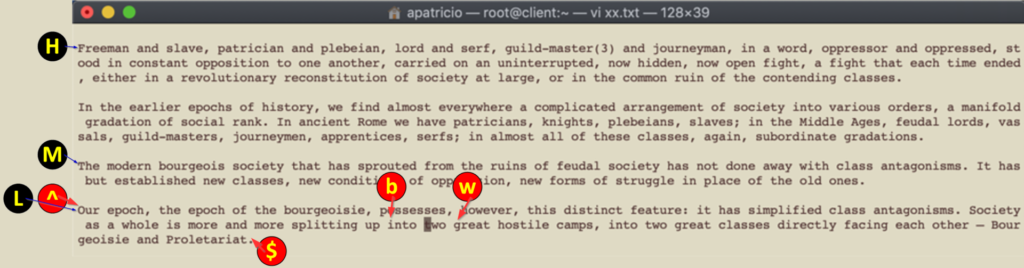
The second navigation concept that we must have in our toolbox is to navigate within a page and through pages. Within the same page, we can use H to go to the first position of the existent page, type L to go to the last line of the current page, and M to go to the middle of the current page.
When saving a file (<escape> + :w) or in some version, it will show up all the time. We can see the number of lines of the current file. We can jump automatically to lines by typing the line number and G. For example, 10G will land the cursor at the beginning of the 10th line of our file. To jump to the last line, just type G.
When you need to move throughout pages, we can use Ctrl-F to go to the next page, and Ctrl-B to go to the previous page.
The next concept is editing a file. At this point, we can place the cursor wherever we want with ease. My best analogy so far: Please imagine that we are piloting a chopper and hovering over the text when we need to edit and to make changes we need to deploy forces and get out of the chopper (the flying portion we covered so far, the deploying portion of the analogy is coming in the next paragraph).
There are two methods to insert text, and we have the letter i, which will allow text to be added to the current cursor position. However, my favorite is the letter a, where we append the text in the next position (makes more sense when editing because we will get to the final word. (You need a new position to continue typing.)
When you need to add new lines, we can type o (letter o, as in owl) to add a new line after the current position, or O (capital letter O, as in owl) to add a line before the current cursor.
The next section of editing is related to deletion! We can delete an entire line by typing dd, and to remove a single character type x.
One last tip about vi: If you want to save your work and keep the session open, just hit <escape>+:w and that will do the trick.
Linux bash
What about if you could use all your knowledge of vi on your bash shell? Although bash has its own set of shortcuts that help a lot by saving time when using the console, I still prefer to use the same keys that I use to manage configuration files in my shell.
To change the default editor to use vi, just run the following command in your current session. If you think that is a perfect combination, make sure to add the command to your ~/.bashrc profile, and it will be your default when you log in.
set -o vi
After that, we can take advantage of the navigation to move around your command line. Just hist <escape> to go to the “chopper” mode and use your navigation skills. When complete just hit <enter> to execute the command.

Featured image: Shutterstock


