If you would like to read the other parts in this article series please go to:
Introduction
In our previous articles we went through the process of understanding the certificate requirements and how to request a certificate using Exchange Management Console, now we are going to assign the brand new certificate that we have requested in the previous steps (previous article).
Assign the services to the certificate…
Now that we have the certificate on the server, just for clarification at this point – the certificate can be found on the Computer Store of the server. Moving on… let’s right click on the certificate and click on Assign Services to Certificate… for now let’s keep just the local server and click on Next, as shown in Figure 01.

Figure 01
In the Select Services page. We can associate the certificate on the server(s) from the previous page to specific services, let’s select Internet Information Services (IIS) (Figure 02) and click Next and Assign on the following page.
Note:
Based on your environment you may have selected more services, and if you did, please make sure that you select them at this point as well.

Figure 02
Note:
Make sure that the services exist on the server that you are trying to assign the services, for example: If you are trying to assign SMTP on a CAS server role it will generate an error on the wizard.
In the final page, just click on Finish. Now, we can check the certificates on the server. Because IIS can be assigned to a single certificate through the console, we can see that the certificate was removed from the self-signed certificate (Figure 03).
Note:
The self-signed is assigned to all services even though if they are not working. For example: POP and IMAP are disabled by default however the cert is assigned to those services.
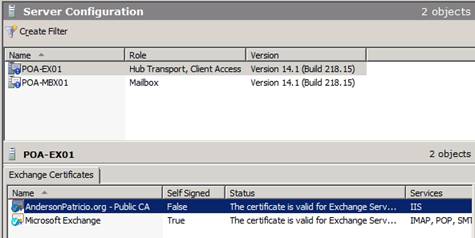
Figure 03
Time to do a test, now that we complete the cycle, let’s open our Outlook Web App and the certificate should appear okay without any error issues. Make sure that you are using one of the names defined in the certificate to access the Outlook Web App and that your DNS is working properly, as shown in figure 04.
Besides this simple test , we should use Exchange Remote Connectivity Analyzer to do an outside test of Autodiscover, Outlook Anywhere, Web services etc.
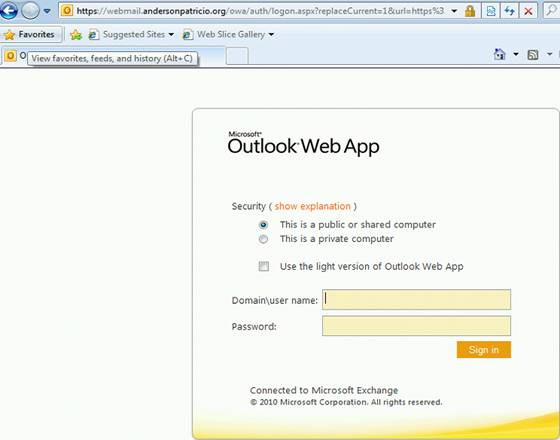
Figure 04
Exporting Certificates…
A common task is to export certificates, and it can be easily done. Just right-click on the desired certificate and click Export Exchange Certificate… On the initial page (Figure 05) define a path to the exported certificate and a password, and then click Export, and Finish on the following page.
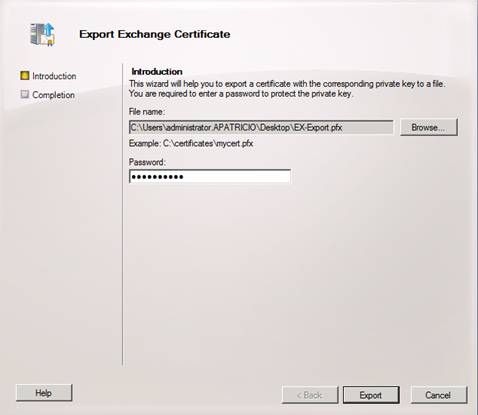
Figure 05
Importing a certificate…
The Import process follows the same logic of the export process, and the only difference is that we have to provide the password defined during the export process, as shown in Figure 06.
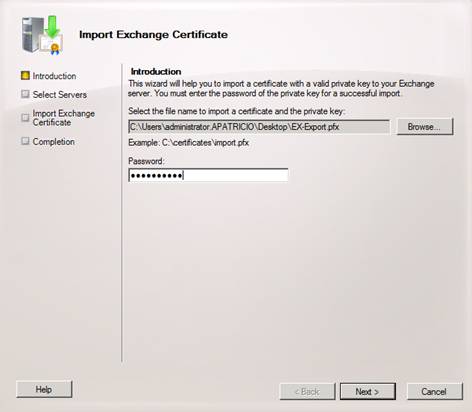
Figure 06
Also, we need to select which servers will receive the new certificate (Figure 07), and here we can select one or more servers. You can use this process in a scenario where you have a farm of CAS Servers, so you can create the certificate that will be shared among all CAS Servers in the first server, and then Export the certificate and repeat this section on each of the CAS Servers. Bear in mind that you also need to assign the certificate to a service afterwards.
In order to finish the Import process after picking up the file and filling out the password, click on Next, Import and Finish.

Figure 07
To double check, you can go to the server where we have imported the certificate and the new certificate should be in the Computer Store / Personal / Certificates location, as shown in Figure 08. The same applies when we remove a certificate using Exchange Management Console.

Figure 08
Managing Certificates using Exchange Management Shell…
If you are an Exchange Server 2007 administrator and has just installed Exchange Server 2010 you will notice a lot of changes, and one of them will be how to manage certificates using Shell. In the past we could use a single line cmdlets, like this one:
New-ExchangeCertificate –GenerateRequest –Path C:\Ex-CertRequest.req –SubjectName ”c=CA, o=Company Name,cn=webmail.company.org” –DomainName webmail.company.org, autodiscover.company.org, srv-ex.company.local –PrivateKeyExportable $true
However if you run the same cmdlet using Exchange Server 2010 the result would be that the requested data would be displayed as output of the cmdlet, as shown in Figure 09.

Figure 09
If you want to stick to the same strategy, just run the first cmdlet using variables and afterwards export the content to a file, for example:
$ReqCert = New-ExchangeCertificate –GenerateRequest –SubjectName”c=CA, o=Company Name,cn=webmail.company.org” –DomainName webmail.company.org, autodiscover.company.org, srv-ex.company.local –PrivateKeyExportable $true
Set-Content –path C:\EX-CertRequest.req –Value $ReqCert
Note:
In this example we used the $ReqCert as variable.
So basically the difference is that we don’t have a –Path anymore to use with the cmdlets that are responsible to manage certificates.
The same rules apply to export and import a certificate. In order to export a certificate the following cmdlets can be used:
$ExportCert = Export-ExchangeCertificate –Thumbprint <Thumbprint> -BinaryEncoded:$true –Password (Get-Credential).Password
Set-Content –Path C:\Export-Cert.pfx –Value $ExportCert.FileData –Encoding Byte
In order to import the certificate we can use the following cmdlet:
Import-ExchangeCertificate –FileData ([Byte[]]$(Get-Content –Path C:\<File-that-was-exported.pfx> -Encoding byte –ReadCound 0)) –Password (Get-Credential).Password
Now, it’s a little bit harder to memorize all cmdlets to manage certificates, however, looking at the bright side we are able to manage certificates using Exchange Management Console and that is really easy to do.
Also, man <cmdlet> –detailed is your friend! If you want to use Exchange Management Shell you can always use the help to see some examples and apply them to your situation.
Conclusion
In this final article we covered the last steps related to the certificate management using Exchange Management Console and we also went through the process using Exchange Management Shell.
If you would like to read the other parts in this article series please go to:


